After seeing the lovely LED stairs at interactivefurniture.de, I decided to make my own, open-source version. Here is a video of them in action. I am not an expert videographer and cannot do the stairs full justice, but they came out exactly as I wanted.
[mom_video id=’iqJ54XC51GQ’]In this clip I use a very simple lighting sequence without any dimming. However it is easy to program the stairs to do any light sequence desired, with up to 34 LEDs per controller.
My build was featured in Make: Online.
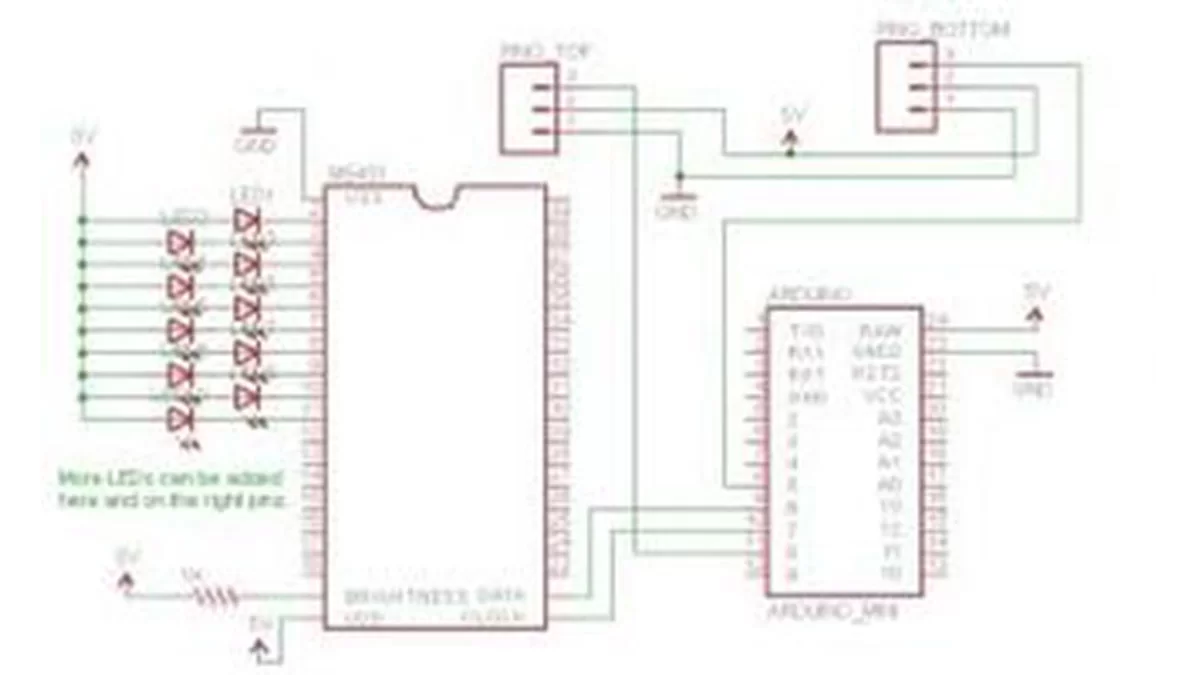
This is the schematic. I wired it up with perfboard and used screw terminals to connect to the external LEDs and PING sensor. The Eagle schematic file is here and should have the correct footprint for the chips; if you plan to make a PCB version it would need to be edited and checked, as I did not use it for that.
My code for the Arduino Processing environment can be found here. You can edit this to add more lights, or to use a different lighting sequence. This code uses the Lightuino source code to drive the M5451 and I am very grateful to have it, as it saved me writing hardware-level code. NOTE:The Ping library here is outdated and uses the BYTE keyword that is no longer supported by recent Arduino releases. I recommend using the NewPing library instead.
Materials:
- Arduino Mini Pro. Any Arduino should work; this was the right size and price for me.
- M5451 (available at multiple suppliers; use Octopart.)
- NorthStar 12V LED lights
- Bell wire rated for indoor use. Get more than you think you need.
- PING ultrasonic sensors (2). The circuit will work with other sensors as well, just change the code accordingly. PINGs are not the cheapest option but I had them handy.
- Perfboard
- Screw terminals
I also used a ground bar for the 5V needed by the LEDs and sensors. To keep things simple, I powered the M5451 with 5V like everything else; even though the LEDs are specified for 12V, this worked just fine. However, you can feed up to 15V into the M5451 at VDD if you want more powerful lights.
For a deeper understanding of how the circuit works, please see Expanding the Arduino: cheap ways to add output pins and power. For details on the build process, here is the complete list of LED stair posts.
Important safety note: In any project that goes into the walls of your home, an electrical fire is the greatest risk. Please be sure to use a fuse on the power input to your circuit (I used 1A on mine), and ideally your power supply will be self-limiting as well. This is more than just theory. I had a connector go bad after installation, creating a short. The fuse blew, as it should, preventing a more dangerous situation.
If you find this information useful, please let me know. Comment here (with a link to your project if you have one), or e-mail me: erica AT thekanes.org.
Source: Automated LED stairs
About The Author
Hassan Zaka
I am an expert in accounting and possess diverse experience in technical writing. I have written for various industries on topics such as finance, business, and technology. My writing style is clear and simple, and I utilize infographics and diagrams to make my writing more engaging. I can be a valuable asset to any organization in need of technical writing services.
Follow Us:LinkedinTwitter