It is modestly described as a simple system that can link to existing door contacts or alarm sensors, and there is also a Web server to feed your own remotely accessible personal dashboard, which is designed for mobile devices.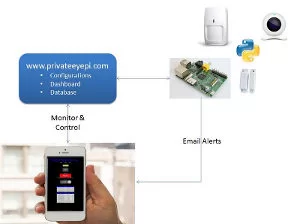
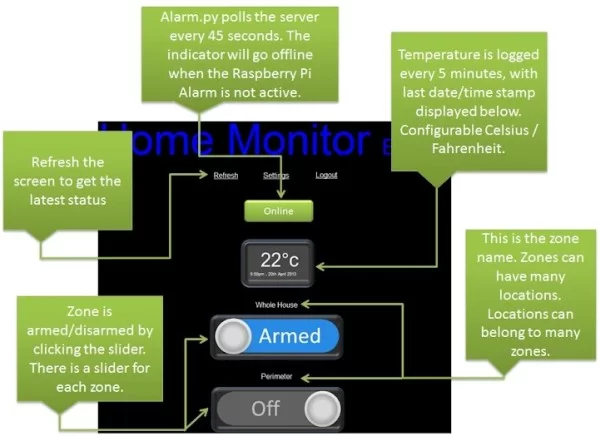
You can use this dashboard to control “alarm system zones”, and view alerts or activity logs (for example times and dates of when a back door has been opened). You can even configure your Pi to send email alerts, if you so wish.
Sounds impressive and the good news is that it is all documented, ready and waiting for serious Gadget Masters who chooses to follow in Mr Nut’s footsteps. Check out the page for the home alarm system »
What skills will you need? Gadget Nut writes:
- Basic low voltage electronic skills. We will provide you with a full inventory of electronic parts and diagrams. We will show you bread board wiring schematics for you to copy.
- Basic Raspberry Pi and Linux experience. Even complete beginners with no programming, operating system or electronics experience can make this work. You can also use our blog to ask questions or email our support email.

The setup and installation process is broken down into detailed, hyperlinked steps. For example, in Build the Electronics, they show diagrams of the electronics that will interface to the alarm system sensors with the Raspberry Pi. There is conventional electronics schematic but also a diagram showing how you can build the circuit prototype on a bread board. He also details the use of magnet-based door contacts (“known as reed switches”), but also motion sensors (“known as PIR”), which are more complicated because they involve power. He warns:
The circuits below don’t provide power for an external electronic device. As a general rule DO NOT use the Raspberry Pi to power external electronic equipment, unless you have a very good understanding of how much power it is going to draw. PIR sensors are not standard and come from many different manufacturers and require power sources specified by the maker of the device. You will need to do a bit of research on the PIR sensor you intend using before connecting it to your alarm circuit board. Often PIR sensors have four wires, two for power and two for the alarm circuit. In this case you will connect the two wires for the alarm circuit to each side of the switches in the diagrams.
On the software side of things he also provides detailed steps for creating commands and registering the system. Those afraid of the Linux command line have a friendly helping hand.
There is even an alarm test utility to help debugging in your own project.
It certainly looks impressive and is a good practical use of a Pi. Note, however, it is still a prototype system, so – as always – be sensible and caveat emptor.
Source: How to build your own Raspberry Pi home alarm system
About The Author
Hassan Zaka
I am an expert in accounting and possess diverse experience in technical writing. I have written for various industries on topics such as finance, business, and technology. My writing style is clear and simple, and I utilize infographics and diagrams to make my writing more engaging. I can be a valuable asset to any organization in need of technical writing services.
Follow Us:LinkedinTwitter