During the summer, when i leave at home my dog watering for several hours, i have the problem that how dog watering pets because water inside its bowl become warm in few time. Then i’ve create this system for watering that can empty and re-fill the bowl with fresh water each preselected time, maintain constant water level and finally spyies my pet.
[mom_video id=’HYWI4icR-is’]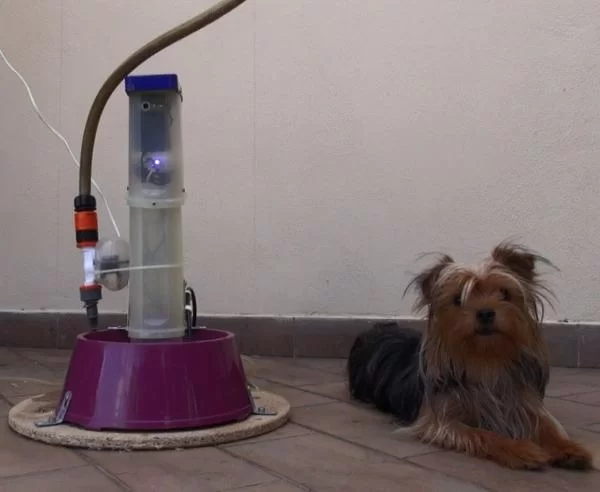
Drinking Dog is an easy project that can help you to take care of your pet.
This project is based on Raspberry Pi platform with Dexter Ind. modified “wheezy” image Linux raspberrypi 3.18.7+ #755 and GrovePi+ sensors.
http://sourceforge.net/projects/dexterindustriesra…
Step 1: Hardware 1
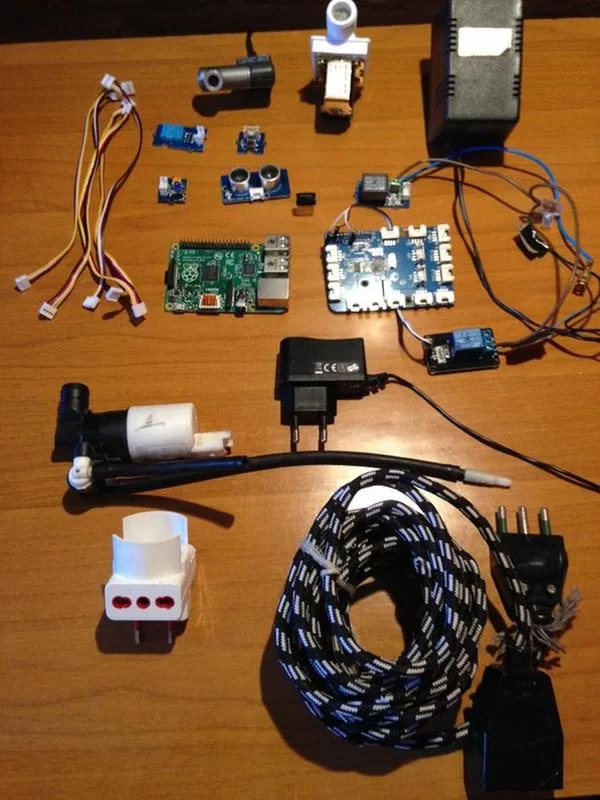
For first you need:
- Raspberry Pi mod.B
- GrovePi+
- GrovePi Led
- GrovePi Button
- GrovePi DHT
- GrovePi Relay
- GrovePi Ultrasonic Ranger
- Generic NC 3.3V relay (or another GrovePi Relay)
- 12V solenoid valve
- 12V Windscreen wiper pump (or acquarium pump)
- USB webcam
- WIFI dongle
- 12V PS
- 5V PS for Raspberry
Extras: power cable extention, some jumpers, electrical socket, screws and brackets.
Tools:
- clipper
- drill
- screwdriver
- silicone glue dispenser
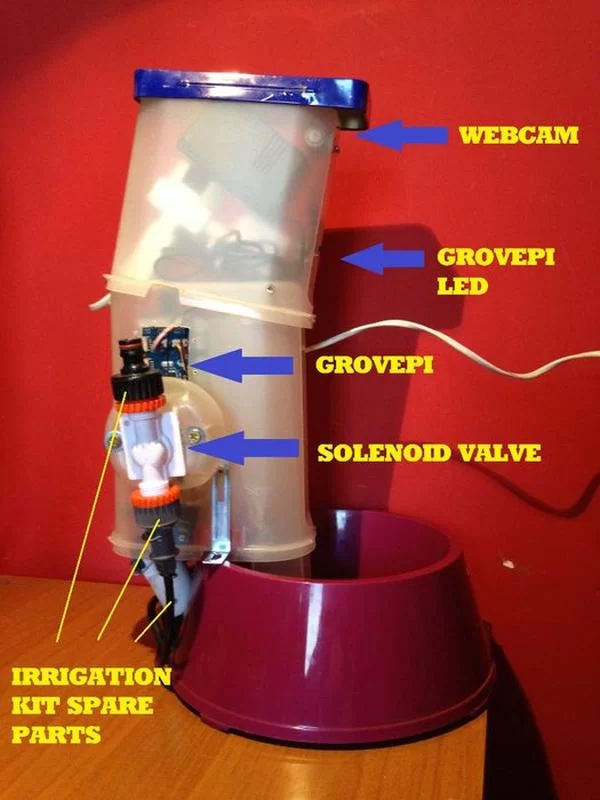
Step 2: Hardware 2
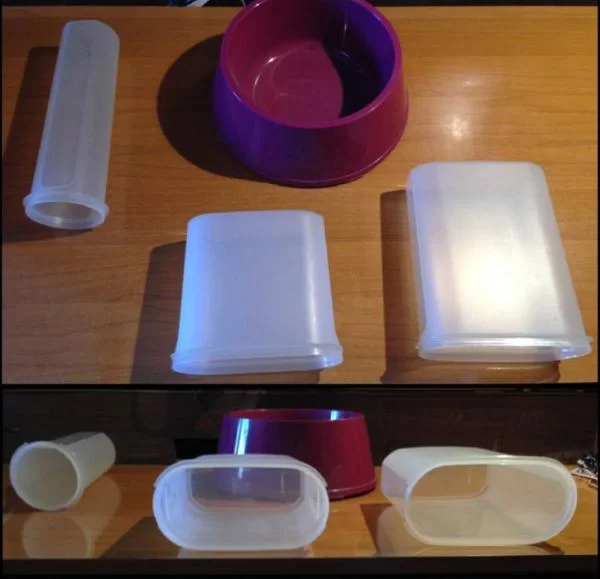
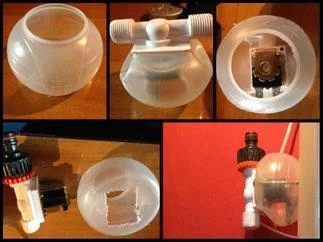
To assemble an enclosure box, basically you need:
- Water bowl
- Washing soap bowl
- Wood basement
- RaspberryPi and co. enclosure
- power supply encosure
- cilinder
As you can see in photo, i’ve two plastic boxes (pasta box), a plastic cylindric container (spaghetti box) and a plastic bowl. Plastic boxes are reused Tupperware food containers (i’ve got a lot of them….. as you can see in my previous instructables!)
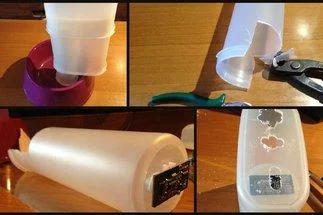
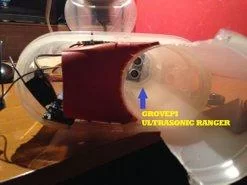
Cylindric container has been modified at the base drilling two holes to insert an ultrasonic ranger and, at the top cutting an area that allow the water flow.
Then, to fit solenoid valve, i’ve added a plastic bowl. Without this there wasn’t enough space to connect water pipes. Secure the area with silicone glue.
Regarding the top box, drills the small side to insert webcam and led. On the top create some holes for ventilation, then cover with a roof. The other box must be drilled on the top too, creating some holes for ventilation and to insert cables from PS and from led/webcam. Rectangular shape has been cutted on the large side of the box, to access with screwdriver to the internal side. After this, for water drops securing, i’ve covered with transparent tape.
Finally you have to drill the water bowl to insert wiper pump. I made this heating a circular metal piece to melt bowl plastic, then i’ve created e perfect circular hole to insert wiper pump gasket.
Step 3: Connections
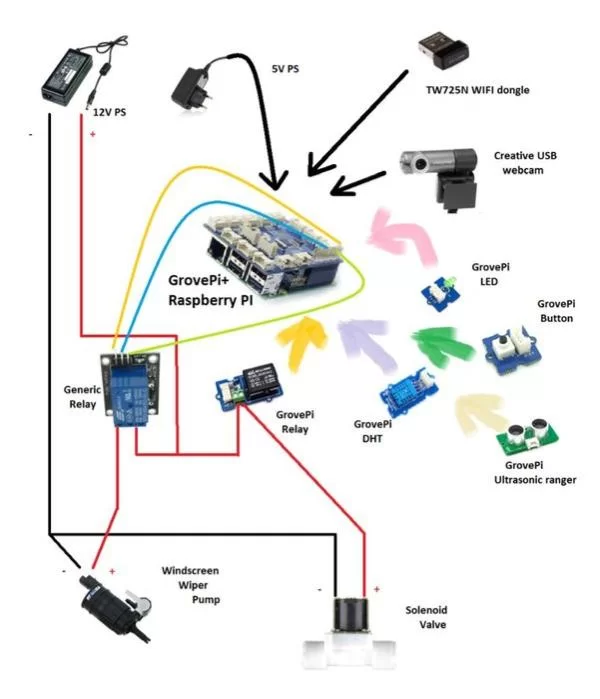
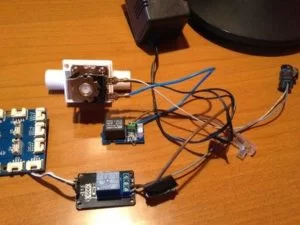
First photo can easly show cable connections.
As you can see, solenoid valve (12V) and wiper pump (12V) are connected at the same PS because they works alternatively . For wiper pump you have to respect correct polarity, solenoid valve doesn’t need.
Sensors are easy connected to GrovePi as follow:
- GrovePi relay > D6
- GrovePi ultrasonic ranger > D4
- GrovePi DHT > D8
- GrovePi button > D2
- GrovePi led > D5
Generic relay has been connected to GrovePi+ pins (if you are using other GrovePi relay, connect it to D3 and modify code as descripted at the code step):
- VCC > pin 1 (3.3V)
- GND > pin 6 (GND)
- SIG > PIN 15 (GPIO 22)
12V power supply connections:
a valve connector and wiper pump negative pole are connected together to power 12V supply negative pole.
the other cable from power supply positive pole is splitted into two cables, first one into GrovePi relay, second one into generic relay COM input. Then a cable from NO generic relay output to wiper pump positive pole. Another cable from GrovePi relay to solenoid valve connector
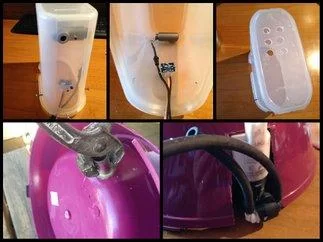
Step 4: Assembling
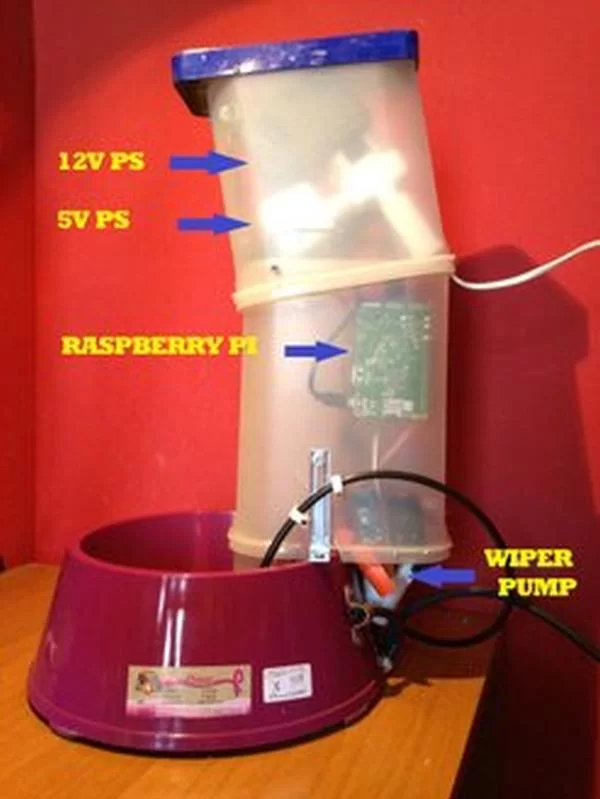
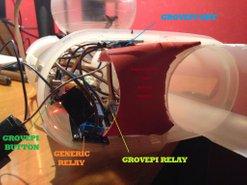
three are the sections of this project
top enclosure box:
inside are GrovePi led and webcam screwed to the internal front side. inside also two PS with power cable.
low enclosure box:
the upper section is occupied by RaspberryPi and GrovePi+ screwed ot the internal right side. GrovePi ultrasonic ranger is screwed to the plastic cylinder.
the lower section is occupied by GrovePi relay, GrovePi DHT, GrovePi button and generic relay. All these are screwed to to the internal side.
the bowl:
it is formed so the wiper pump fits.
Step 5: How Code Works

First thing, install motion.
sudo apt-get install motion
modify configuration file:
sudo nano /etc/motion/motion.conf
you can basically change this option:
#start as
daemon
other parameter settings, ad-lib.
add following lines at rc.local file:
sudo nano /etc/rc.local
before “exit” add:
sudo mkdir /var/run/motion
sudo chmod a+rwxt /var/run/motion
sudo motion
sleep 60
save and exit.
To watch stream from outside your home network, you have to configure router to do that.
Then copy in your home directory the attached file: drinkdog.py
Try it running:
sudo python drinkdog.py
if everything is ok,process sequence is:
- starts bowl empting
- after 20 seconds bowl empting ends (time to empty my water bowl, change at line 25 with seconds that you need. Wiper pump became overload quickly, try to set no more than 20-30 seconds)
- wait 5 seconds
- Led ON
- starts bowl filling
- stop water bowl filling once water level is 8cm (depends by your building materials, change at the line 97 with water level distance that you need)
- if water level becames down 8cm, solenoid valve starts and water bowl refill automatically up to preselected maximum level
after 2, 3 or 4 hours process restarts (depends by outside temperature checked by DHT sensor, from 25°C every 2 hours, from 19°C to 24°C every 3 hours and less 18°C every 4 hours. Change lines 59 and 61 to set different temperature range)
Pushing button inside, system shutdown.
Autostart settings:
sudo nano /etc/crontab
add the following line:
@reboot sudo python /home/pi/drinkdog.py
so when you’ll restart the system, script starts.
If you are using GrovePi Relay instead of the generic relay:
- comment lines 21,67 and 73
- uncomment lines 23, 31, 68, 74
P.S. script is 24h based
Step 6: The End

I hope that you have enjoyned this project.
If you have seen the video on Youtube, sorry for webcam poor quality .It’s very old and, probably, not fully compatible with Raspberry.
Thanks to Millie!
ciao
Source: Drinking Dog – Dogs Watering and Spying System
About The Author
Hassan Zaka
I am an expert in accounting and possess diverse experience in technical writing. I have written for various industries on topics such as finance, business, and technology. My writing style is clear and simple, and I utilize infographics and diagrams to make my writing more engaging. I can be a valuable asset to any organization in need of technical writing services.
Follow Us:LinkedinTwitter