Components Required
- Raspberry Pi
- Sensors – Temperature sensor (DS18B20)
- 8 Channel Relay (12V/ 7A/ 240 V AC)
- Bulb (60W)
Description of components:
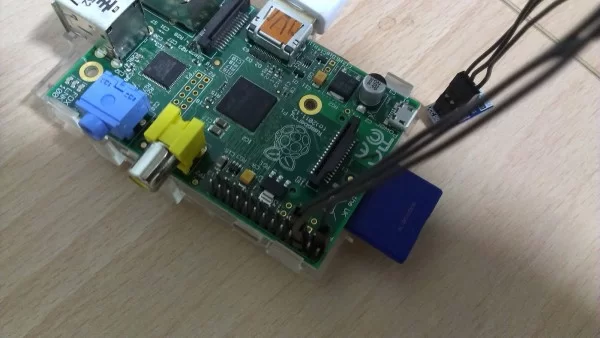
Raspberry Pi
The Raspberry Pi is a credit-card sized computer that can plug into your TV and a keyboard which was found for the intention of teaching basic concepts in schools. It is a portable little computer which can be used in electronic projects, and for many of the things that your desktop PC does, like spreadsheets, word-processing and games. It also plays high-definition video. It has an IEEE 802.5 standard Ethernet card and also MAC – Media Access Control which is being controlled by a chip called as the ASIC – Application Specific Integrated Circuit. By using the Ethernet card we can communicate through the internet with an approximate speed of data transfer of 100 MB/s.
It is an ARM based Processor designed and fabricated by QCOMM international by using 32nm CMOS technology. The operating speed of the processor is 700MHz and overclocking of the processor is also possible. The Processor is capable of multi-tasking and gaining control of the GPIO pins. We can take video out using HDMI – High Definition Media Interface.
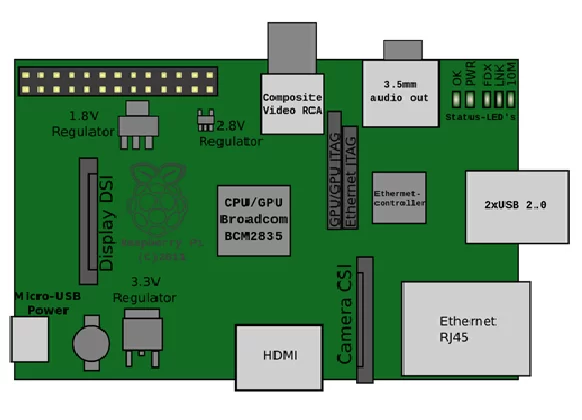
Raspberry Pi Block Daigram:
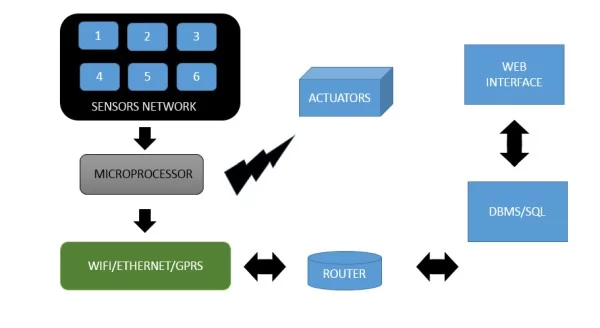
Block Diagram of the project:
Temperature Sensor:
We are using a semi-conductor temperature sensor which is named as DS18B20. This sensor offers high accuracy and high linearity over an operating range of about 55 degree centigrade to 150 degree centigrade. Internal amplifiers can scale the output to convenient values such as 10mV/ C . They are also useful in cold-junction compensation circuits for wide temperature ranges. This temperature sensor is an integrated circuit, and can therefore incude extensive signal processing circuitary within the same package as the sensor thus eliminating additional circuitries. This sensor can be directly connected to the microprocessor input and thus capable of direct and reliable communication with microprocessor.
Features:
- No external components required
- Temperature range of -55 c to 125 C in 0.5 intervals
- Wide power supply range 2.7 V to 5.5 V
- Converts temperature to digital word in less than 1s
- One wire communication is possible
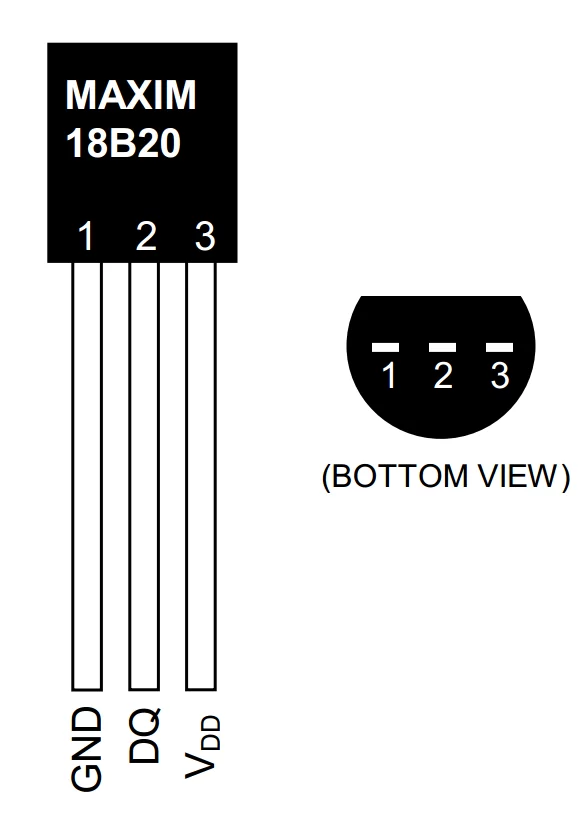
PIN Diagram:
Relay:
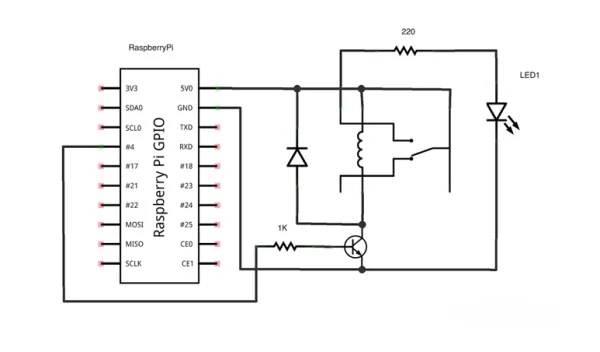
A relay is an electrically operated switch. Many relays use an electromagnet to mechanically operate a switch, but other operating principles are also used, such as solid-state relays. Relays are used where it is necessary to control a circuit by a low-power signal (with complete electrical isolation between control and controlled circuits), or where several circuits must be controlled by one signal. The first relays were used in long distance telegraph circuits as amplifiers: they repeated the signal coming in from one circuit and re-transmitted it on another circuit. Relays were used extensively in telephone exchanges and early computers to perform logical operations.
Temperature sensor Programming:
With a little set up, the DS18B20+ can be read directly from the command line without the need of any Python program. However, this requires us to input a command every time we want to know the temperature reading. In order to introduce some concepts for 1-Wire interfacing, we at first will access it via terminal, and then we will write a Python programme which will read the temperature automatically at set time intervals.
We have to install the module firmware for the starting of the sensor module at the start-up of the operating system.
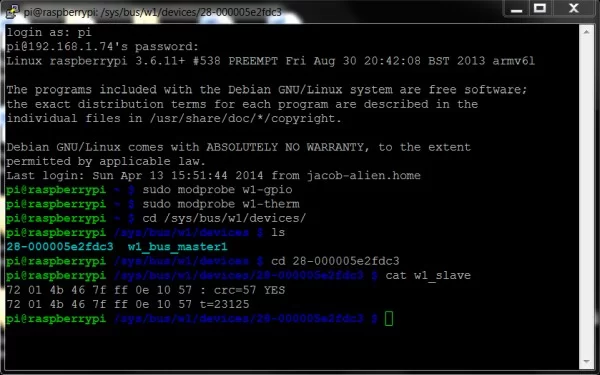
sudo modprobe w1-gpio
sudo modprobe w1-therm
We then need to change the directory cd to our 1-Wire device folder and list (command: ls) the devices in order to ensure that our sensor has been loaded correctly.
cd /sys/bus/w1/devices/
ls –> list the files in the folder
In the device drivers, your sensor should be listed as a series of numbers and letters. In this case, the device is registered as 28-000005e2fdc3. We then need to change the access to the sensor with the cd command, replacing the serial number of the sensor.
cd 28-000005e2fdc3
The sensor periodically writes to the w1_slave file, so we simply can use the ‘cat’ command to read it. But it shows only the raw output data of the sensor.
cat w1_slave
This yields the following two lines of text, with the output ‘t= temperature in degrees Celsius’. A decimal point should be placed after the first two digits e.g. the temperature reading we’ve received is 23125 degrees Celsius. We have to get the reading as 23.125 degree celcius.
72 01 4b 46 7f ff 0e 10 57 : crc=57 YES
72 01 4b 46 7f ff 0e 10 57 t=23125
We can use the SSH protocol to access the raspberry terminal from any system. We can enable SSH in the raspberry pi by using the command,
sudo raspi-config
Enable or disable ssh server
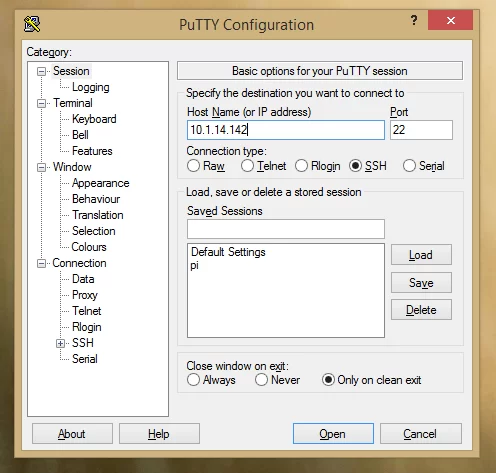
We can use putty for the remote interaction and also we can access the GUI of the LXDE desktop by enabling X11 forwarding and then we have to start the XMING. Now start putty where we enter the remote IP to start the session which will ask for the user name and password. After that the remote shell terminal will be opened. To access the GUI we have to use the command,
Sudo startlxde
Once the terminal is started, we can entirely control the raspberry pi using the putty. It is only possible in the internal network. But if we need to access the raspberry pi from the external network then we have to enable the port forwarding so that we can access it from anywhere.
Port forwarding block diagram
PUTTY Window
PUTTY is a light weight plug and play software which can be used to control shell using various protocols like ssh, serial, telnet, raw and rlogin. The communication between the end node and the computer will be encrypted using an ssh key. It uses an AES encryption standard. This is capable of working under a proxy protocols like http, https, socks4, socks5, squid.
SSH SHELL
PROGRAM:
#For opening the temperature sensor connected to the pi
f = open(“/sys/bus/w1/devices/28-000005891c00/w1_slave”)
#For writing the data to an text file
f1 = open(“/var/www/temps.txt”, ‘w’)
#For reading the data form the W1_slave
text = f.read()
#For formatting data for Raw format to required
secondline = text.split(“\n”)[1]
temperaturedata = secondline.split(” “)[9]
temperaturedec = float(temperaturedata[2:])
temperature = temperaturedec / 1000
print temperature
f1.write(str(temperature))
#Opened files must be closed
f1.close()
f.close()
Methodology :
Configuration of raspberry pi:
To start with, configuration of raspberry pi is done by burning the OS. The required dependencies are installed. Then the GPIO library is installed with the help of the github repository. The ‘pip’ command is used for the installation of several python libraries. After the installation, the raspberry pi can be configured to serve as a server by using its ability to combine modern web frameworks with hardware and electronics.
Not only can you use the Raspberry Pi to get data from servers via the internet, but your Pi itself can also act as a server. There are many different web servers that you can install on the Raspberry Pi. Traditional web servers, like Apache or lighttpd, serve the files from your board to clients. Most of the time, servers like these are sending HTML files and images to make web pages, but they can also serve sound, video, executable programs, and much more.
However, there’s a new breed of tools that extend programming languages like Python, Ruby, and JavaScript to create web servers that dynamically generate the HTML when they receive HTTP requests from a web browser. This is a great way to trigger physical events, store data, or check the value of a sensor remotely via a web browser.
For our project we are using a server system called as FLASK
STEP 1:
To install Flask, we need ‘pip’ to be installed in the system. It can be installed by using the following command,
pi@raspberrypi ~ $ sudo apt-get install python-pip
Then after installing the pip we can install the Flask by using the command,
pi@raspberrypi ~ $ sudo pip install flask
After installing the Flask we can start programming the GPIO pins that can turned HIGH and LOW using the following command
GPIO.setup(14,GPIO.OUT)
GPIO.output(14, GPIO.LOW)
GPIO.output(14, GPIO.HIGH)
Flask uses the GET and POST request to communicate with the server and the client. The app route and the PORT address of the server can be defined by using the commands,
app.run(host=‘0.0.0.0’, port=80, debug=True)
Host —-> IP Address of the Raspberry Pi
Port —-> Port number for the flask to use
To find the host address of the raspberry, pi the following command can be used,
Sudo ifconfig
We can use any user interface for the communication. If you need to use the Ethernet for communication, you have to use the IP of the eth0 and if you need to communicate through WIFI then you have to use the wlan0. We can also use the local loop back address for the internal communication is localhost or 127.0.0.1
Program:
import RPi.GPIO as GPIO
# to import GPIO library
from flask import Flask, render_template, request
app = Flask(__name__)
GPIO.setmode(GPIO.BCM)
# Create a dictionary called pins to store the pin number, name, and pin state:
pins = {
2 : {‘name’ : ‘light1’, ‘state’ : GPIO.LOW},
3 : {‘name’ : ‘light2’, ‘state’ : GPIO.LOW},
4 : {‘name’ : ‘light3’, ‘state’ : GPIO.LOW},
18 : {‘name’ : ‘light4’, ‘state’ : GPIO.LOW},
17 : {‘name’ : ‘light5’, ‘state’ : GPIO.LOW},
27 : {‘name’ : ‘light6’, ‘state’ : GPIO.LOW},
23 : {‘name’ : ‘light7’, ‘state’ : GPIO.LOW},
24 : {‘name’ : ‘light7’, ‘state’ : GPIO.LOW},
}
# Connect as many devices as you require
# Set each pin as an output and make it low:
for pin in pins:
GPIO.setup(pin, GPIO.OUT)
GPIO.output(pin, GPIO.LOW)
@app.route(“/”)
def main():
# For each pin, read the pin state and store it in the pins dictionary:
for pin in pins:
pins[pin][‘state’] = GPIO.input(pin)
# Put the pin dictionary into the template data dictionary:
templateData = {
‘pins’ : pins
}
# Pass the template data into the template index.html and return it to the user
return render_template(‘index.html’, **templateData)
# The function below is executed when someone requests a URL with the pin number and action in it:
@app.route(“/<changePin>/<action>”)
def action(changePin, action):
# Convert the pin from the URL into an integer:
changePin = int(changePin)
# Get the device name for the pin being changed:
deviceName = pins[changePin][‘name’]
# If the action part of the URL is “on,” execute the code indented below:
if action == “on”:
# Set the pin high:
GPIO.output(changePin, GPIO.HIGH)
# Save the status message to be passed into the template:
message = “Turned ” + deviceName + ” on.”
if action == “off”:
GPIO.output(changePin, GPIO.LOW)
message = “Turned ” + deviceName + ” off.”
if action == “toggle”:
# Read the pin and set it to whatever it isn’t (that is, toggle it):
GPIO.output(changePin, not GPIO.input(changePin))
message = “Toggled ” + deviceName + “.”
# For each pin, read the pin state and store it in the pins dictionary:
for pin in pins:
pins[pin][‘state’] = GPIO.input(pin)
# Along with the pin dictionary, put the message into the template data dictionary:
templateData = {
‘message’ : message,
‘pins’ : pins
}
return render_template(‘index.html’, **templateData)
if __name__ == “__index__”:
app.run(host=‘0.0.0.0’, port=80, debug=True)
Then after all the configuration processes and programming we can run the flask server using the following command. Here ‘server.py’ is the filename of the program.
pi@raspberrypi ~ $ sudo python server.py
* Running on http://0.0.0.0:80/
* Restarting with reloader
Above lines show that the server is being started in the port 80. We can access the server through the browser using the link http://localhost/ without the need of entering the port number because HTTP default port is 80.
From another computer on the same network as the Raspberry Pi, type your Raspberry Pi’s IP address into a web browser. If your browser displays control system, you will know that you’ve configured it correctly. You may also notice that a few lines appear in the terminal of the Raspberry Pi:
10.0.1.100 – – [08/Nov/2014 00:31:31] “GET / HTTP/1.1” 200 –
10.0.1.100 – – [08/Nov/2014 00:31:31] “GET /favicon.ico HTTP/1.1” 404 –
The first line shows that the web browser requested the root URL and our server returned HTTP status code 200 for “OK.” The second line is a request that many web browsers send automatically to get a small icon called a favicon to display next to the URL in the browser’s address bar. Our server doesn’t have a favicon.ico file, so it returned HTTP status code 404 to indicate that the URL was not found.
Webpage
Templates
If you want to send the browser a site formatted in proper HTML, it doesn’t make a lot of sense to put all the HTML into your Python script. Flask uses a template engine called Jinja2 so that you can use separate HTML files with placeholders for spots where you want dynamic data to be inserted. We can create our own layout using the html scripts and also we can add colours and better effects using the CSS and HTML5
If you’ve still got ‘server.py’ running, press Control-C to kill it.
To make a template, create a new file called template.py with the code from below. In the same directory with template.py, create a subdirectory called templates. In the templates subdirectory, create a file called index.html and insert the code from below. Anything in double curly braces within the HTML template is interpreted as a variable that would be passed to it from the Python script via the render_template function.
Template.py
from flask import Flask, render_template
import datetime
app = Flask(__name__)
@app.route(“/”)
def hello():
now = datetime.datetime.now()
timeString = now.strftime(“%Y-%m-%d %H:%M”)
templateData = {
‘title’ : ‘Control station’,
‘time’: timeString
}
templateData = {
‘title’ : ‘Status of Pin’ + pin,
‘response’ : response
}
return render_template(‘main.html’, **templateData)
if __name__ == “__main__”:
app.run(host=’0.0.0.0′, port=80, debug=True)
After creating the template.py file, we have to create an html file for the template data and rendering purpose.
index.html
<!DOCTYPE html>
<head>
<title>Current Status</title>
</head>
<body>
<h1>Device Listing and Status</h1>
{% for pin in pins %}
<p>The {{ pins[pin].name }}
{% if pins[pin].state == true %}
is currently on (<a href=”/{{pin}}/off”>turn off</a>)
{% else %}
is currently off (<a href=”/{{pin}}/on”>turn on</a>)
{% endif %}
</p>
{% endfor %}
{% if message %}
<h2>{{ message }}</h2>
{% endif %}
</body>
</html>
All things are now set and ready to go now the pin can be called directly accessed through the URL. Now we can change the GPIO pin state.
http://10.1.14.142:80/24/on
http://10.1.14.142:80/24/off
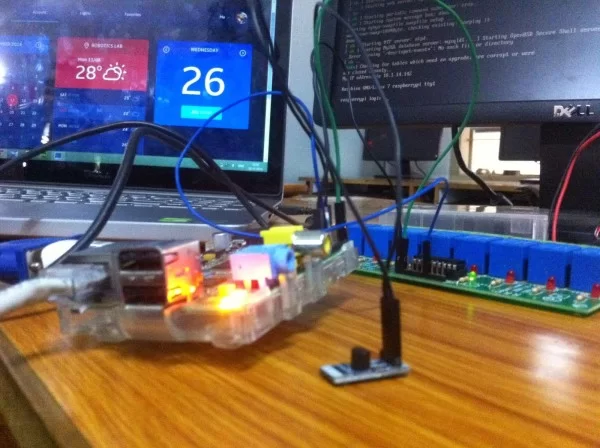
By using the URL, the pin’s state can be changed. Now the pin numbers can be changed to control the other pins. These pins are connected to the 8 channel relay. By controlling these pins we can trigger the relay. By controlling the relay we can turn off and turn on the devices which are connected to the relay.
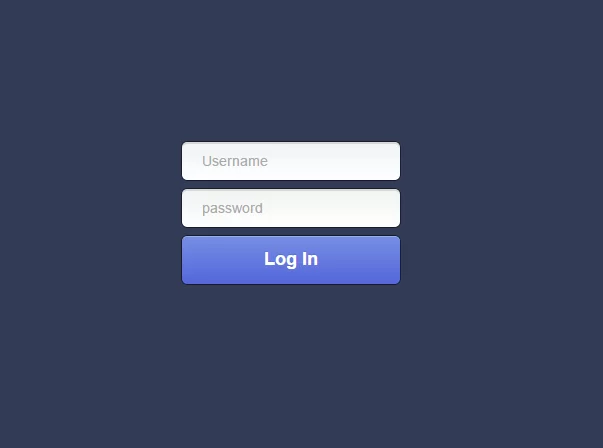
For security reasons we have developed a login portal for the system. In this PHP POST method and session management is used.
LOGIN PAGE
Program:
<!DOCTYPE html>
<head>
<meta charset=”utf-8″>
<title>Home Automation</title>
<?php
session_start();
$secretpassword = ‘admin’;
$secretusername = ‘iqube’;
if (isset($_SESSION[‘authenticated’])&&$_SESSION[‘authenticated’] == true) {
// Go somewhere secure
} else {
$error = null;
if (!empty($_POST)) {
$username = empty($_POST[‘username’]) ? null : $_POST[‘username’];
$password = empty($_POST[‘password’]) ? null : $_POST[‘password’];
if ($username == $secretusername && $password == $secretpassword) {
$_SESSION[‘authenticated’] = true;
// Redirect to your secure location
header(‘Location: /Flat/Temp/index.php’);
return;
} else {
$error = ‘Incorrect username or password’;
}
}
// Create a login form or something
echo $error;
?>
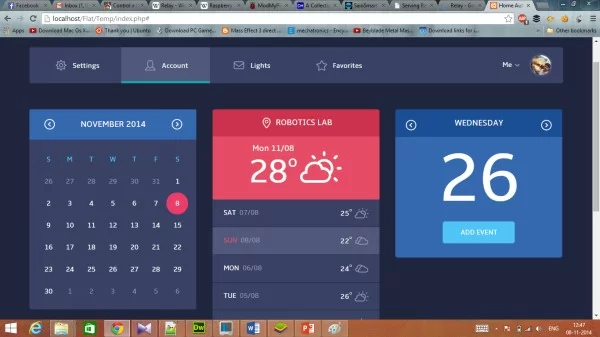
Once the user name and password is correct then the page will redirect to a secure location and an encrypted server URL.
CPANEL
Program:
Please see this link to get the source code
http://www.automation.fun2pk.com/
NOTE: We have not included the program as it contains 1000 lines
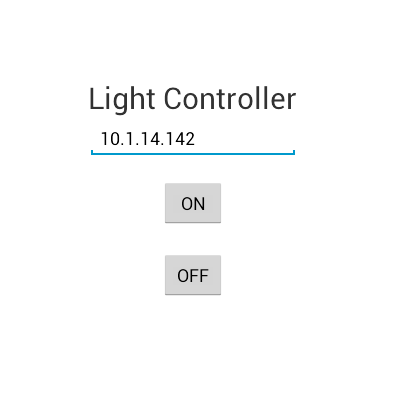
Android Application
Program:
package com.thiri.trigger;
import org.apache.http.Header;
import android.app.Activity;
import android.os.Bundle;
import android.view.View;
import android.view.View.OnClickListener;
import android.widget.Button;
import android.widget.EditText;
import com.loopj.android.http.AsyncHttpClient;
import com.loopj.android.http.AsyncHttpResponseHandler;
public class MainActivity extends Activity implements OnClickListener
{
@Override
public void onClick(View v) {
// TODO Auto-generated method stub
if(v==b1)
{
AsyncHttpClient client = new AsyncHttpClient();
client.get(“http://”+t1.getText().toString()+”:800/18/on”, new AsyncHttpResponseHandler() {
@Override
public void onStart() {
// called before request is started
}
@Override
public void onSuccess(int statusCode, Header[] headers, byte[] response) {
// called when response HTTP status is “200 OK”
}
@Override
public void onFailure(int statusCode, Header[] headers, byte[] errorResponse, Throwable e) {
// called when response HTTP status is “4XX” (eg. 401, 403, 404)
}
});
}
else
if(v==b2)
{
AsyncHttpClient client = new AsyncHttpClient();
client.get(“http://”+t1.getText().toString()+”:800/18/off”, new AsyncHttpResponseHandler() {
@Override
public void onStart() {
// called before request is started
}
@Override
public void onSuccess(int statusCode, Header[] headers, byte[] response) {
// called when response HTTP status is “200 OK”
}
@Override
public void onFailure(int statusCode, Header[] headers, byte[] errorResponse, Throwable e) {
// called when response HTTP status is “4XX” (eg. 401, 403, 404)
}
});
}
}
Button b1,b2;
EditText t1;
@Override
protected void onCreate(Bundle savedInstanceState) {
super.onCreate(savedInstanceState);
setContentView(R.layout.activity_main);
b1=(Button)findViewById(R.id.button1);
b2=(Button)findViewById(R.id.button2);
b1.setOnClickListener(this);
b2.setOnClickListener(this);
t1=(EditText)findViewById(R.id.editText1);
}
}
Source: Home Automation using Raspberry pi and IoT
Home Automation >> Custom Home Automation Projects >> Raspberry Pi >> Home Automation using Raspberry pi and IoT
