(DISCLAIMER: Not meant as a security solution or a lesson in good dog behavior. It’s an experimental proof of concept to play with the application of embedded computing to solve particular use cases)
Sleep deprivation has been driving me mad recently. And it’s all down to a new member of the family (kind of), our new dog. She barks at night when she’s left out. She barks early in the morning when she’s left in. So once I recognized the patterns of her barking, I realized that all I needed was something that would let her out when she needed to go for a pee, usually around 6:30 in the morning. I could do this with a timer switch and a door strike, but where’s the fun in that.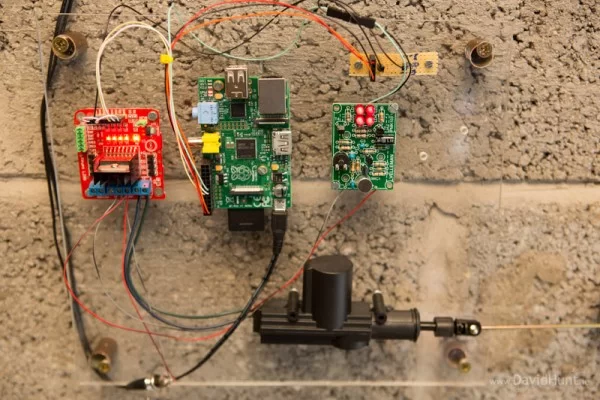
I wanted this to be an educational project, so I decided I’d use the Raspberry Pi again, this time for a non-camera related project. And I decided on a bark activated automatic door opener. So here’s what I came up with:
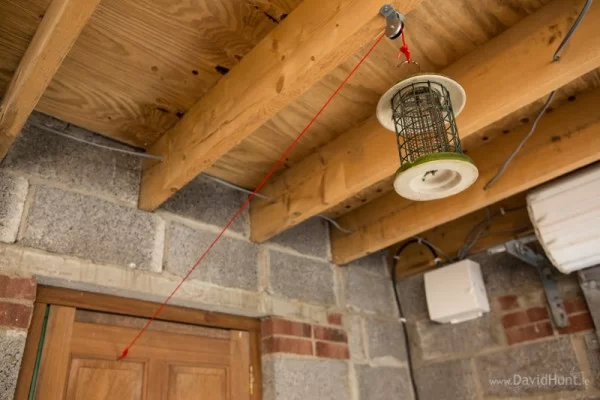
It involves a bark detector (noise detector circuit) wired to the input of the Raspberry Pi so that it can detect the barks. A motor driver circuit to drive the actuator that unlocks the door, and a weight/pulley system that swings the door open when its unlocked.
Here’s the pulley system. As soon as the door is unlocked, the door swings gently open, allowing Rex to go to do their business. 🙂
I picked up the audio detection circuit in Maplin as a DIY kit for €9.99, the kind of ones where you get all the components and a PCB in a bag, and solder them all together. It took about 30 minutes, but worked perfectly, I could bark, and the LED’s would light as I barked. My family thought I was gone mad when they heard me making dog noises in my workshop.
Electronics engineers will now cringe at what I did next. I probed the audio sensor with a voltmeter, and saw that when the volume into the microphone was at a decent level I saw about 3-3.5 volts at one point, so I hooked that directly up to the GPIO on the Raspberry Pi, and it worked beautifully. Ideally, a proper buffer circuit would be used to give a proper logic signal to the GPIO, but I’m not always one for the perfect solution, as is obvious by the fact that I built this contraption at all! 🙂
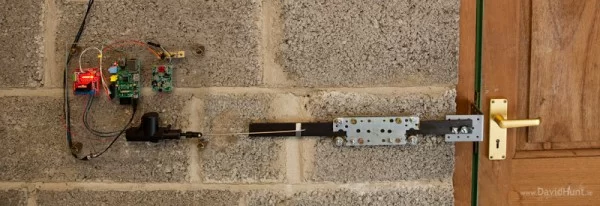
Here’s the actuator I used, it’s a 12V model, €3 with €3 shipping from Hong Kong. There’s about 30mm of travel in the actuator, which is ideal for the lock/unlock mechanism that I built.
And here’s what the actuator is driving. I had a few pieces of metal lying around, and an angle bracket which got around the concrete blocks nicely to meet the door lock. I added a couple of bearings to reduce the friction on the mechanism, I didn’t want to burn out the actuator. When it was built, it was still a little stiff, so I greased it up, and it was then moving nice and smoothly.
The actuator came with a metal rod so I used that to connect to the locking system. Notice the small bit of tape to keep it from falling out of it’s hole! 😉
The actuator as two positions, and here it is in the latched position, where it just catches the door bolt.
And when the bark is detected, it moves the lock mechanism to the following position, allowing the door to swing open.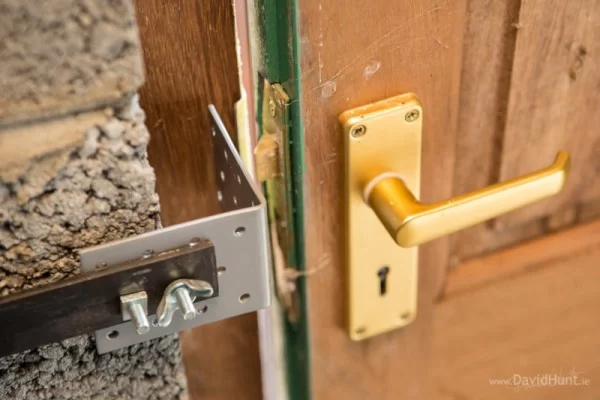
So, here’s the brains of the project. A Raspberry Pi in the centre, a motor driver PCB to the left. I used this because it easily allows me to send 12 volts to the actuator in either polarity, for pushing or pulling the door bolt. The PCB on the right is the audio detection circuit from Maplin. And at the bottom is the 12V actuator. The small veroboard PCB is just a voltage breakout with GND, +5v and +3.5v, to make the wiring easier. Coming into the board from out-of-shot above is the 5V supply for the Raspberry Pi, and the 12V supply for everything else. I used a piece of 5mm clear acrylic to mount everything on, which makes it nice and neat, and also portable if I ever bring it to a show-and-tell! 🙂
All the wiring is done with dupont connectors, 0.1″ (2.54mm) pitch, just like the Raspberry Pi GPIO header. I got a crimp tool off eBay, as well as a a few dozen blank connectors and a roll of female crimps. Make cabling up this kind of project very easy, where you don’t want to solder everything into place. And now I can make a custom connector for the GPIO header very easily without fiddling with individual jumpers, and forgetting where they’re all supposed to go between projects! 🙂
Here’s the code to read in the GPIO from the audio circuit. I just count pulses, and when I get a particular number of pulses in a predefined time, I activate the unlock. It’s really low-tech, would be nice to sample the audio using the Pi itself and compare to known barks, etc. 🙂
import sys
import wiringpi2
from time import sleep
gpio = wiringpi2.GPIO(wiringpi2.GPIO.WPI_MODE_GPIO)
enable_1 = 27
enable_2 = 17
enable_3 = 18

gpio.pinMode(enable_1,gpio.INPUT)
gpio.pinMode(enable_2,gpio.OUTPUT)
gpio.pinMode(enable_3,gpio.OUTPUT)
gpio.pullUpDnControl(enable_1,1)
gpio.pinMode(enable_2,1)
gpio.pinMode(enable_3,1)

gpio.digitalWrite(enable_2,gpio.HIGH)
gpio.digitalWrite(enable_3,gpio.LOW)
sleep (0.1)
gpio.digitalWrite(enable_2,gpio.HIGH)
gpio.digitalWrite(enable_3,gpio.HIGH)

samples = [0 for i in xrange(50)]

j=0
ons = 0;

while (1):
        sample = gpio.digitalRead(enable_1)
        samples[j] = sample
        ons = 0;
        for i in xrange(50):
                if (samples[i] >0):
                        ons = ons +1;
        j = j + 1
        if (j>49):
                j=0
                print ons
        if ons >25:
                print ons
                gpio.digitalWrite(enable_2,gpio.LOW)
                gpio.digitalWrite(enable_3,gpio.HIGH)
                sleep (0.1)
                gpio.digitalWrite(enable_2,gpio.HIGH)
                gpio.digitalWrite(enable_3,gpio.HIGH)
                sleep (2)
                gpio.digitalWrite(enable_2,gpio.HIGH)
                gpio.digitalWrite(enable_3,gpio.LOW)
                sleep (0.1)
                gpio.digitalWrite(enable_2,gpio.HIGH)
                gpio.digitalWrite(enable_3,gpio.HIGH)
                for i in xrange(50):
                        samples[i] = 0;
                sleep (0.01)
Source: Pi-Rex – Bark Activated Door Opening System with Raspberry Pi
About The Author
Hassan Zaka
I am an expert in accounting and possess diverse experience in technical writing. I have written for various industries on topics such as finance, business, and technology. My writing style is clear and simple, and I utilize infographics and diagrams to make my writing more engaging. I can be a valuable asset to any organization in need of technical writing services.
Follow Us:LinkedinTwitter