Overview of Arlo Pro 4 Battery Installation: Quick & Easy Guide
This article explains manual battery installation, troubleshooting, replacement steps, and tips to maximize battery life for Arlo Pro 4 cameras. It covers insertion/removal fixes, connectivity checks, step-by-step battery replacement, power-saving settings, factors affecting performance, replacement options, safety and disposal guidance, and best practices to ensure reliable operation and security.
Quick Solutions to Questions related to Arlo Pro 4 Battery Installation:
-
How do I replace the battery in an Arlo Pro 4 camera?
Power off the camera by holding the power button 5 seconds, press the underside battery release button ~2 seconds until it clicks, slide the camera out, remove the old battery, insert the new battery aligning contacts, slide camera back until it clicks, then power on by holding the power button 5 seconds. -
What should I do if I have difficulty inserting or removing the battery?
Ensure the housing is properly aligned, gently wiggle the housing while applying pressure to remove the battery, and clean contacts on both the batteries and inside the camera. -
Can connectivity issues occur after installing a new battery and how do I fix them?
Check Wi-Fi stability and range, restart your router and camera, and verify the battery is fully charged before connecting. -
How can I maximize battery life on my Arlo Pro 4?
Adjust motion detection sensitivity and zones, optimize recording schedules, and enable power-saving features like sleep mode and geofencing in the Arlo app. -
Are third-party batteries acceptable for Arlo Pro 4 cameras?
Third-party batteries are available and often cheaper, but quality varies; original Arlo batteries are designed for compatibility and assured quality. -
What safety and disposal precautions should I follow for Arlo Pro 4 batteries?
Handle with clean dry hands, avoid heat or puncturing, store properly, remove and bag old batteries, and use local recycling centers or designated drop-off points for disposal.
Welcome to the world of Arlo Pro 4 cameras, where manual battery installation is a light and easy way to power up your device. Capture stunning footage with this innovative camera system. If you want your camera to perform like a pro, mastering the manual battery installation process is the light way to go. It ensures smooth operation and captures stunning footage. Trust me, it’s not just about popping in some manual batteries for security and calling it a light day with alerts. We’re talking serious business here.
Why does proper battery installation matter? Well, my friend, a manual can make all the difference between smooth sailing and a comedy of errors. It’s important to have the right manual on hand to answer any question that may arise. Additionally, having a light handy can provide better visibility in case of any security concerns. A well-installed battery ensures optimal performance for your Arlo Pro 4 camera, capturing every moment with precision and clarity.
Additionally, the battery’s security features protect your camera from unauthorized access. If you have any question about the battery or its compatibility with your camera, feel free to reach out to our support team. Plus, who wants their camera’s security compromised or its light failing on them when they need it most?
So get ready to dive into the importance of following the correct battery installation process for your Arlo Pro 4 camera housing. Stick around as we uncover tips and tricks that will have your camera running like a well-oiled machine in no time.
Troubleshooting Common Battery Installation Issues for Arlo Pro 4 Cameras
Difficulty Inserting or Removing Batteries
- If you’re having trouble with inserting or removing batteries in your Arlo Pro 4 camera, here are some solutions to consider for your question.
- Ensure that the camera housing is properly aligned with the battery compartment.
- Gently wiggle the camera housing while applying pressure to remove the battery.
- Clean the contacts on both the batteries and inside the camera to ensure a secure connection.
Connectivity Problems after Battery Installation
- After installing a new battery, if you encounter connectivity issues with your Arlo Pro 4 camera, try these troubleshooting tips:
- Check for a stable Wi-Fi connection and ensure that your camera is within range of your router.
- Restart both your router and camera to refresh their connections.
- Verify that the battery is fully charged before attempting to connect.
By following these troubleshooting steps, you can resolve common problems associated with Arlo Pro 4 battery installation. From addressing difficulties in inserting or removing batteries to resolving connectivity issues, these solutions will help ensure a smooth setup process for your cameras. Keep these tips handy whenever you encounter any hiccups during battery installation or experience connectivity problems with your Arlo Pro 4 system.
Step-by-Step Guide: Replacing the Battery in an Arlo Pro 4 Camera
Replacing the battery in your Arlo Pro 4 camera is a breeze with this step-by-step guide. Follow these instructions to ensure a smooth and successful battery installation process:
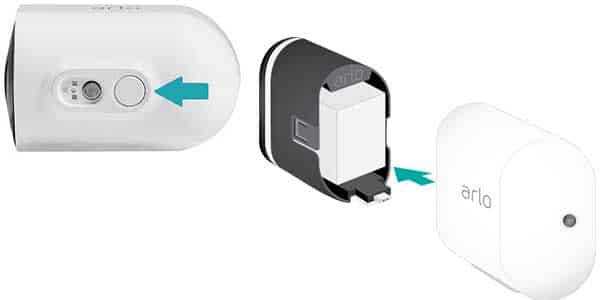
- Begin by powering down the camera. Press and hold the power button for a duration of 5 seconds to turn it off.
- On the camera’s underside, you’ll find a small circular button marked with a “-“ symbol. This is the battery release button. Locate it.
- Hold down the battery release button for approximately 2 seconds. During this time, you’ll hear a clicking sound, and the camera will start to slide out of its housing.
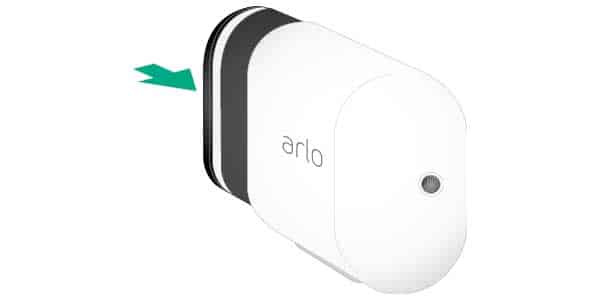
- Carefully slide the camera out from its housing until it’s fully removed.
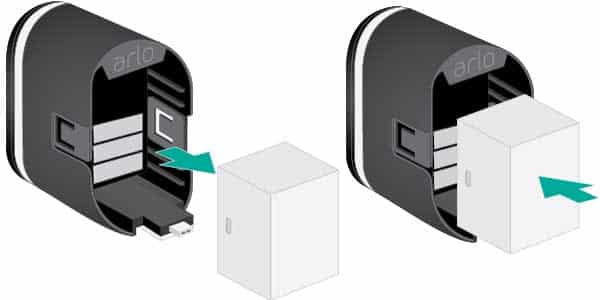
- Extract the old battery from the camera by gently pulling it out.
- Insert the new battery into the camera, ensuring that the battery contacts are properly aligned.
- Push the camera back into its housing, applying gentle pressure until it clicks securely into place.
- Power on the camera by pressing and holding the power button for another 5 seconds
During this process, keep in mind some expert tips for handling and storing batteries:
- Always handle batteries with clean hands to avoid transferring oils or dirt onto them.
- Store spare batteries in a cool, dry place away from direct sunlight and extreme temperatures.
- Avoid mixing different types or brands of batteries when replacing them in your Arlo Pro 4 camera.
By following these simple steps and expert tips, you can effortlessly replace the battery in your Arlo Pro 4 camera and ensure its optimal performance.
Remember, proper maintenance of your camera’s battery will contribute to its longevity and reliability.
Tips for Maximizing Battery Life on Your Arlo Pro 4 Camera
Adjusting Motion Detection Settings:
- Customize the motion detection sensitivity to avoid unnecessary triggers.
- Narrow down the camera’s field of view by adjusting the motion detection range.
- Opt for specific zones within the camera’s view where you want motion detection to be active.
Optimizing Recording Schedules:
- Determine when you truly need continuous recording versus motion-triggered recording.
- Set specific time intervals for recording based on your requirements.
- Schedule your camera to record only during certain hours or days.
Exploring Power-Saving Features:
- Enable the sleep mode feature to conserve battery when the camera is not in use.
- Utilize the geofencing feature, which automatically activates or deactivates your camera based on your location.
- Take advantage of the power-saving options available in the Arlo mobile app.
By implementing these strategies, you can extend your Arlo Pro 4 camera’s battery life and ensure consistent surveillance without frequent recharging. Remember to adjust motion detection settings, optimize recording schedules, and explore power-saving features tailored to your needs. With these tips, you can make the most out of each charge and maintain reliable monitoring with your Arlo Pro 4 camera.
Factors Affecting Arlo Pro 4 Battery Performance
Understanding the factors that impact your Arlo Pro 4 battery’s performance is crucial. Temperature, usage patterns, and firmware updates can all affect battery life. By mitigating these factors, you can ensure optimal performance.
Temperature
Extreme temperatures can have a significant impact on your Arlo Pro 4 battery. Here’s what you need to know:
- Cold weather: Batteries tend to drain faster in colder temperatures. If you live in a cold climate, consider these tips:
-
- Keep your camera indoors or use a weatherproof housing.
- Opt for lithium batteries as they perform better in low temperatures.
- Minimize unnecessary recordings to conserve battery life.
- Hot weather: High temperatures can cause batteries to degrade more quickly. To protect your battery:
-
- Place your camera in shaded areas whenever possible.
- Avoid direct exposure to sunlight.
- Regularly check for any signs of overheating.
Usage Patterns
Your usage patterns play a vital role in determining how long your Arlo Pro 4 battery will last. Consider the following:
- Recording frequency: The more frequently your camera records, the quicker the battery drains. Adjust the recording settings based on your needs and prioritize essential events.
- Motion detection sensitivity: Higher sensitivity levels may result in more frequent recordings and faster battery depletion. Find a balance between sensitivity and conserving power.
Firmware Updates
Firmware updates are designed to improve functionality and address any issues with your Arlo Pro 4 system. However, they can also impact battery performance:
- Optimization: Firmware updates often include optimizations that enhance energy efficiency, potentially extending battery life.
- Unforeseen issues: Occasionally, firmware updates may introduce unforeseen bugs or glitches that negatively affect battery performance. Monitor the community forums or official support channels for any reported issues after updating.
By understanding these factors and taking appropriate measures, you can maximize the battery life of your Arlo Pro 4 camera system. Stay mindful of temperature, adjust usage patterns, and keep an eye on firmware updates to ensure optimal performance.
Understanding Different Replacement Battery Options for Arlo Pro 4
Looking to replace the batteries in your Arlo Pro 4 camera? Let’s explore the various options available to you and help you make an informed decision.
Original Manufacturer Batteries vs. Third-Party Alternatives
You have two main options: original manufacturer batteries or third-party alternatives. Here’s a quick comparison of cost and quality:
- Original manufacturer batteries:
-
- Generally more expensive
- Designed specifically for Arlo Pro 4 cameras
- Assured quality and compatibility
- Third-party alternatives:
-
- Often more affordable
- Compatible with Arlo Pro 4 cameras
- Varying levels of quality, so research is crucial
Compatibility Considerations
Before purchasing replacement batteries, it’s essential to consider compatibility factors. Here are some insights to keep in mind:
- Voltage requirements: Ensure that the replacement battery matches the voltage specifications of your Arlo Pro 4 camera.
- Physical dimensions: Check if the battery size aligns with the camera’s compartment to ensure a proper fit.
- Charging capabilities: Verify if the replacement battery can be charged using the existing charger or if a separate charging solution is needed.
Remember, always refer to your camera’s user manual or consult customer support for specific compatibility information.
Safety Precautions when Handling and Disposing of Arlo Pro 4 Batteries
Handling Arlo Pro 4 Batteries Safely
- Always read the manufacturer’s instructions before handling Arlo Pro 4 batteries.
- Ensure your hands are clean and dry before touching the batteries.
- Avoid exposing the batteries to excessive heat or direct sunlight.
- Do not puncture or attempt to open the battery casing.
Proper Disposal of Old or Damaged Batteries
- When it’s time to dispose of old or damaged Arlo Pro 4 batteries, follow these steps:
- Remove the battery from the device carefully, following any specific instructions provided by Arlo.
- Place the battery in a sturdy, leak-proof bag to prevent any potential leaks or spills.
- Check with your local recycling center or municipality for proper disposal methods.
- Some recycling centers may have designated drop-off points for batteries.
Hazards Associated with Mishandling or Improper Disposal
- Mishandling Arlo Pro 4 batteries can lead to personal injury or property damage.
- Incorrect disposal can harm the environment due to toxic substances present in batteries.
- Leaking batteries can cause chemical burns if they come into contact with skin.
Remember, taking safety precautions is crucial when dealing with Arlo Pro 4 batteries. Handle them properly and dispose of them responsibly to avoid any accidents or harm.
Enhancing Your Arlo Experience with Seamless Battery Installation
Installing batteries in your Arlo Pro 4 cameras is a crucial step to ensure optimal performance and uninterrupted security. With a smooth battery installation process, you can enhance your overall experience with these advanced cameras. Let’s explore how proper battery installation brings convenience and peace of mind to your Arlo setup.
- Convenience and Peace of Mind:
-
- Properly installed batteries provide reliable power to your Arlo Pro 4 cameras, ensuring continuous connectivity for seamless monitoring.
- The housing design allows for easy access to the battery compartment, simplifying the installation process.
- Utilizing the USB port, you can conveniently charge the batteries without removing them from the camera.
- A light indicator on the camera guides you through the battery installation, making it user-friendly even for beginners.
- Avoiding Common Pitfalls:
-
- Following the manual’s instructions is essential to avoid any issues during battery installation.
- Double-checking that the batteries are inserted correctly guarantees proper functionality and prevents any connection problems.
- Regularly inspecting the battery status within the Arlo app helps you stay informed about their charge level, avoiding unexpected downtime.
- Enhancing Security and Tracking:
-
- With properly installed batteries, your Arlo Pro 4 cameras offer uncompromised security by capturing high-quality footage without interruptions.
- The seamless battery installation ensures that your cameras remain operational, providing continuous tracking of activity around your property.
By focusing on a smooth battery installation process for your Arlo Pro 4 cameras, you can optimize their performance and enjoy enhanced security features. Remember to follow the manual’s guidelines and take advantage of helpful indicators within both hardware and software settings. Now you’re ready to elevate your Arlo experience with hassle-free battery installations!
Maximizing Battery Life: Tips for Efficient Use of Arlo Pro 4 Batteries
Congratulations on completing the sections that covered troubleshooting common battery installation issues, step-by-step guide for replacing the battery, tips for maximizing battery life, factors affecting battery performance, replacement battery options, safety precautions, and enhancing your Arlo experience with seamless installation. You now have a comprehensive understanding of how to make the most out of your Arlo Pro 4 camera batteries.
Now that you’re armed with knowledge on optimizing battery life, it’s time to put these tips into action. By implementing these strategies, you can ensure that your Arlo Pro 4 batteries last longer and provide reliable surveillance when you need it most. Remember to regularly check your camera settings, adjust motion detection sensitivity, and explore power-saving features within the Arlo app. With a little effort and attention to detail, you can enjoy extended battery life while keeping your property secure.
FAQs
Can I use third-party batteries with my Arlo Pro 4 camera?
Yes! While Arlo recommends using their official batteries for optimal performance and warranty coverage, there are compatible third-party options available in the market. However, be cautious when selecting third-party batteries as they may not offer the same level of quality or longevity as genuine Arlo batteries.
How often should I replace the batteries in my Arlo Pro 4 camera?
The frequency of battery replacement depends on various factors such as usage patterns and environmental conditions. On average, Arlo Pro 4 cameras with moderate usage may require new batteries every three to six months. However, by following our tips for maximizing battery life and adjusting settings accordingly, you might extend this timeframe significantly.
Can I charge my Arlo Pro 4 camera directly without removing the battery?
No. The Arlo Pro 4 camera does not support direct charging without removing the battery from its compartment. To recharge your camera’s battery, you’ll need to remove it and use the provided charging cable and adapter.
What happens if I mix old and new batteries in my Arlo Pro 4 camera?
It’s best to avoid mixing old and new batteries in your Arlo Pro 4 camera. When different battery capacities are combined, it can lead to inconsistent performance and reduce overall battery life. To maintain optimal performance, always replace all batteries in your camera at the same time.
Can I use rechargeable batteries with my Arlo Pro 4 camera?
Yes! Arlo Pro 4 cameras are compatible with rechargeable batteries. Using high-quality rechargeable batteries can be a cost-effective and environmentally friendly alternative to disposable ones. Just ensure that the rechargeable batteries you choose meet the recommended specifications for your camera model.
[WPCR_INSERT]
About The Author
Hassan Zaka
I am an expert in accounting and possess diverse experience in technical writing. I have written for various industries on topics such as finance, business, and technology. My writing style is clear and simple, and I utilize infographics and diagrams to make my writing more engaging. I can be a valuable asset to any organization in need of technical writing services.
Follow Us:LinkedinTwitter


