Overview of WiFi based home automation by Intel Edison and Banana Pi M1
This project builds a low-cost WiFi home automation and monitoring system using a Banana Pi M1 host and Intel Edison WiFi sensors. It integrates flame, smoke, thermal, and photo-resistors, a webcam on a servo for remote viewing, and a modified 9V LED with PIR controlled by the Banana Pi. Software includes Python scripts, Arduino code for Edison, wiringBP and Banana Pi GPIO packages, and uses TCP chat-style commands and Android telnet for control. Text-to-speech via eSpeak and separate power for the servo are recommended.
Quick Solutions to Questions related to WiFi based home automation by Intel Edison and Banana Pi M1:
-
How do I read the four sensors on Intel Edison?
Send A for smoke, T for thermal resistor, P for photo resistor, and F for flame detector as commands to the Edison. -
Can the webcam angle be changed remotely?
Yes, by mounting the webcam on a DC servo (Tower Pro MG90) and controlling it with a Python script using Banana Pi GPIO BCM 27. -
Does the 9V LED with PIR run on batteries or power supply?
The project replaces batteries with parallel capacitors and wires the 9V adaptor; control is via an NPN transistor driven by the Banana Pi. -
What software is needed on Banana Pi M1?
Ubuntu MATE image, wiringBP, Banana Pi GPIO Python package, the Python host script qs.py, and eSpeak for text-to-speech. -
Best way to power the DC servo for the webcam?
Use an independent 5V/3A DC power supply because Tower Pro MG90 may not be powerful enough from the Banana Pi alone.
Hi! People,
This is the project I have done alone. I tried to make something could be helpful to those Taiwanese whose age is old. So, I picked those consuming electronics products up which is available and inexpensive to make this project.
The host computer in this project is Banana Pi M1, which is a famous name card size Linux single board computer, the image I adopted is Ubuntu MATE, but installed wiringBP and Banana Pi GPIO package for Python. You can download and prepare everything you need to clone the host in this project :
1. OS Image download ==>
2. wiringBP ==> http://regishsu.blogspot.tw/2015/05/banana-prowiri…
3. GPIO package for Python ==> https://github.com/LeMaker/RPi.GPIO_BP
Actually, all *.py those script files written in Python are compatible with Raspberry Pi 2, but please do not forget the definition of pins are different.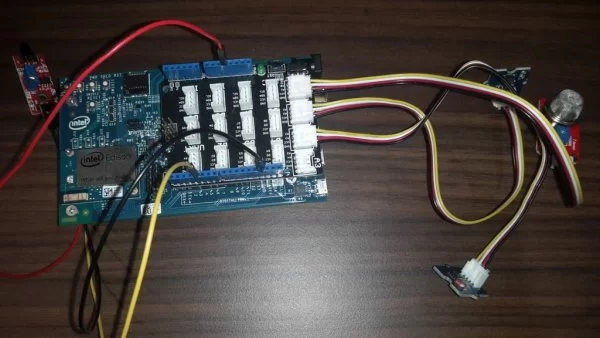
The sensors in whole system are bundled with Intel Edison and its WiFi shield. There are 4 sensors this project adopted : flame detector, smoke detector, thermal and photo-resistors. Their specifications are listed as following :
1. Flame detector ==> http://www.ltc.com.tw/product_info.php/products_id…
2. Smoke detector ==> http://www.ltc.com.tw/product_info.php/products_id…
3. Thermal resistor ==> https://wiki.seeedstudio.com/Wio-Terminal-Therm…
The other components included : One 9V LED with PIR, a 5V/3A DC power supply, one DC servo (Mine is Tower Pro MG90), Logitech C170 webcam and 4 ports USB hub.
Whole system are based on traditional TCP chat client and server, so it is not too difficult to understand. Now, let’s get it done and put it work!
Step 1: Make your distributed WiFi sensors by Intel Edison
I programmed my Intel Edison by its Arduino IDE 1.6.0, the sensors are all supplied DC 5V on board power, for easy to implement, I adopted Base Shield. That’s OK if you just wire them by jumpers with no Base Shield.
You can download the source code file : http://www.instructables.com/files/orig/F3Z/0B5Z/I…
Follow the instructions Intel told you, and program your Intel Edision! When this step is done, you can check it out by your Android App. Like you watch in the following video :
http://www.instructables.com/files/orig/FCJ/9Z86/I…
The commands to read four sensors are :
A –> Smoke detector
T –> Thermal resistor
P –> Photo resistor
F –> Flame detector
The Android App I use in video can be downloaded at Google Play, key word is ‘Telnet’. Or, the Python script I wrote also works :
http://www.instructables.com/files/orig/FGJ/77WJ/I…
Step 2: Prepare your webcam and DC servo for monitor your home
This part is based on : Web Cam streaming from Raspberry Pi to Android using streamer
You can get your live video in your home on your Android App by follow the steps this forum told you. But, we can not change the angle of webcam as we want, for this article didn’t teach us how to control the motor or something to fit our requirement.
Thus, I try to get a DC servo which is Tower Pro MG90, and a plastic rack I got to put webcam on it. The DC servo repeat changes the angle of webcam, and you can watch live video on your Android phone then. The Python script to control DC servo by GPIO BCM #27 is :
http://www.instructables.com/files/orig/FS6/L6QD/I…
For Tower Pro MG90 is not so powerful to drive the webcam and plastic rack I found, so an independent 5V/3A DC power supply for Tower Pro MG90 is suggested.
All Banana Pi M1 GPIO description has shown here : http://hardware-libre.fr/2014/07/banana-pi-gpio-no…
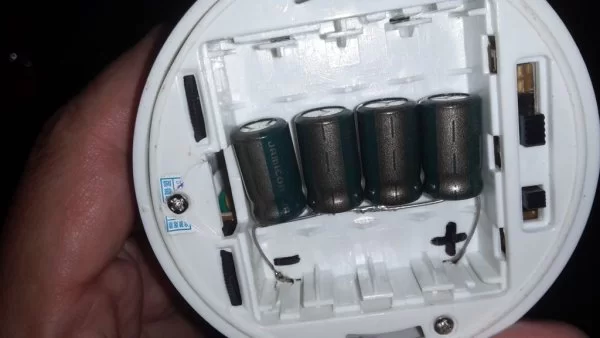
Step 3: Modify your LED to be controlled by Banana Pi M1
I did some modification on the marketed 9V LED with PIR, for it needs batteries, so I replaced the batteries with many parallel linked capacitors. And, get its series with an NPN to let it becomes controlled by Banana Pi M1.
The 9V adaptor is boundled with 9V LED with PIR itself, I just wired it.
Step 4: Put everything together and run your host!
The host runs Python script “qs.py” to accept commands from Android App, such as “light off” and “light on” to power 9V LED up or not.
It also can produce voice by Text to Speech that pre-installed in Ubuntu MATE of Banana Pi M1. If not, please check out “eSpeak” package.
http://www.instructables.com/files/orig/FEF/B7YY/I…
That’s all! So easy, huh? Enjoy!
And, please let me know if you have any good idea about this project, I am an open source maker, of course I like DIY forever!
Source: WiFi based home automation by Intel Edison and Banana Pi M1
About The Author
Hassan Zaka
I am an expert in accounting and possess diverse experience in technical writing. I have written for various industries on topics such as finance, business, and technology. My writing style is clear and simple, and I utilize infographics and diagrams to make my writing more engaging. I can be a valuable asset to any organization in need of technical writing services.
Follow Us:LinkedinTwitter


