Overview of Linear Garage Door Opener Troubleshooting – Complete Guide
This article explains troubleshooting for Linear garage door openers, covering sensor alignment, springs/cables, error flash codes, power issues, remote problems (batteries, reprogramming, interference), and specific fixes for flashes 2–7. It advises consulting the user manual, contacting support for model verification, and when to call a technician for mechanical, electrical, or encoder failures.
Quick Solutions to Questions related to Linear Garage Door Opener Troubleshooting Guide:
-
How do I fix a remote that stopped working?
Check and replace the remote battery, reprogram the remote using the Learn button procedure from the manual, check for signal interference, and ensure the wall lock button is not active. -
What does three flashes on my Linear opener mean and how do I fix it?
Three flashes indicate a safety sensor problem; clean and align the sensors and test by waving an object to ensure the door reverses. -
Why does my garage door close then immediately open?
Causes include a blocked threshold, dirty/misaligned sensors, incorrect travel down or force settings, worn springs or rollers, or deprogrammed remote; inspect sensors, adjust travel/force per manual, and check hardware. -
How can I restore power when my opener has no power?
Verify the unit is plugged in, reset any GFCI outlets (including back patio), check the breaker, and inspect linked wall switches before checking motor capacitor or circuit board. -
Can I reset encoder or error codes myself?
Yes; many models allow resetting by holding the Learn button (about 6 seconds) until LEDs blink, but this erases travel settings and limits while preserving transmitter memory. -
When should I call a technician for flashing error codes?
Call a professional for force factor issues (4 flashes), mechanical or electrical failures (6 flashes), encoder errors that persist (7 flashes), or if springs, cables, or logic board replacement is needed.
Having trouble with your linear garage door opener? Don’t sweat it! I’m here to help you understand the basics of troubleshooting and guide you through common issues that may arise. Whether your opener is acting up or not working at all, we’ll get you ready to tackle any problem head-on.
Common issues and how to address them effectively
One issue you might face is when the opener flashes but the door doesn’t open or close. This could be due to a misaligned sensor or an obstruction in the path of the door. Check if anything is blocking the sensors and make sure they are properly aligned. If necessary, clean the sensors and adjust their position until they are facing each other directly.
Sometimes, the garage door opener flashes and the wall station’s LED light bulb might not open all the way and then goes back up. This can happen because of old springs, broken cables, or a problem with the opener settings. Look at the springs and cables for any problems. If they’re bad, get help from an expert to fix them. Also, check if the LED light unit opener settings are right and change them if necessary.
Identifying Your Linear Garage Door Opener Model
Understanding Model-Specific Error Codes
If your garage door opener isn’t working right, you need to know the error codes for your model. These codes tell you what’s wrong and help you fix it. By figuring out what each code means, you can solve the problem.
If your garage door opener shows an error code about the sensors, it means something might be blocking them or they’re not in the right place. You can check if there’s anything in the way or move the sensors to make them line up correctly. Knowing what each error code means helps you fix problems without guessing.
Accessing the User Manual
To troubleshoot your linear garage door opener effectively, it’s essential to have access to the user manual. The user manual contains valuable information on installation procedures, operating instructions, and troubleshooting techniques specific to your model. It serves as a comprehensive guide that equips you with all the necessary instructions for maintaining and resolving issues with your garage door opener.
- Linear Garage Door Opener LDCO 841/863: Click Here
- Linear Ld050 Garage Door Opener Manual: Click Here
- Linear Ldco800 Garage Door Opener Manual: Click Here
By referring to the user manual, you can find step-by-step instructions on how to troubleshoot common problems such as motor malfunctions or remote control issues. It provides insights into the recommended maintenance practices that can help prevent potential problems in the future. Having easy access to this resource ensures that you are well-equipped with accurate information.
Contacting Support for Model Verification
In some cases, identifying your specific linear garage door opener model may require expert assistance. If you’re unsure about which model of linear garage door opener you have installed in your home, reaching out to support staff can help verify the exact model and provide tailored troubleshooting guidance.
You can talk to the garage door opener people to get help. They know a lot about different models and can help you find yours. They can also fix any problems that only your opener has.
If your garage door opener isn’t working right, experts can help you fix it. They can tell you what’s wrong and how to fix it. Just ask them for help when you need it.Common Remote Control Issues
Here is the Linear Garage Door Troubleshooting Guide
Problem – 1
Why Linear Garage Door Opener Remote Not Working
Minor problems with the garage door remote or opener can occasionally be swiftly resolved by adjusting the garage door or opener by a professional. Others, on the other hand, are more serious and point to a critical repair requirement. When your garage door won’t open with the remote, try troubleshooting these five typical remote problems to find the issue and get your garage door back to working smoothly and dependably.
1. Remote Battery Power Is Low

To ensure your linear garage door opener remote control is working properly, it’s essential to check the battery life. Low or depleted batteries can lead to unexpected malfunctions and frustrations. To check the battery life:
- Locate the battery compartment on your remote control unit.
- Open the compartment and remove the batteries.
- Inspect the batteries for any signs of corrosion or damage.
- Test the batteries using a battery tester or by replacing them with fresh ones.
- If the battery tester indicates low power or if you notice any issues with the batteries, replace them promptly.
By regularly checking and replacing depleted batteries, you can avoid potential problems and ensure that your remote control has sufficient power supply to operate effectively.
2- Reprogramming the Remote
If you’re experiencing issues with your linear garage door opener remote control, such as programming errors or lost synchronization, reprogramming it may solve the problem. Follow these step-by-step instructions:
-
Consult your linear garage door opener manual for specific reprogramming instructions.
-
Locate the “Learn” or “Program” button on both your linear garage door opener motor unit and remote control.
-
Press and release the “Learn” button on your motor unit, then within 30 seconds, press and hold down a button on your remote control until you see a light flash or hear a beep sound.
-
Release the button on your remote control and wait for approximately 30 seconds to complete synchronization.
-
Test your newly programmed remote control by pressing its buttons to open or close your garage door.
Reprogramming your remote control will help regain control over your linear garage door opener and resolve any programming-related issues.
3. Abrupt Remote Signal
Sometimes signal interference can disrupt communication between components of your linear garage door opener system, causing performance issues. Here’s how you can inspect for signal interference:
- Check for nearby electronic devices that may emit signals on the same frequency as your garage door opener, such as Wi-Fi routers or cordless phones.
- Move any potential sources of interference away from the garage door opener unit to minimize signal disruption.
- Ensure that there are no physical obstructions between the remote control and the motor unit, such as walls or large objects.
- Consider installing a signal booster or antenna extension to improve signal strength and reliability.
4. Lock Button Is Inactive
Verify that the lock button on the wall-mounted control panel for your garage door has not been activated since this is another straightforward garage door remedy. During routine everyday tasks, you might inadvertently hit this button, and pressing the lock button makes it simple to release the door lock. Test the door’s functionality after unlocking it by clicking the open button on the panel.
Problem – 1 -2
Garage Remote Not Working After New Battery
You checked it all and test the above three reasons then what other causes against the remote is not working after changing a new battery.
Here are the Reasons and Solutions:
Programming Issues
Sometimes when you add a new device to the garage door control system, the existing devices unintentionally become un-programmed. Certain devices may occasionally disappear from the receiver’s memory as you add more. To reset the device in this circumstance, you should see the last section. Despite the rarity, you can try reprogramming your remote in accordance with predetermined instructions or stick to the fundamentals listed below;
- Long-press the learn dial until the LED turns off on the opener unit. All prior codes will be erased by this exercise.
- Use the remote to see if the reprogramming was effective after that.
Mechanic Issues with the Remote
If the remote has physical damage, such as stuck buttons from being dropped or trodden on, it could malfunction. Also, you might have unintentionally spilled liquids or even garage door lubrication on the appliance. In order to fix or replace the remote, it is best to consult a technician.
Failure of the Receiver
Look for physical damage to your receiver, then have it fixed. Again, check sure the antenna is straight and secure and clean away any debris like cobwebs. Adjust the angle if it has been pushed aside or bent. You can still attempt to reset the receiver system to see if it fixes the issue. Plug the device back in after unplugging it for a minute. Verify the remote’s functionality.
Faulty Wiring for the Door Controller
There can be an issue with the control wire system if the door won’t open or close when the remote and wall panel are used. The wiring of the opener should ideally be tested as follows:
- Disconnect the two wires from the motor and unplug the opener.
- Reset the machine’s memory, plug it in, and program all the remote controls.
- Reconnect the control wiring to the motor after unplugging the device once more.
- Unplug the controllers that are installed on the wall’s wiring.
- Test out the door’s functionality with the remote.
A Faulty Ground Fault Interrupter (GFI)

Your home is shielded from electrical harm by a GFI. The garage door and remote will stop functioning if the GFI blows. To fix the problem, push the reset button on the wall, and your remote should now unlock the door.
Problem – 2
Linear Garage Door Opener Closes Then Opens
You May Have a Blocked Threshold (Sensor)
Look check your garage door’s threshold before pulling out your toolkit or dialing for assistance. Your garage door will sense any object that even partially blocks the threshold and will reverse direction to avoid damage or safety risks.
If the sensor eyes are dirty or smudged, your garage door may even detect a blockage in the threshold. To ensure the sensors have full eyesight, locate them throughout the floor and clean them with a towel and a gentle cleanser. If the threshold is clear and the sensor eyes are clean, a system or component problem may be the cause of your garage door unexpectedly reversing.
You Need To Change the Travel Down Setting
Your garage door has a preset distance it must travel before closing. If it shuts before covering that distance, it assumes something is wrong and opens again to minimize any harm.
Your garage door’s components may move or shrink as a result of weather changes. The distance your garage door must travel may alter as a result. In situations like this, you just need to change your “travel down” setting to reflect the new distance.
You Need a New Travel Module or Logic Board
The logic board of your garage door opener receives information about the position of the door from the journey module. The logic board in your garage door opener serves as its brain. You could require a replacement because the logic board and travel module both eventually wear out.
The logic board cannot communicate the location of the garage door to the travel module when it is worn out, which can result in your garage door unexpectedly closing before opening (and vice versa).
You probably rely on an old garage door opener that has to be replaced if your travel module or logic board is worn out. Installing a new opener is the best move in this scenario. Without having to deal with the difficulties of replacing the logic board, you can benefit from the features of a new opener.
The Close-Force Mode Is Off
Your garage door has a setting for the amount of force it needs to close, just as it does for the distance it travels. It might not have enough energy to reach the floor if the force setting is too low, therefore it returns to the open position.
There should be a screw on your garage door opener that enables you to change this setting. The manual for your opener contains further information on it.
Your Remote Is Deprogrammed or Dying
Your garage door may occasionally act strangely if the remote’s battery is running low. Check to determine if your wall switch enables the door to shut all the way. If it works properly with the wall switch, changing the battery will probably fix your problem. The programming could be the problem if the battery is not the issue.
For the garage door to open and close, communication between your remote and keypad is required. You may recall going through the first programming process if you’ve ever installed a new keypad. It may be necessary to reset the programming between your keypad and door if there is a glitch.
A reset might be the solution if your wall switch is still functional but your remote control and keypad are not. In order to complete the reprogramming procedures, locate the user handbook for your garage door opener.
Springs or Rollers Are Misaligned or Worn
The door closes more slowly and forcefully when your springs or rollers are worn out or out of alignment. The door can cease closing as a result of this extra friction.
Occasionally lubricating the springs and rollers can solve this issue, but occasionally you’ll need to replace your springs and rollers entirely. Replacement is probably the best option if your garage door is old or if these parts have a lot of rust.
Problem – 3
Linear Garage Door Opener No Power
The following troubleshooting steps will help determine why the garage door opener has no power.
Make Sure Cord is Plugged into the Outlet
Let’s start with the most obvious thing, even though I realize it seems dumb. Make sure the garage door opener is hooked into the ceiling outlet if you recently moved into a home and it isn’t working.
In order to prevent someone from mistakenly locking the garage door and trying to open it during a property showing, a realtor or previous owner has been known to unplug the garage door opener on numerous occasions. You wouldn’t believe how frequently this occurs, which explains why so many garage door openers are disconnected.
GFCI Outlet in the Garage Has Tripped
According to information I’ve found online, the NEC started requiring that garage door opener outlets be connected to a GFCI circuit in the house in 2008. The front wall of the majority of these homes, which you face as you pull into your garage, will be home to a GFCI outlet. Using this GFCI outlet, power is supplied to the opener.
Try resetting the GFCI outlet in the garage first to see if it fixes the issue if your garage door opener is not receiving power. This will usually quickly resolve the problem in 90% of cases. If not, let’s on to the next piece of advice.
GFCI Outlet Tripped on the Back Patio
Do you mean the back patio? And I did. I realize this may sound strange, but some home builders protect the outlets in the garage by connecting a wire to the GFCI outlet on the patio in back. Many of our clients have had the same issue, and I personally have two family members who live in newer homes that were wired in this manner. Everything resumed functioning after the GFCI outlet on the back patio was reset.
Breaker Has Tripped

When a garage door opener loses electricity, most people first check the breaker box. As of late, the GFCI outlet, rather than the circuit breaker, has tripped, therefore I decided not to include it first. You will likely notice a tripped breaker if there isn’t a GFCI outlet connected to the ceiling outlet for the garage door opener in the garage or on the rear patio.
The Switch Is Wired To the Ceiling Outlet
This one depends on where you are in the world, I’m sure of it. In our neighborhood, we have frequently observed instances where a wall switch in the garage is wired to an outlet in the ceiling. If you’re having trouble determining why the ceiling outlet isn’t working, try turning on some switches within the house or in the garage. There is a strong probability that this will fix your garage door opener’s power issue.
Helpful Tip
It is not advised to repeatedly turn the garage door opener on and off using a switch because this could harm the receiver logic board in the operator. If the power is shut off too frequently, you will at the absolute least need to reprogram the travel restrictions on the garage door opener. This is increasingly typical with more recent garage door openers that have electronic restrictions on DC motors.
Capacitor Has Blown in Motor Head

Standard AC garage door openers have had capacitors inside the motor head for many years. The capacitor is a component that stores enough energy to start and run a copper wound AC motor. The device will still have electricity after the capacitor blows, but as it tries to start the motor, it will either click or hum.
Circuit Board Has Failed in Garage Door Opener

If you have exhausted all other options on this list and are still experiencing no power in your garage door opener, you may have a faulty circuit board. Given how expensive circuit boards may be, I would save this for last. Pressing and releasing the back-mounted learn button is a reliable approach to check whether your circuit board has failed. If the light does not turn on, your board most likely has to be replaced.
Problem – 4
Flashing Codes Errors and Troubleshooting
Error Code Interpretation Guide
Understanding the error codes that your linear garage door opener flashes can be a real lifesaver. These codes provide valuable information about what might be going wrong with your opener. By referencing an error code interpretation guide, you can quickly diagnose specific issues and take appropriate action.
Each error code signifies a different problem with your garage door opener. For example, if you see a red LED light flashing three times, it could indicate an issue with the safety sensors. On the other hand, if the light flashes twice, it might suggest a problem with the motor.
Using an error code interpretation guide will help you decipher these signals effectively. It’s like having a secret decoder ring for your garage door opener! Once you identify the error code, refer to the guide to understand what it means and how to fix it.
Addressing Error-Specific Solutions
Now that you know how to interpret the flashing lights on your linear garage door opener let’s dive into some common errors and their respective solutions.
- Motor Malfunctions: If your garage door opener’s LED light is flashing four times, there may be an issue with the motor. In this case, check for any obstructions or debris in the tracks that might be impeding its movement. Clear any blockages and try operating the door again.
- Sensor Misalignment: A flashing LED light five times suggests misaligned safety sensors. Ensure that both sensors are facing each other and aligned properly. Clean any dirt or debris on them as well. If necessary, adjust their positions until they are perfectly aligned.
- Faulty Wiring: When you notice six flashes of the LED light on your garage door opener, it indicates a wiring issue. Check all connections between components and ensure they are secure and free from damage or corrosion.
Remember to always follow step-by-step instructions tailored to each specific error scenario when addressing these issues. By doing so, you can troubleshoot and resolve problems efficiently, saving yourself time and money.
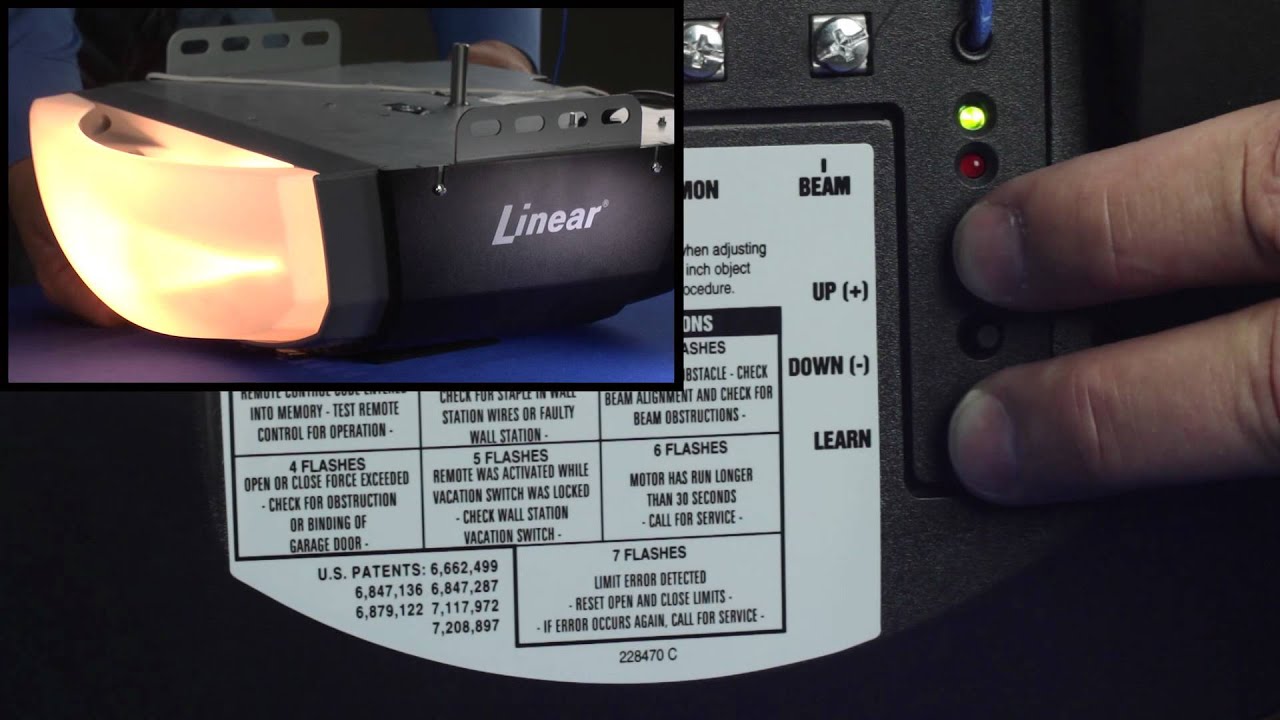
| Flash | Reason | Troubleshooting |
| Flash 1 | Device working Perfectly | No – Troubleshooting Against Flash 1 |
| Flash 2 | Wired Wall Station Issues | Inspect Damage and loose wire, Replacement requires sometimes. |
| Flash 3 | Safety Sensor Problem | Take a look at the sensor with the two LEDs. That is the sending sensor. Both the green and red LEDs should be on. |
| Flash 4 | Force Factor issues | call a garage door technician |
| Flash 5 | Vacation Switch Error | Simply unlock the vacation switch on the wall station. Problem solved. |
| Flash 6 | Mechanical or Electrical Failure | Call a Linear garage door opener expert in your area to come and fix it. |
| Flash 7 | Encoder Detected an Error | Contact a qualified garage door professional. |
Let’s Get Into Detail Of How To Fix Flash Error Codes?
Linear Garage Door Opener Troubleshooting 2 Flashes Wired Wall Station Issues
Flashes – 2
Checking for Connection Problems
To troubleshoot any issues with your linear garage door opener, it’s essential to identify potential connection problems between the opener and other components. Start by inspecting the wiring and ensuring proper connectivity. Loose connections or damaged cables can cause malfunctions, so make sure everything is securely connected.
Wall Station Button Functionality Test
Perform a functionality test on the wall station buttons of your linear garage door opener.
- Press each button and verify if they are working correctly and responding as expected. This test will help you determine if any of the buttons are malfunctioning and in need of repair or replacement.
- When checking for connection problems, take a close look at the wired wall station and surrounding wires. Ensure that all wires are properly connected to their respective terminals. If you notice any loose or disconnected wires, secure them tightly to ensure a reliable connection.
- In addition to checking the physical connections, inspect the condition of the wires themselves. Look for any signs of damage such as fraying or exposed wires. If you find any issues, replace the damaged wires promptly to prevent further complications.
Once you’ve addressed any potential connection problems, proceed with testing the functionality of the wall station buttons. Press each button individually and observe how they respond. The buttons should activate different functions such as opening, closing, or stopping the garage door.
If you encounter a button that doesn’t respond or behaves erratically, it may indicate a malfunctioning button. In such cases, consult your linear garage door opener’s manual for guidance on troubleshooting specific button malfunctions.
Depending on the severity of the issue, you may be able to fix a malfunctioning button by cleaning it thoroughly or adjusting its position within the wall station. However, if these attempts don’t resolve the problem, it’s advisable to contact a professional technician who specializes in linear garage door openers.
Remember that safety should always be your top priority when troubleshooting any garage door opener issues. Before attempting any repairs or maintenance, disconnect the power to the opener to avoid electrical hazards.
Linear Garage Door Opener Troubleshooting 3 Flashes Safety Sensor Problem
Flashes – 3
Cleaning and Aligning Sensors
To ensure optimal performance of your linear garage door opener, it’s important to regularly clean and align the safety sensors. These sensors play a crucial role in detecting obstacles and preventing accidents or damage to your vehicle or property. By removing any dirt or debris that may obstruct their functionality, you can maintain the smooth operation of your garage door.
- Regularly clean the safety sensors
- Regularly align the safety sensors
- Remove dirt and debris that may obstruct sensor functionality
- Ensure smooth operation of the garage door opener
- Prevent accidents and damage to vehicles or property
Testing Sensor Functionality
Testing the functionality of your safety sensors is an essential step in troubleshooting any issues with your linear garage door opener system. This will help verify if they are detecting obstructions properly and triggering appropriate responses.
- Close the garage door using the remote control or wall-mounted button.
- Wave an object (such as a broomstick) in front of one of the sensors without touching it.
- The sensor should detect the obstruction.
- The door should immediately reverse its direction.
By conducting regular tests on your linear garage door opener’s safety sensors, you can identify and troubleshoot any problems related to faulty sensor operation. This proactive approach will help ensure the safe and efficient operation of your garage door system.
Linear Garage Door Opener Troubleshooting 4 Flashes Force Factor issues
Flashes – 4
Your Linear garage door opener’s LED or light bulb flashing four times indicates that the opener’s force has been exceeded. You need to understand what a garage door opener’s force is and why it matters before we start the troubleshooting process.
The force needed to lift or lower a garage door under typical circumstances is referred to as the force of a garage door opener. The torsion spring lifts or lowers the door’s total weight, not your Linear garage door opener. The force of the opener only pushes or pulls it.
What results in a force that is too great? When the torsion spring is injured, the garage door tracks are damaged, and the door is out of balance, in that order. When any of these issues arise, lifting the door will demand too much energy from the opener, which could harm your opener. Thus, your Linear garage door opener will turn off in order to avoid this.
Use these troubleshooting instructions to resolve this issue. Before you carry out these actions, make sure your door is shut.
- Draw the safety cord down and in the direction of the garage door opener. By doing this, the garage door opener and door will be separated.
- Manually raise your door a little at a time, then look for any areas of resistance.
- Inspect the door tracks for any damage indications. The door may be binding or sticking as a result of that.
- If you are skilled with tools, you can solve the problem yourself, or you can hire a garage door repairman.
Follow these troubleshooting methods to see if your garage door is balanced.
- Draw the safety cord down and in the direction of the garage door opener. By doing this, the garage door opener and door will be separated.
- Manually raise the garage door about halfway.
- Leave the door now. It should not move up or down in that position for a balanced garage door. In the event that is not the case, your garage door is out of balance.
- Lift the garage door up until it is completely open. As you depart, the garage door ought should remain raised. That is not balanced if not.
In case your door is uneven, call a technician. If you are inexperienced, trying to balance your door on your own could result in serious injury. You might need to modify the force factor of your garage door opener after troubleshooting, provided that your garage door is in good condition.
How to Modify a Linear Garage Door Opener’s Force Factor
For these specific models, change the force factor as follows: the LDCO852, LDCO800, and LDCO850
- For three seconds, press and hold the Up and Down buttons on the back panel. The opener lights, red and green LEDs, and both will flash twice. It indicates that the opener is set to use Force Factor.
- If you want to change the force factor, press the up or down buttons.
- To save changes, click the Learn button. The lights will flash twice more to signal that the modifications have been stored.
- After adjusting, carry out the Safety Reversing Test. Put a brick underneath the garage door, blocking the door from opening.
- The door has two seconds to turn around after hitting the brick. If not, lower the Force Factor and carry out the test again until the door reverses.
For these specific models, change the force factor as follows: LS050, LC075, LD033, and LD050
Adjusting the Close Force
- Find the open and close force adjustment dials on your opener’s sides.
- Turn the Close Force Adjustment dial 1/8 turn at a time in a clockwise direction to raise the Close Force until the door closes completely without reversing.
- Turn the Close Force Adjustment dial 1/8 turn counterclockwise at a time until the door stops in the middle, then reverse while the door descends to reduce the Close Force.
- After adjusting, carry out the Safety Reversing Test. Put a brick underneath the garage door, blocking the door from opening.
- The door has two seconds to turn around after hitting the brick. If not, reduce the close force and carry out the test again until the door reverses.
Adjusting the Open Force
- Find the open and close force adjustment dials on your opener’s sides.
- Increase the Open Force by turning the Close Force Adjustment dial clockwise 1/8 turns at a time, until the door opens completely without pausing.
- Turn the Close Force Adjustment dial 1/8 turn counterclockwise at a time to reduce the Close Force until the door stops in the middle of its upward movement.
Notably, carrying out the Safety Reversing Test is an essential action. Failing to do so could cause a serious injury or, if the force is set too high, even death. Also, avoid using the Force Adjustment to fix a stuck or binding door.
Linear Garage Door Opener Troubleshooting 5 Flashes Vacation Switch Error
Flashes – 5
Deactivating Vacation Mode
If you’ve recently returned from a long trip or want to disable the energy-saving settings on your linear garage door opener, it’s important to know how to deactivate the vacation mode feature. By doing so, you can restore normal operation and regain control over your garage door opener’s functions.
To deactivate vacation mode on your linear garage door opener, follow these steps:
- Locate the vacation switch on your garage door opener. It is usually located near the wall-mounted control panel or on the motor unit itself.
- Flip the switch into the “Off” position.
- Wait for a few seconds to allow the system to reset.
- Test your garage door opener by pressing the buttons on your remote or using the wall-mounted control panel.
By deactivating vacation mode, you should be able to return your linear garage door opener to its regular functioning state and resume using it as usual.
Checking for Switch Faults
Switch faults can cause various issues with your linear garage door opener, such as unresponsive buttons or inconsistent signals. To ensure smooth operation of your garage door opener, it’s essential to identify and troubleshoot any potential switch faults.
Here are some steps you can take to check for switch faults:
- Inspect all switches used with your linear garage door opener, including wall-mounted control panels and remotes.
- Look for any signs of physical damage or wear on the switches.
- Ensure that all switches are securely connected and properly aligned.
- Replace any faulty switches with new ones if necessary.
By checking for switch faults and addressing them promptly, you can improve the overall performance of your linear garage door opener and avoid frustrating issues like unresponsive buttons or inconsistent signals.
Remember that troubleshooting requires patience and attention to detail. If you’re unsure about performing any of these steps yourself, it’s always a good idea to consult a professional for assistance. They can provide expert guidance and ensure that your linear garage door opener is functioning optimally.
Linear Garage Door Opener Troubleshooting 6 Flashes Mechanical or electrical failure
Flashes – 6
Identifying Mechanical Obstructions
If your garage door isn’t working right, check for stuff that might be in the way. Look at the door and see if there’s anything blocking it, like toys or leaves. Take out the things that are blocking it, so it can work better and not get broken.
Assessing Electrical Component Issues
Alongside mechanical obstructions, electrical component issues can also affect the performance of your linear garage door opener. To check for problems, first look for loose connections. Make sure all the wires are connected and not broken. If you see any frayed or broken wires, fix or change them.
Sometimes, the garage door opener can have a problem with its circuitry. You might see lights flickering or the power going on and off. When this happens, it can make the opener not work right and break a lot. If this happens, it’s a good idea to ask an electrician for help. They can find out what’s wrong and fix it fast.
By addressing both mechanical and electrical problems promptly, you can avoid further complications with your linear garage door opener. Regular maintenance checks can help prevent these issues from arising in the first place, ensuring smooth operation of your garage door.
Linear Garage Door Opener Troubleshooting 7 Flashes Encoder Found a Mistake
Flashes -7
Addressing Encoder Errors
If you’re experiencing issues with your linear garage door opener, specifically related to encoder errors, don’t fret! There are solutions available that can help you troubleshoot and resolve these problems. One common issue is incorrect position readings or misalignment of the encoder. To address this, you can try resetting the encoder using a simple step-by-step process.
Resetting the Encoder
To reset the encoder on your linear garage door opener, follow these instructions:
- Locate the “Learn” button on your garage door opener motor unit.
- Press and hold down the “Learn” button for approximately 6 seconds until the LED light on the motor unit starts blinking.
- Release the “Learn” button once the LED light begins to blink.
- Wait for about 30 seconds to allow the reset process to complete.
- Test your garage door opener by opening and closing it to see if the encoder error has been resolved.
By following these steps, you can reset the encoder and potentially fix any issues related to incorrect position readings or misalignment. Remember to consult your specific model’s manual for detailed instructions as some models may have slight variations in their reset procedures.

- When the red and green indicators as well as the light on the powerhead flashes twice then release the buttons and your garage door opener has been reset.

Note: All your four programmed settings and set limits will be erased after resetting, however the programmed transmitter setting will remain in memory.
Linear Garage Door Opener Manual
- Linear Garage Door Opener LDCO 841/863: Click Here
- Linear Ld050 Garage Door Opener Manual: Click Here
- Linear Ldco800 Garage Door Opener Manual: Click Here
About The Author
Hassan Zaka
I am an expert in accounting and possess diverse experience in technical writing. I have written for various industries on topics such as finance, business, and technology. My writing style is clear and simple, and I utilize infographics and diagrams to make my writing more engaging. I can be a valuable asset to any organization in need of technical writing services.
Follow Us:LinkedinTwitter


