Overview of Trane Smart Thermostat Manual – Complete Guide part 1
The article is a user manual for the Trane XL824 smart thermostat, outlining features (design, scheduling, voice control, energy optimization), network and Trane Home registration, Z-Wave device pairing, and detailed setup via the User Setup Wizard. It covers Wi‑Fi connection methods (standard, WPS, hidden), adding devices through the thermostat or mobile app, Home Screen views and customization, schedule creation/editing/grouping, and how to override schedules and hold temperature set points.
Quick Solutions to Questions related to Trane XL824 Programmable Comfort Control:
-
How do I connect the XL824 to Wi‑Fi?
Go to Home > Menu > Settings > Network > Connect to Wi‑Fi Network, select your network, enter the password, and select CONNECT. -
Can I add Z‑Wave devices from the thermostat?
Yes: From Home Screen select MENU > SMART HOME > ADD DEVICE, then set the Z‑Wave device into learn mode within four minutes. -
How do I register my thermostat with Trane Home?
Create or log into a Trane Home account via tranehome.com or the mobile app, select CONNECT NEW DEVICE, choose the thermostat model, get the PIN from the app, enter it on the XL824, accept the agreement, and select DONE. -
What steps are in the User Setup Wizard?
The wizard guides Screen Settings, Screen Layout, Schedule Settings, Guided Scheduling or 1‑Touch Presets, Network Setup, and Trane Home registration. -
How do I override a schedule temporarily?
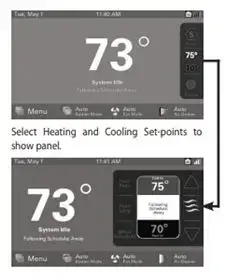
Press the indoor temperature area to open the Temperature Control Panel, adjust Cooling or Heating Set Points, then set Hold duration via the Status area; Holding Until will display on the Home Screen.
As the technology is developing day by day it is also making our daily lives more efficient, comfortable and convenient. The Trane smart thermostat which was once used just to maintain the indoor temperature of your homes is now integrating our modern life styles with its seamless features. Trane thermostat is not a device that just controls the indoor temperature but it understands unique pattern of your household, optimizes energy usage and reduces the carbon footprints. It has the features to schedule the temperature according to your requirement, has the facility of remote access through smart phone apps and also integrates your voice as command to control it. Therefore a complete Trane Smart Thermostat Manual guide for the user to get the info as quickly as possible from here.
Some of the important features of Trane thermostat are following.
- Sleek functional design
- Easy installation
- Mastering the interface
- Efficiency at fingertips
- Personalization and adaptation
- Voice integration
- Troubleshooting and maintenance
Note: Unable to choose a perfect Trane Thermostat: Don’t Worry! You can evaluate based upon your requirement and features.
To make sure that your thermostat is functionally perfectly a very important point is to understand how to use or install it. In this article we will give you deep insight in its settings and you will get to know how to set up your thermostat step by step.
Trane xl824 Programmable Comfort Control wi-fi Thermostat Manual
Network Setup
You can connect your Trane XL824 Control to a local network by several methods.
Option 1. Wi-Fi connection
Wi-Fi Step 1.
Navigate Home > Menu > Settings > Network > and then Connect to Wi-Fi Network. Now select your network.

Wi-Fi Step 2.
Then Enter your Password and select CONNECT.

Option 2. WPS for Wi-Fi connection
WPS Step 1.
Click on the WPS button on the router, Now return to your XL824 Control and then select the WI-FI PROTECTED SETUP button on the Wireless Network screen. Select NEXT.

Option 3. Hidden Wi-Fi network connection
Hidden Wi-Fi Step 1.
Select the Hidden Network which is present at the end of the list of all available networks. In case there are more than eight networks, scroll to the next page.

Hidden WiFi Step 2.
Now enter the name of your network that you would like to connect and select Next.

Hidden WiFi Step 3.
Select the security type for this network. If you select None, select Connect.

Hidden WiFi Step 4.
You will have to enter a Password to connect to network if you select WPA or WEP network.

Trane Home Registration:
To control your home climate system from your web enabled smartphone, tablet or computer follow these steps.
Trane Home Registration
Step 1.
Go to the website www.tranehome.com or you can use your mobile app to setup a Trane Home account. You can download the Trane Home mobile app from the Google Play™ Store or App Store®, then install the app. In case you already have an account just log in and simply go to Step 3.
Step 2.
Now press SIGN UP NOW to make an account or log in to existing account if you already have one.

Step 3.
From the mobile app Dashboard select the Menu icon and then select CONNECT NEW DEVICE.

Step 4.
After logging into your account Select the Trane ® or American Standard® smart thermostat: 824, 850, or 1050 model.

Step 5.
Select CONTINUE.

Step 6.
Then your mobile phone app will generate a PIN code. Record the PIN code.

Step 7.
Return to the XL824 control and select NEXT.

Step 8.
Enter the PIN code and select NEXT.

Step 9.
ACCEPT or DECLINE the agreement after reading it carefully.

Step 10.
Registration is successful. Select DONE.

Adding Z-Wave Devices
To Add or Remove Z-Wave Devices select: Home Screen > Menu > Smart Home Your XL824 is designed to integrate seamlessly with your Trane Home account.
Adding Z-Wave Devices
- From the HOME Screen, select MENU, then select SMART HOME.
- Then Select ADD DEVICE and follow the manual instructions carefully for setting the Z-Wave device into the learning mode. You will have to set the device within 4 minutes into learn mode once you select the ADD DEVICE button.

Advanced Z-Wave Settings
for advanced Z-Wave functions such as unregistering the bridge from Trane Home or factory resetting your bridge Select ADVANCED. For more information see the Advanced Z-Wave Settings section.
Adding Z-Wave Devices (via mobile app)
Alternatively, your XL824 allows you to add Z-Wave devices using the Trane Home app on your mobile device.
Adding Z-Wave Devices
- Start the mobile app.
- Select the menu button in the top left corner.
- Select Connect New Device At the bottom of this slide out menu.
")
4. Select Z-Wave Device.

5. When prompted, prepare the device to be added to the Z-Wave network by following the device manufacturer’s instructions to put device into add mode. You will have to complete this process in four minutes.

Trane 824 Thermostat user Manual
Here is a complete guide for the XL824’s user configurable setting of Wizard Setup.
To complete this Setup, connect your XL824 to Trane Home, all you need is:
- A high-speed and stable connection of Internet (wired or wireless)
- Name and password of your wireless (Wi-Fi) network.
- An internet browser
- A registered and valid e-mail address to access the User wizard Setup, now select MENU > SETTINGS > USER SETUP WIZARD. Once the whole Setup Wizard is activated, the process cannot be cancelled and this Wizard will guide you through all the following steps:
Screen Settings
- Adjust the Screen settings such as backlight, brightness, screen saver and color themes.
Screen Layout
- Select up to two widgets for the display of home screen.
Schedule Settings
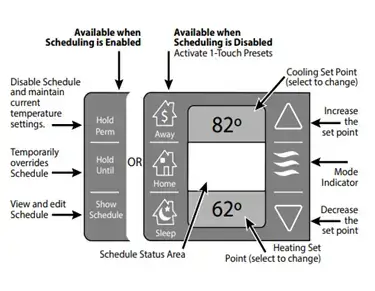
- Set the scheduling feature to either be enabled or disabled. 1-Touch Presets are available when Scheduling is disabled.
Guided Scheduling (Scheduling Enabled)
- You can create schedules automatically based on answers to a series of questions. 1-Touch Presets (Scheduling Disabled)
- Configure the heating and cooling target temperatures for your Home, Away and Sleep. You can select preset from the Home Screen.
Network Setup
- Select the wireless network then enter your password. If wireless network is available but is not visible in the list, select Hidden Network, and enter your network’s name manually (SSID).
NOTE: If you are facing difficulty in enrolling the XL824 to your account, visit the troubleshooting section at www.tranehome.com for help.
Trane Home registration (requires Internet connection)
- Your XL824 control comes with remote access and a lot of other features from Trane Home. Weather (requires Trane Home registration)
- For appropriate weather information i.e., five-day forecasts, radar display and weather alerts
enter the Zip Code of the location,
That’s it! Now you can start enjoying the benefits of your new Trane XL824 Smart Control.
NOTE: While the XL824 is hard-wired to home network, Wireless Setup is not required.
Navigating the Control Home Screen – Simple View

Home Screen View
Homeowners may toggle between Home Screen Options Home Screen View by selecting: Home Screen > Menu > Settings > Screen > Home View Options. Select Simple View or Classic View

Home Screen – Classic View
Home Screen can be customized with several widgets.

Temperature Control Panel
You can set and adjust your desired temperature on the control panel. This control panel is displayed only on Classic View Home Screen.
Home Screen – Simple View

Home Screen Customization
Homeowners may customize the Home Screen by Home Screen Customization selecting: Menu > Settings > Screen > Screen Layout
Select up to two apps to show on the Home Screen. Make the desired selection and select Apply

Menu Screen
You can Navigate to Menu Screen by selecting: Home Screen > Menu

Settings Screen
Navigation to Set your Screen can be done by selecting: Home Screen > Menu > Settings

Schedule Screen
Navigate the Scheduling Screen by this step: Home Screen > Menu > Schedules & Presets > Custom Schedule

Grouping Screen
Grouping Screen can be Navigated by selecting: Home Screen > Menu > Schedules & Presets > Custom Schedule > Grouping

Use the same set points to select Grouping for multiple days.
Now select the days that you want to group or remove from the group.
Select Apply.
The previous Scheduling screen will appear. Now whenever a set point or period start or stop time will be changed for the entire group of days to the new set point and period of time.
Changing Periods
Changing Period Start or End Times
- To make the period active select anywhere in the it. All the other Periods will dim. The Start and End times for selected Period will appear in a black box.
- Select either the TIME START or TIME END to adjust the time by using the UP and DOWN arrows. These periods should be of 30 minutes at least.
Changing Period Set Points
- first of all select the currently used Period’s Cooling and Heating Set Points.
- Adjust these Set Points by using UP and DOWN arrows.
Changing the Period Name
- Select the PERIOD NAME (Wake, Away, etc.).
- Select the already defined name or you can select NEW and select NEXT.
- If you are choosing a new name, you can enter the name using on-screen keyboard.
- Select NEXT
To change the Periods, select these options: Home Screen > Menu > Schedules & Presets > Custom Schedule > Select Schedule Time
When all the modifications are done, select APPLY to safely save and exit, or select CANCEL if you want to discard the changes that were made in this Schedule.

Adding Periods
To Add Period, navigate by selecting: Home Screen > Menu > Schedules & Presets > Custom Schedule > Add Period
- First select ADD PERIOD, the Add Period Screen will be displayed.
- Now select the green circle and you can insert a Period there.
- Select a name for this new Period or select New to customize name and select NEXT.
- In case you are selecting a new name, you can enter the name by using on-screen keyboard.
- Select NEXT.
- You can add additional periods up to 4 a day.
- Now select APPLY and save your changes then return to the Schedule Screen. The new period will be displayed.

Deleting Periods
You can delete Periods that you do not want by selecting: Home Screen > Menu > Schedules & Presets > Custom Schedule > Delete Period
- Select DELETE PERIOD From the Schedule Screen, the Delete Periods Screen will be displayed.
- Select the TRASH BIN icon in the Period or periods that you want to delete.
- To save your changes Select APPLY and return to your Schedule Screen. The changes will be visible in the display.

Overriding Schedules
NOTE: These functions require Scheduling to be enabled. To enable Scheduling, go to HOME > MENU > SCHEDULES & PRESETS > USE SCHEDULES ON.
Hold Until follow these steps to override a schedule until a specified time.
- Press in the INDOOR TEMPERATURE area to reveal the Temperature Control Panel.
- To change the Cooling Set Point, select the blue COOLING SET POINT. Then the Mode Indicator will show blue wavy lines. Adjust the Set Point to the desired temperature by Using the UP and DOWN Arrows.
- Select the red HEATING SET POINT To change the Heating Set Point and the Mode indicator will show red wavy lines. You can adjust the Set Point to the desired temperature by using the UP and DOWN Arrows.
- if you want to change the duration of Hold, click in the STATUS AREA and the day will appear in bold.
- While cancelling the Hold select the day by using the UP and DOWN arrows.
- To toggle to the Time setting click in the STATUS AREA again and the Time will appear in bold.
- To select the time of cancellation of Hold, use the UP and DOWN arrows.
- Now click in the INDOOR TEMPERATURE area to return to Home Screen and the words “Holding Until” will appear under the selected Indoor Temperature.
Read more: Trane Smart Thermostat Manual – Complete Guide part 2
About The Author
Hassan Zaka
I am an expert in accounting and possess diverse experience in technical writing. I have written for various industries on topics such as finance, business, and technology. My writing style is clear and simple, and I utilize infographics and diagrams to make my writing more engaging. I can be a valuable asset to any organization in need of technical writing services.
Follow Us:LinkedinTwitter


