I’ve had the Nest Thermostat for a few months. After a hard day at work, all I want to do is return home to a well-cooled house.
This device serves the job while saving me money by not allowing the HVAC system to run while no one is at home.
My Nest Thermostat, on the other hand, stopped working last week. Because I had no idea what was wrong, I spent many hours searching the internet for various answers.
You may resolve the Nest Thermostat not cooling problem by examining the circuit breaker and replacing the fuse if it is broken. You might also try restarting or resetting the Nest Thermostat.
In reality, just a few of the blogs and forums had useful information that you and I could apply to diagnose the problem.
As a result, I’ve provided a few solutions that could work for you.
However, your HVAC system should be inspected for coolant leaks and worn-out air filters.
Note: Sometimes users get confused between a not cooling problem and a delayed issue, both required different procedures to fix this. Therefore don’t mix it with it.
More information is provided below. Before we get there, here’s the first critical action I need you to take.
Here are the Solutions for Nest Thermostat Not Cooling
Installation of Wires
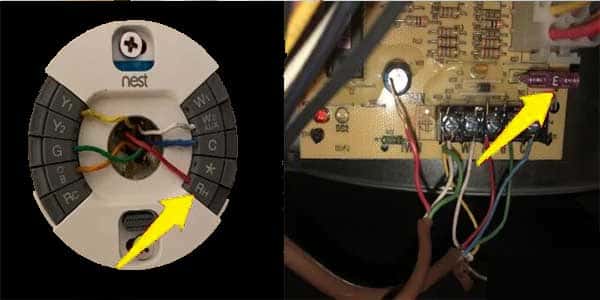
Smart devices are useless if the wiring is incorrect. So, if your Nest Thermostat isn’t cooling your room, it’s possible that the cables aren’t correctly fitted.
To begin, turn off the system power through the switch or fuse to ensure the safety of both you and the thermostat.
Then, remove the display and inspect the wiring connections.
Determine if the voltage is high or low. If your equipment is powered by high-voltage electricity, you’ll see two to four large wires of the same color.
Multiple wires of various colors, typically narrow in size, are used in low-voltage systems.
After you’ve located the wires, you may proceed to the next rewiring step.
If your thermostat needs a C wire, check those connections as well. This can help with fixing your Nest thermostat if it shows a low battery message as well.
Nest Thermostat Rewiring
Examine the wires carefully before proceeding with this step. There should be no obvious rust or damage.
If you live in a home with older thermostat wiring, you might reconsider testing compatibility.
To do this, run Google’s compatibility tool to get the correct wiring diagram for your system.
- Unplug the cables one at a time and carefully put them back into place.
- Examine the wire movement to ensure that the wires are correctly installed.
- Once placed, the wires should remain in place with no movement.
For most individuals, rewiring addresses the temperature control issue.
However, if you were not successful with this step, here are some further solutions to return your device back to normal.
Inspect Circuit Breaker
Checking your circuit breaker box for a tripped breaker is one easy thing you may do if you’re still having problems with cooling.
- Simply check for any switches that are in the off position to complete this task.
- Once it has been located, turn the breaker on, then off, and then back on.
This will reset the breaker and could resolve your problem.
I personally used this technique, and it was successful for me in a matter of seconds.
Inspect RH Wiring Issue
Your HVAC fuse, drainage pipe, or air filter is likely to be the source of this issue if your Nest Thermostat displays the error number E73 or “No Power To Wire” on its display.
You should turn off the Nest Thermostat for a short examination before moving on to the fix.
Examine the red wire more closely by taking the thermostat panel out of the wall.
It has to be attached to either the RC or RH port.
If that doesn’t solve your issue then try connecting the red wire to the RC port instead and see if that does the trick.
Note: Sometimes the cooling works but for a short period of time, and then shuts off. if that’s the case you have to follow this topic to fix it… Nest Thermostat Short Cycling Ac
Blown Fuse inside Air Handler
A blown fuse within your air handler is an additional, less frequent cause of your Nest conditioning system not functioning.
It can be challenging to access this fuse, and taking off the air handler cover may need several screws.
You’ll discover a circuit with a number of fuses once you’re inside.
Fuses are rather inexpensive, so you may simply replace them all if you’re unsure which one has blown.
Make sure the filters are not clogged,
Your HVAC system’s return air duct is normally where the air filters are positioned. The air filter in the air handling unit should also be checked out.
To make your task much easier if this is your first time changing the air filters, you may contact an HVAC specialist.
Analyze for Coolant Leaks
For your home to cool effectively, optimal coolant levels are needed. Any pipe leaks might cause the coolant to slowly drain away, preventing your HVAC system from cooling the room even after several hours of operation.
To identify any coolant leaks, you must examine the HVAC system.
Less or no cooling will occur from a coolant leak. You might ask a specialist to assist you to identify any leaks because this stage takes a lot of time.
Other Fixes you can do to fix the Nest thermostat not cooling.
Remove Auto Scheduling
Although the auto-scheduling tools may seem fantastic, they rarely function. To prevent issues with the cooling state, you must give up these functions. Simply log into the smart device and eliminate any configurations that could conflict with the temperature settings.
After that, manually lower the thermostat before letting the HVAC system take over. The HVAC will start cooling if the electrical issues are fixed. If the space is tiny, you’ll notice a reduction in temperature right away.
Check the cooling configuration.
This might potentially be due to the cooling setup. It’s possible that you increased the cooling mode’s temperature. The Nest device won’t lower your room’s temperature, even in cooling mode.
In this case, all you need to do is tweak the cooling setup and double-check that the temperature settings are right. If the room is not becoming any cooler, there is no purpose in continuing with the same setups.
To test the HVAC system’s responsiveness, you can further change the cooling mode to the lowest level. The Nest thermostat cooling will ideally solve the issue straight away.
Check for Updates
Simply put, you could be missing certain updates. If you want to prevent these small programming errors, it is recommended to keep your Nest firmware updated. Therefore, there is no use in delaying these updates if you haven’t updated yet.
All you need to do is go to the home screen and hit the settings button. Simply choose the version update features from there for the device to begin looking for potential upgrades. You will be given a list of potential changes after the search, which might take a few minutes.
Once you’ve selected the most recent update, be sure to begin its download and then allow the update to install. You may then try out the cleaning mode once again after refreshing all configurations.
Restart the System
Even while it is doubtful that this can fix a problem as serious as your Nest thermostat not cooling, it is still worthwhile to reset your thermostat.
Here are the steps to restart your Nest Thermostat:
- Open the Nest app on your IOS or Android mobile.
- Click on
- Now select
As soon as the thermostat has finished restarting, try setting it to cool.
Reset Nest Thermostat
The easiest solution at this time is to reset the thermostat. There is no need in wasting additional time trying to figure out the programming problem. Just do the reset procedure to return everything to its settings.
To go through with a reset, first, remove the thermostat from your account, then:
- Press the thermostat ring to open the menu.
- Go to Settings > Choose All Settings.
- Your device will reboot with the factory default settings
Contact Nest support
If nothing else resolves the problem, getting in touch with Nest support would be the best course of action. However, it could take some time for them to respond and attempt to resolve your issue remotely. If it doesn’t resolve your problem, a specialist will be dispatched to your house to do so as soon as feasible.
Conclusion
According to several reviews and discussions regarding the Nest thermostat, most issues with their products have been resolved or replaced.
The device is the most recommended one by far as per users’ statistics due to its functionality of saving energy feature is the most efficient among other rivals and comes with a two-year guarantee.
Additionally, the nest has the fewest issues compared to other top thermostats, with the exception of the problem that happened most frequently when the nest stopped working after an update.
You might want to see this:
- Nest Camera Troubleshooting
- How to Fix Google Nest Mini Not Connecting To Wi-Fi
- Nest Hello Not Connecting To Wi-Fi
- 2022’s Best Affordable Smart Thermostats
Frequently Asked Questions:
Why does my Nest Thermostat keep going into eco mode?
Due to sensor issues or obsolete programming, your Nest Thermostat may repeatedly enter the Eco mode.
Why is My Nest Blowing Hot Air Instead Of Cold?
Try turning your Nest thermostat in a different direction if it is blowing warm air rather than chilly air. Your heat pump may operate in the heater mode since it doubles as an air conditioner.
How Do I Override My Nest Thermostat?
By choosing the factory reset option on your Nest Thermostat device, you can override the Nest Thermostat.
Home Automation >> Brands >> Google >> Why My Nest Thermostat Not Cooling – How to fix it?

