A few years ago, I became a dog owner for the first time. I didn’t like leaving Cody in the kennel alone all day. I had a webcam on him, but I couldn’t watch it all day long. What if he was in some kind of distress? What if there was an emergency at the house, like a fire?
I wanted some way of getting an immediate email notification when he barks, or when something bad happens. So reading lead to tinkering, and tinkering eventually lead to making this full blown home automation system based on open source hardware (Arduino) and open source software (OpenHAB). I know I know, yet another “Arduino Home Automation” project, right? But I promise I’m not going to turn on a light from a smart phone. I’m more focused on extensive networked sensors, timely alerts, and aesthetically appealing presentation of events.
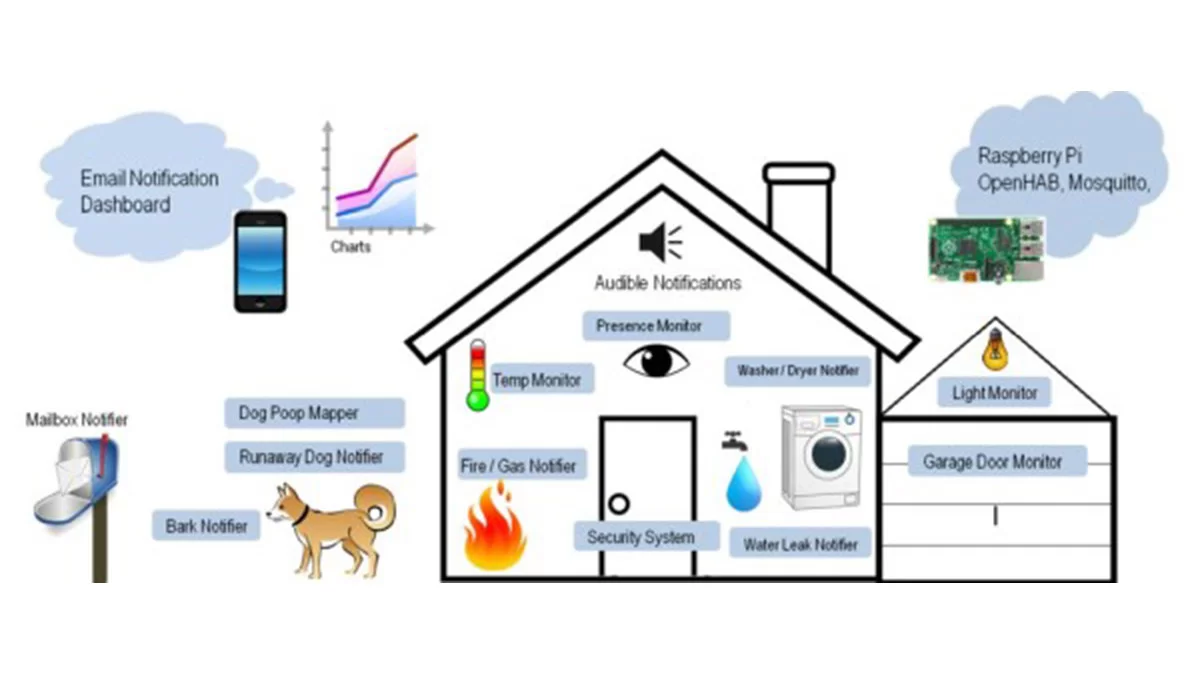
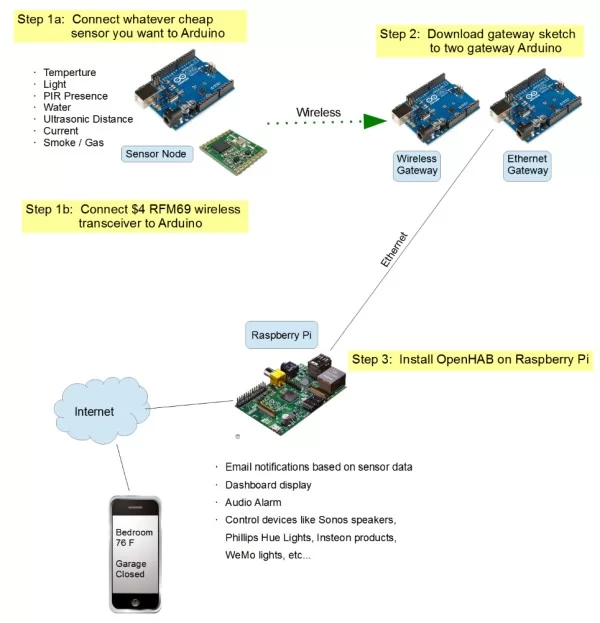
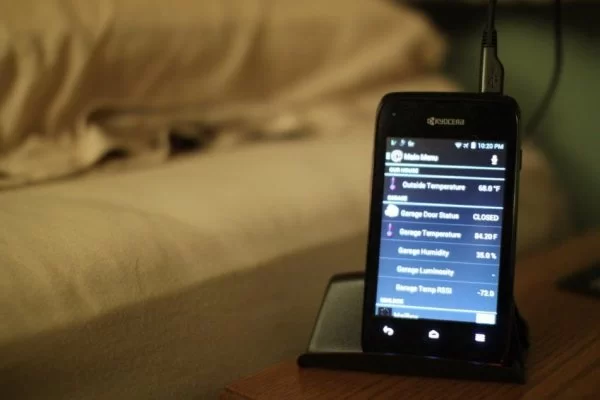
Here’s the basic idea. With Arduino, it’s really easy to connect boatloads of cheap sensors. Using this setup, that boatload of cheap sensors can now be on the internets. They can email you when things get too hot, too cold, too smokie, too gassy, or too bright. And your dog can email you by barking. You can also view the status of sensors on your smart phone. These sensor nodes are wireless, so you’re not constrained by the location of ethernet ports.
Here’s how it’s put together.
This Instructable will be a tutorial for how to build a variety of long range wireless sensors, and how to integrate these sensors into a sophisticated open source home automation server. Aside from looking at a mobile app to see what’s happening, you’ll also receive timely email and audio notifications. This is a long Instructable, but you can jump to the sensor you’re interested in building.
These elements are the focus of the design:
- Low Cost. Each sensor node costs less than $20 to make, so you can inexpensively scale up.
- Flexibility. Arduino based nodes allow anyone to extend the system to their particular sensing needs. You’re not tied to only the examples I’m providing, even though I strive to provide many examples.
- Very good reliability, up-time, and wireless sensor range.
- I’m providing both a battery powered and wall-power sensor node design
So, here’s the list of sensors in this Instructable. I want to provide a home with the full range of human senses. Your home should be smart and sensitive.
Dog Bark (Any Loud Noise) Sensor
Get email notifications of loud noise. I use it to get an email if my dog barks in the kennel, so that I can open up my kennel webcam and see why he barked. There is also a counter to try to quantify how much he has been barking.
Washer-Dryer Sensor
Get an audio reminder when washer/dryer cycle completes – something like a “Washer Complete” announcement in the living room. No more forgetting laundry in the washer or wondering if it’s done yet. Use the smartphone app to check if the cycle is complete or if the load has been picked up.
Light Sensor
Detect whether the light got left on or not. Displays the status of light on the smartphone app.
Area Intrusion Monitor
A PIR sensor monitors a room and sets off audio alarm/email notification when it senses a moving body.
Dog Tracker
Get notified if your dog runs away, track he’s GPS location on google maps, and also map where he poops.
Gas/Fire/Smoke Sensor
Although this should not be the primary fire alarm, it can be used to send an email notification to you when the sensor senses smoke, fire, or LP gas commonly used in gas-powered stoves.
Temperature / Humidity Sensor
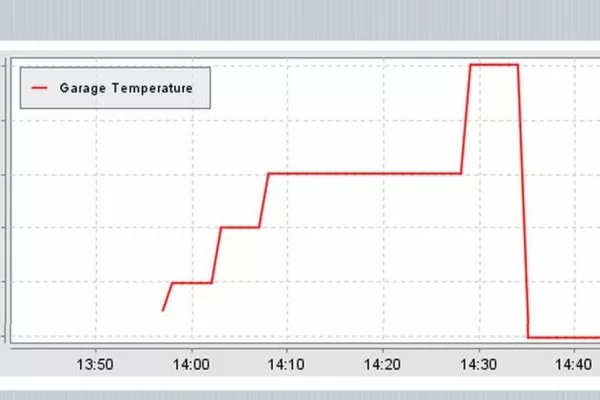
Temperature and humidity is reported to the mobile app. Optionally, you can enable email notifications when temperature dips below/above some preset value. Helpful for detecting furnace or air conditioner failures. You can also view a historical chart of temperature data using OpenHAB.
Water Leak Sensor
Get an email notification and audio alarm when a water leak is detected.
Just kidding, I got nothing for taste. I just like that picture. A couple more sensors that don’t fit in neat categories.
Security – Door / Window / Drawer / Mailbox sensor
A battery powered reed-switch sensor that can set off an audible alarm, or send an email notification to your smart phone. Can be used to monitor doors, windows, mailboxes, or drawers. It also logs the time the event happened, as well as the remaining battery capacity on the sensor.
Garage Door Monitor
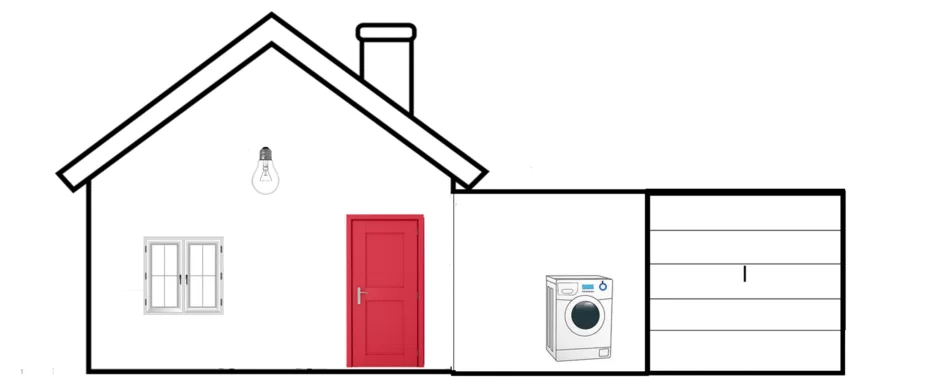
This is handy if you can’t see your garage door from the house. Use a smart phone to check whether your garage door is opened or closed. You can also set it to play an audio reminder at, say 10PM, if the garage door is still opened.
With these sensors, everything from your dog to your washer & dryer can be part of the Internet of Things in a practical and useful way.
If there is any other home sensing thing you’d like an example of, add a comment and I’ll try to get a sensor for it or use an existing sensor to fill the need. I’m trying to make a collection of sensors for most situations. It’s only in the aggregate that this system makes sense – a bunch of one-off sensors don’t really create a coherent home automation project.
Thanks for visiting my Instructable!
- Intro
- 1. Basics
- 2. Parts List & Prep
- 3. Gateway Setup & OpenHAB Install
- 4. Garage Door Monitor
- 5. Reed Switch Sensor for Mailbox & Security
- 6. Uber Sensor – General Build
- 7. Uber Sensor – Presence Detection
- 8. Uber Sensor – Dog Bark / Noise Sensor
- 9. Uber Sensor – Light Sensor
- 10. Uber Sensor – Temperature & Humidity
- 11. Uber Sensor – Flame Sensor
- 12. Uber Sensor – Smoke & Gas Sensor
- 13. Laundry Room Sensor
- 14. Charts
- 15. Dog Tracker
- 16. Uber or Not?
- 17. What is Home Automation?
- 18. Conclusion
Step 1: Usage & Explanation
I’ll start off with some videos explaining how this system works and how it can be used. If this is still interesting, the rest of the steps detail how to build it. You’ll see these videos repeated on the steps for the individual sensors. The home automation and “IoT” space is so fragmented right now that there’s a lot of cynicism about whether or not the smart home can work or is actually useful. Besides showing you how the system works, the videos help lend some credibility to the project.
1. Detailed Video Explanation
5. Security – Wireless Door Sensor or Mailbox Sensor
There are a lot of “Arduino Home Automation” projects out there. My project is unique for the following reasons:
- Cheap – each sensor node is less than $20, including the wireless transceiver.
- Flexible – I’m providing the design for wall-powered sensors as well as energy efficient battery powered sensors that can run for a year on 4xAA batteries.
- Best wireless solution – the RFM69HW in this project is energy efficient and has great range. Many other wireless solutions make compromises. Bluetooth is energy efficient, but poor range. Wifi has ok range, but can’t be battery powered for a year.
- Attractive and secure user interface – the OpenHAB UI is available as a mobile app (Android and iPhone), but is also accessible through any web browser. And the communication between the display device and the Raspberry Pi is done using encryption and authentication. So your home automation system stays private. It’s also pretty easy to use considering the sophistication and features.
- Controls commercial products: If you happen to have Sonos speakers, Insteon lights/plugs, or z-wave at home, you can use OpenHAB to control those devices too. OpenHAB isn’t just for this Arduino project.
- Allows you to integrate any sensor to your automation needs. Commercial home automation system might not provide the niche sensing “thing” for which you have a need, maybe because your needs are unique.
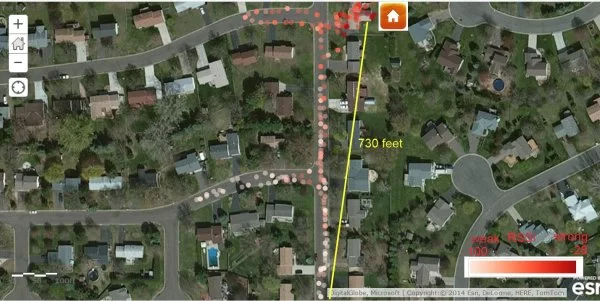
The heat map below shows the range of the RFM69HW wireless transceiver used in this project. I produced the map using a GPS module connected to an Arduino with a RFM69HW transmitting the coordinate. I walked around outside with this GPS Arduino while another Arduino sitting inside my house received the GPS coordinate every few seconds. I then mapped the GPS points. I’m able to send data 7 houses away, through many walls. Zigbee, bluetooth, Z-wave, and wifi can’t do this for just $4. The 915MHz frequency used by the RFM69 has better range and wall penetration than 2.4GHz wireless modules. This is one of the reasons I’m using it instead of the nRF24L01+ transceiver that is popular in the Arduino community.
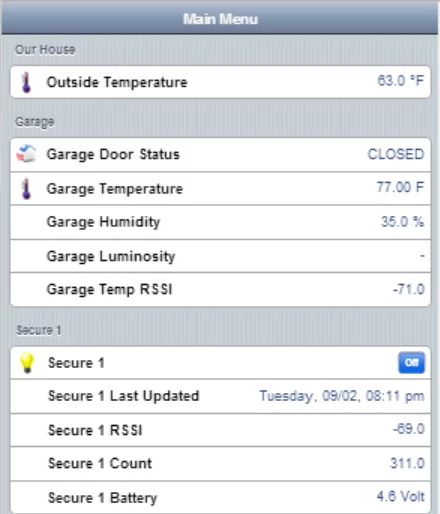
This is an example page from the OpenHAB user interface.
This project doesn’t require hugely expensive equipment. The technical challenges are surmountable. And the results are pretty cool.
Step 2: Parts List and Initial Prep
Parts List
I’ll try to point you to the cheapest versions of the components I used, so most of these links will be to good old ebay.
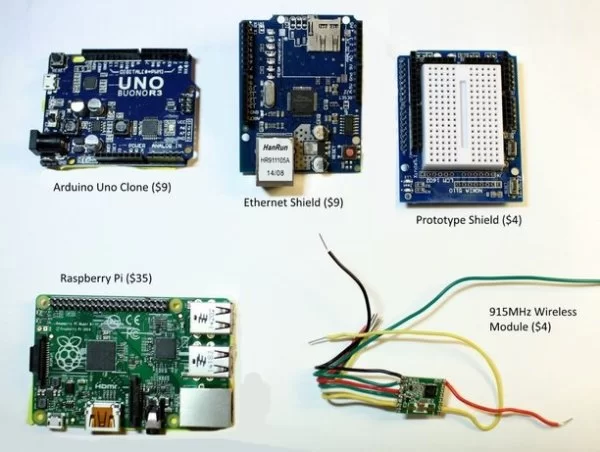
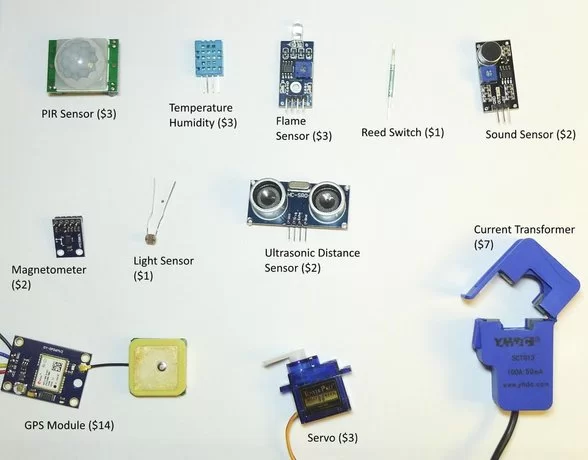
- [3 x] Arduino Clone with 3.3V option. $9
- [1 x] Arduino W5100 ethernet shield. $9…shop around on this one.
- [1 x] Raspberry Pi OR your own PC
- [2 x] 10k Ohm resistors
- [1 x] Prototype Shield for as many sensor nodes as you want to build [$4]
- [2 x] RFM69HW wireless transceiver [$4]
- DH11 Temperature sensor [3]
- Ultrasonic distance sensor [$2]
- Reed switch [$1]
- PIR presence sensor [$3]
- Flame sensor [$3]
- Sound sensor [$2]
- MQ2 gas/smoke sensor [$2]
- Photo resistor [$2]
- GPS module [$14]
- current transformer [$7]
- Magnetometer [$2]
- Servo motor [$3]
- Male-Female Dupont cables [$4]
- 22 gauge hook-up wire
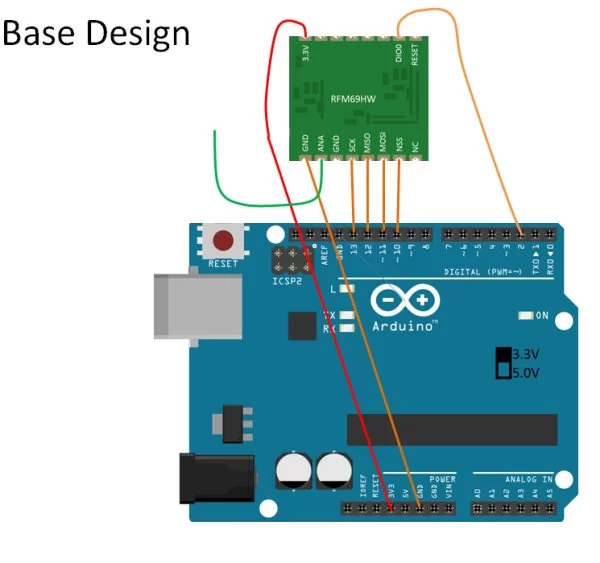
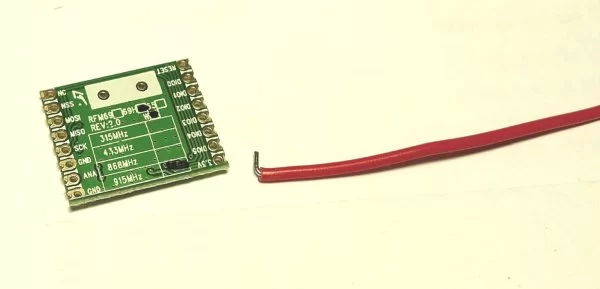
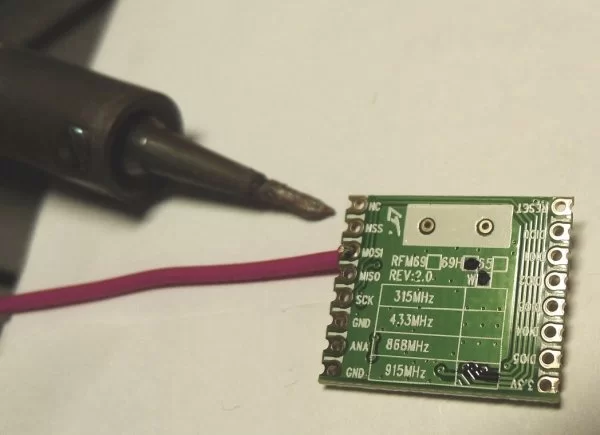
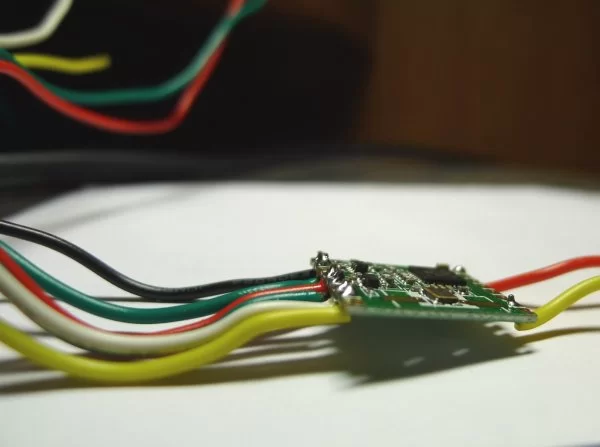
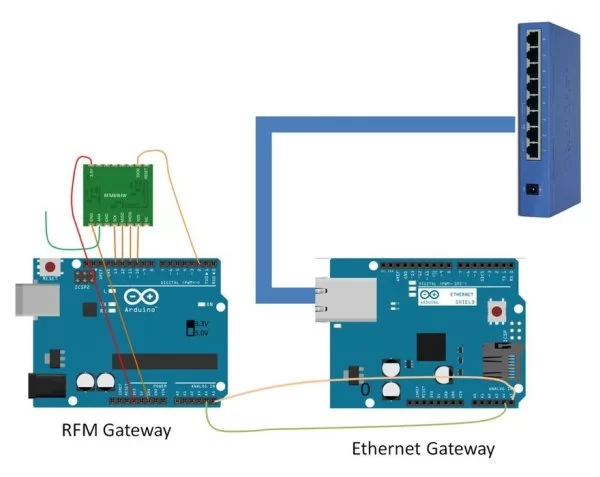
Once you get the parts, you’re pretty much ready to start building. The only mandatory soldering step is for the RFM69HW transceiver. They arrive as a bare chip, and require that you solder 22-gauge hookup wire to the pads. Follow this wiring diagram to solder wires to the RFM69HW and you should get something that looks like the following series of pictures.
Step 3: Create Arduino Gateway and OpenHAB
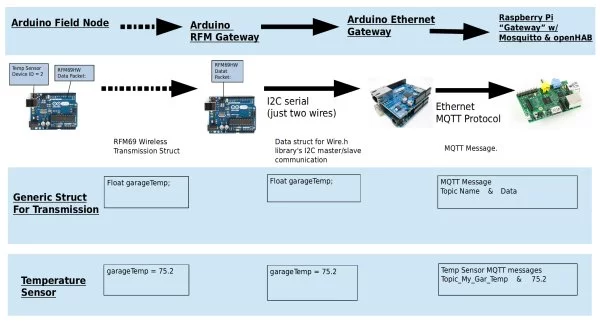
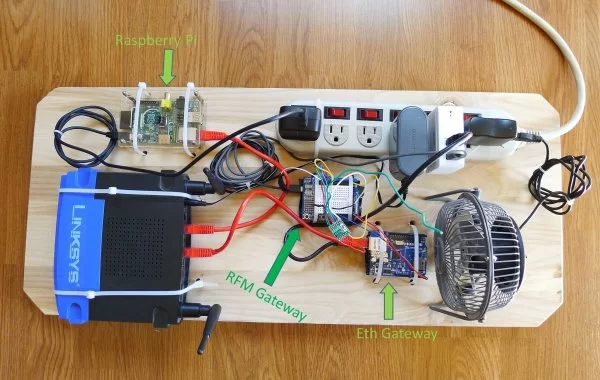
Once you have at least two RFM69 chips soldered with wires, we need to make the wireless gateway and setup the Raspberry Pi with OpenHAB. It’s basically two Arduinos connected together using I2C. See the wiring diagram above and the instructions below. The communications path looks like this.
The wireless data is sent from the sensor node to the RFM gateway in the form of a struct. The struct data is then passed from the RFM gateway to the ethernet gateway using I2C (those two pairs of wires on pins A4 & A5). The ethernet gateway takes each individual piece of data from the structure and post it to the MQTT broker. The MQTT broker (Mosquitto) on the Raspberry Pi picks up this sensor data, and sends it to the OpenHAB program also sitting on the same Raspberry Pi
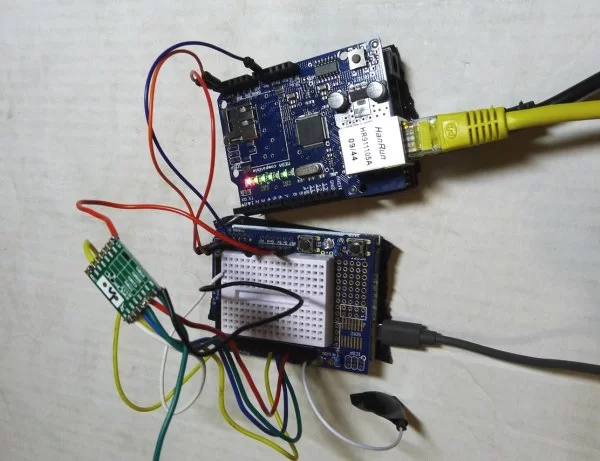
Here’s what the gateway looks like when you’ve got 22 gauge hookup wires connecting the two Arduinos. You can see the RFM Gateway Arduino on the bottom. It has the wireless transceiver mounted on it. On the top is the Ethernet Gateway with the ethernet cable connected.
Create Arduino Gateways
Components Needed:
- Two Arduino Uno Clones with 3.3V/5V switch set to 3.3V.
- One Wiznet 5100 ethernet shield
- One RFM69HW w/ wires soldered on
One Arduino will be designated the “RFM Gateway” and the other is the “Ethernet Gateway”. On the RFM Gateway Arduino, wire up the RFM69HW like you see in the wiring diagram at the top of this step.
RFM69HW To Arduino
- NSS to Pin 10
- MOSI to Pin 11
- MISO to Pin 12
- SCK to Pin 13
- GND to Ground
- 3.3V to the 3.3V header
- DI00 to Pin 2 (interrupt)
Plug the ethernet shield on the “Ethernet Gateway”. Hook together these two gateway Arduinos for I2C using male-male dupont cables, or just hookup wire if you have some around:
- Ground to Ground
- Analog Pin 4 to Analog Pin 4
- Analog Pin 5 to Analog Pin 5
Download the two gateway Arduino sketches above.
Prepare The Host Computer
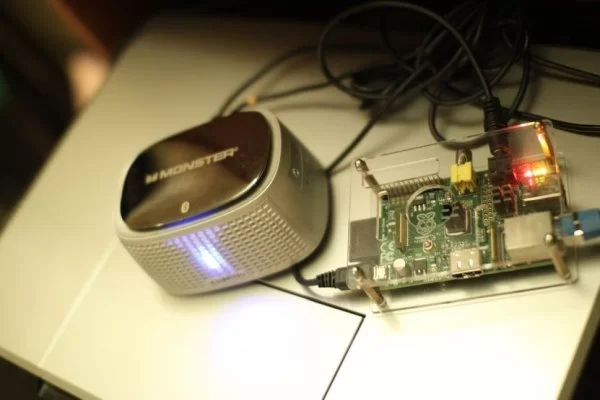
Next, we need to install OpenHAB on the host computer. The host computer in my case is a Raspberry Pi. It’s nice to use the Pi or similar single board computer because of the low power consumption. But if you’d rather use a Windows or Apple computer, that’s fine too. OpenHAB works on all of those machines.
Follow the wiki article on the OpenHAB site to install it on a Raspberry Pi or PC/Mac.
https://github.com/openhab/openhab/wiki/Quick-Setup-an-openHAB-Server
And the final thing we need on the host computer is to install the MQTT broker called “Mosquitto”. If using Raspberry Pi running Raspbian, use apt-get like this:
sudo apt-get install mosquitto mosquitto-clients python-mosquitto
If you’re not using a Raspberry Pi as the server, download the Mosquitto install for a Windows or Mac. It’s very easy to say in a tutorial “install this”. But let’s face it, for new Linux users, there will be problems that aren’t covered in the tutorials. Just being honest here. Things like permissions (sudo), start up issues (chmod on the init.d file), or just transferring files to the Raspberry Pi (“mount” USB drive). Just don’t expect to be able to finish the installation quickly if you’re new to Linux, and be prepare to google. Feel free to ask questions in the comments, I know how frustrating Linux can be. If all else fails, there’s always the option of using the Windows version of OpenHAB and Mosquitto. The great thing about OpenHAB is that the operating system doesn’t matter – you can start on Windows and move to Linux at a later date and all the configuration files can just be moved over and it’ll work.
Once you’ve gotten this far, you can move on to creating the individual sensors. Each of the next steps of the tutorial covers a single sensor, so you can jump around to the sensor you want to build.
Step 4: Garage Door Monitor
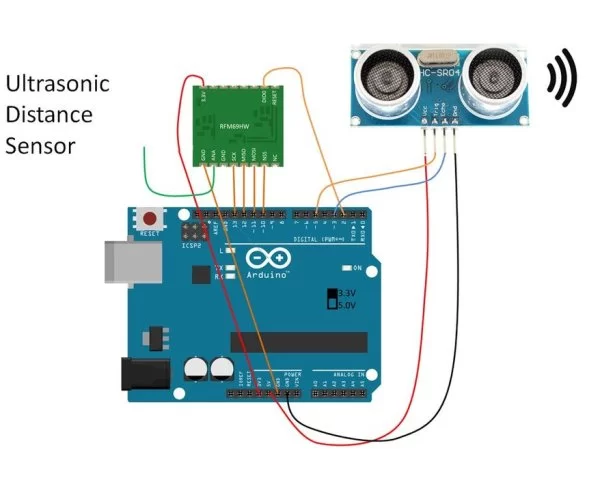
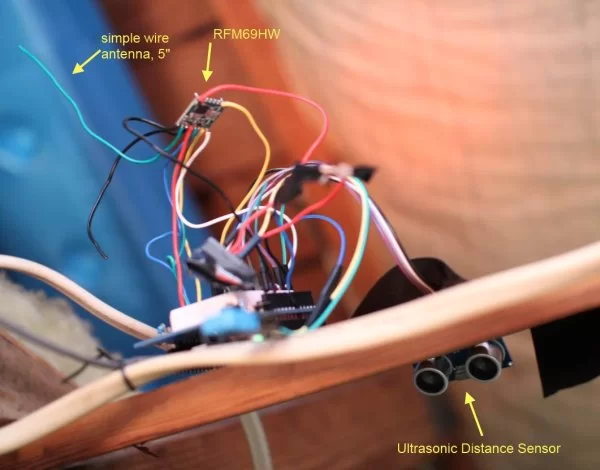
Use this ultrasonic sensor setup to do things like tell if a garage door is closed, or if there is a car in a spot. Basically, anything you can sense with a distance sensor. The sensor is reading the distance from the sensor to the object in front of the sensor. It then sends that distance data wirelessly to the gateway and that data is processed by OpenHAB to evaluate to “open” or “closed”.
The ultrasonic distance sensors can be found on ebay for about $3 each. Hook it up according to the wiring diagram above. See youtube video for how it works.
Install it above the garage door when the door is opened. My installation looks like this.
The two files attached to this step are the Arduino sketch for the garage door monitor and the OpenHAB configuration file. The Arduino sketch includes code for a temperature/humidity as well as a light sensor, but you don’t have to use it if you don’t want to. The sketch will work without the sensor. More details on the light sensor and temperature/humidity sensor later on in the Uber sensor section.
Step 5: Battery Powered Reed Switch – Door / Window / Drawer / Mailbox Sensor
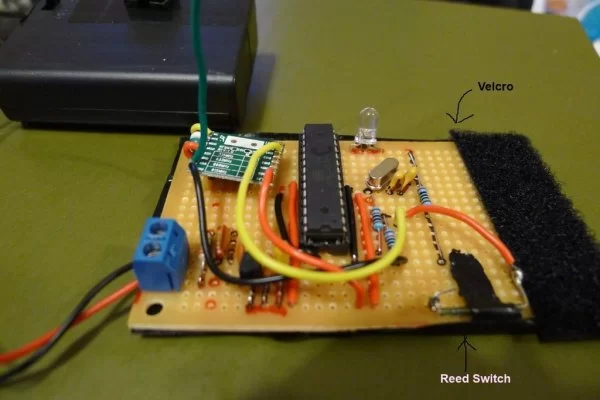
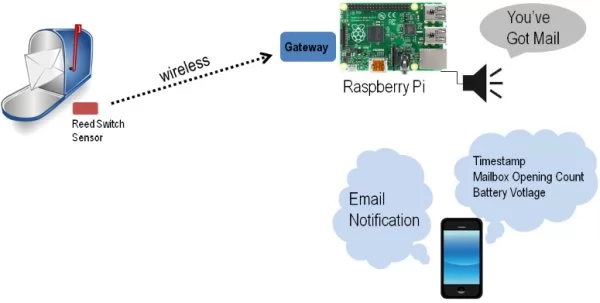
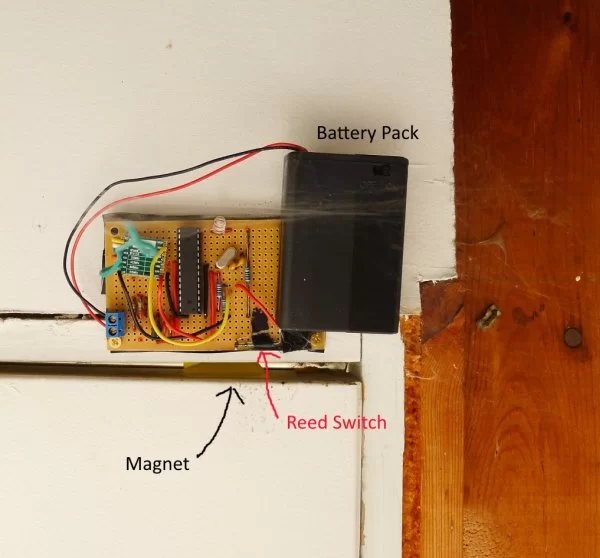
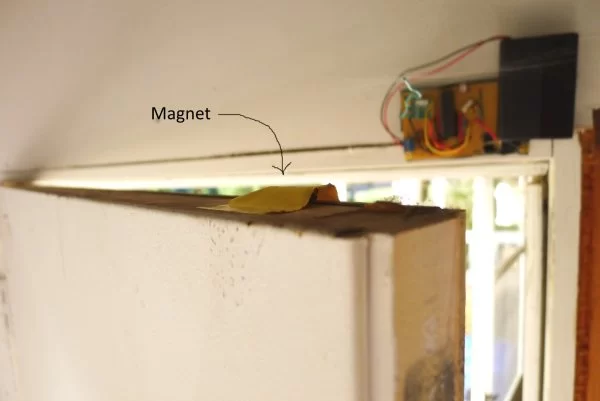
This battery-powered wireless Arduino sensor can be used in a number of ways – pretty much anywhere a magnet could be attached to a moving part. It can be used as a security sensor by enabling the audio alarming and email notification, or maybe you simply want to see the window/door status on your smartphone.
Here’s the basics of how this battery powered unit works. You can mount it under your mailbox to get the notification when the mailbox gets opened.
You can also mount it on top of a door or window like this. This one has been mounted on the side door to my garage for a while.
Here’s two youtube videos that show you how this can be used for notification and security. The first one shows how to use this to be notified when a door is opened/closed. I neglected to include in the video a clip of the Raspberry Pi playing an alarm sound. But any event can be associated with a unique MP3 file, so you can play a loud audio alarm as a deterrent, just like a real burglar system.
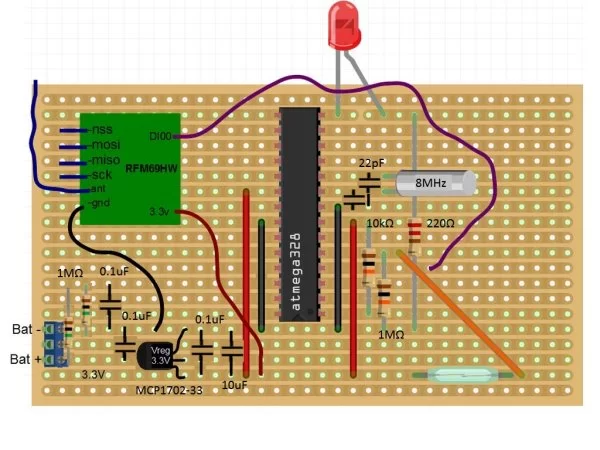
(1) A blank ATMEGA328P-PU
(1) HopeRF RFM69HW 915MHz transceiver (North America) Use this 868MHz version for Europe / Asia
(1) screw terminalfor battery connection
(2) 1MOhm resistor for voltage divider and pull down resistor on reed switch
(3) 0.1uF ceramic capacitor for voltage divider , and supply capacitors
(1) 10uF tantalum capacitor(for output)
(1) Oscillator: 8MHz oscillator preferred
(2) 22pF capacitors for oscillator
(1) one LED, I used red
(1) 220 ohm resistor for current limiting LED
(1) 10k ohm pull-up resistor for reset line
(1) Reed switch
(1) strip board about 3×6 inch
(1) 28 Pin socket to mount the ATMEGA328 on
(1) AA battery box, could be 3xAA or 4xAA
If you’re new to Arduino, I recommend some research on how to make a bread-board Arduino, since this is what it is. Do a search on putting Arduino onto a bare bones ATMEGA328P-PU. Notice that the Arduino is running on the Pro/Mini 8MHz bootloader in my build. You can use either 8MHz or 16MHz, but 8MHz conforms to the Atmel specification for 3.3V operation.
The two files attached are the mailbox Arduino sketch and the OpenHAB configuration file. You’ll have to download the Arduino sketch onto the ATMega microcontroller. Follow along with the OpenHAB configuration file to make the necessary changes on the Raspberry Pi (or PC/Mac if you’re using a computer instead).
On the Raspberry Pi (or PC/Mac), place the MP3 file for the audio under the folder for any audio alert you want to play. Look for this code snippet in the configuration file.
rule "send email and talk"
when
Item itm_mailbox changed from OFF to ON
then
playSound("aolmail.mp3")
sendMail("myemailaddress@gmail.com", "subject line here" , "email body text")
end
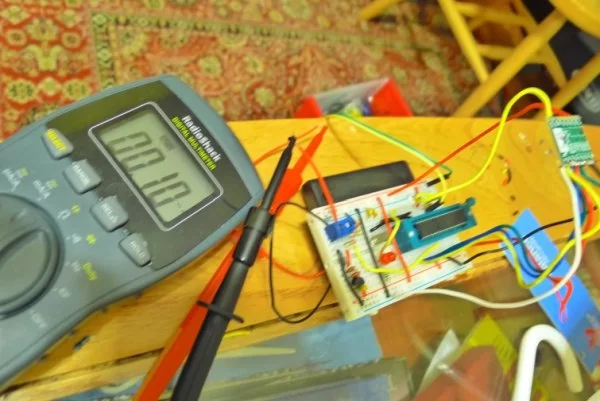
I had a hard time measuring the battery current consumption. My general use Radio Shack multimeter might not be able to measure small amounts of current very reliably. I think it consumes about 0.1mA in sleep mode. Since the microcontroller sleeps most of the time and only wakes up to transmit when the door opens or closes, I estimate a 4xAA battery pack will last 1.5 years. The one I have mounted over the side door to the garage has been there for about a month, so time will tell.
Step 6: Uber Sensor – General Build Instructions
Here’s a video demonstration of each element in the Uber Sensor. I’m not great with youtube, so please excuse the amateur effort here. Hopefully it’s enough to show you what the setup is capable of.
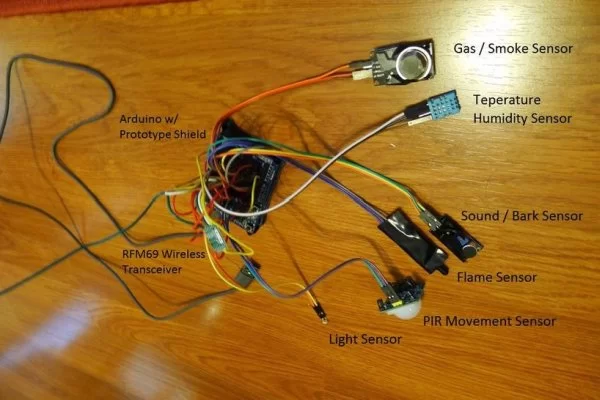
- Bark / Noise Sensor: Pretty sensitive when pointed in the right direction, and includes a sensitivity pot for adjustment. I’m using it to notify me if the dog barks. The system emails me when sound sensor goes off, as well as turning on an indicator on the OpenHAB display.
- Temperature / Humidity: Displays the temperature and humidity on the smart phone interface.
- PIR Presence Sensor: Used as a security sensor to email you when movement is detected.
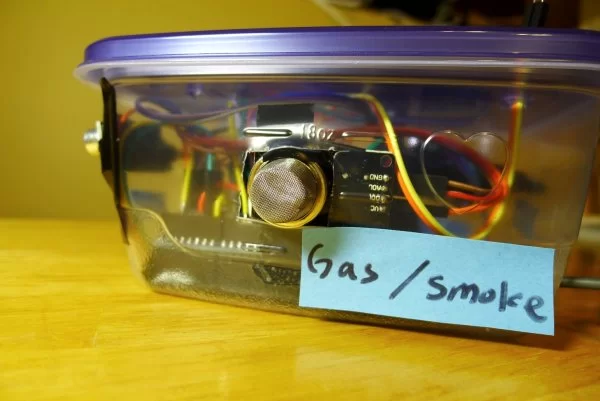
- Smoke / Gas: Detects explosive gas (propane, methane, natural gas), as well as smoke. Sends an email notification when these are present.
- Flame Sensor: Detects a flame, and sends email notification.
- Light Sensor: For detecting if a room light is left on
This single sensor node covers about half of the home automation sensors I set out at the beginning.
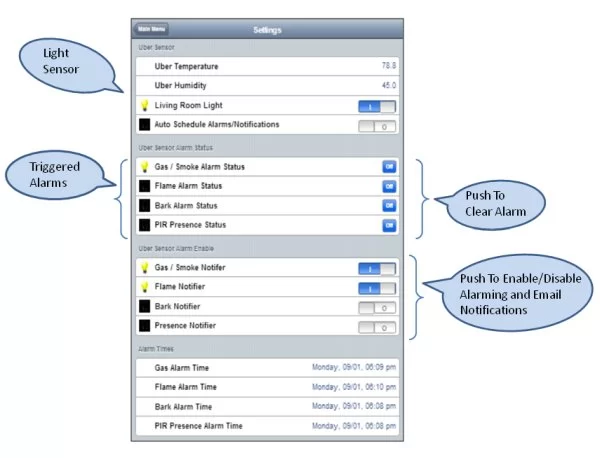
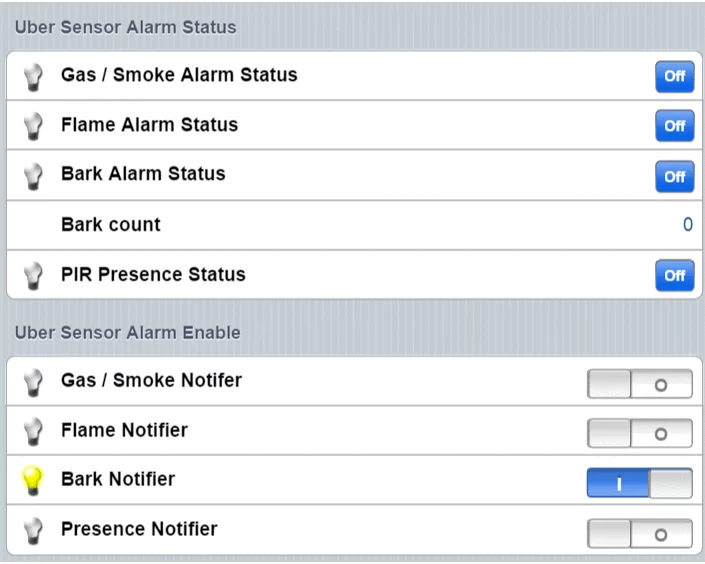
The OpenHAB user interface looks like this. You use your smartphone to access the user interface, where you can enable email notifications and alarming for the sensors you want. Once the alarm is enabled, you’ll get an email the moment that sensor detects something.
Let’s say you had the dog bark alarm enabled, and your dog barks. You’ll get ONE email notification of that event, and the alarm status for “bark” will light up. You will not receive more email if your dog keeps barking. You can use your smart phone to acknowledge the alarm by hitting the “off” button next to the alarm status. It’s only if your dog barks again after this manual acknowledgment that you’ll receive an additional email notification for barking.
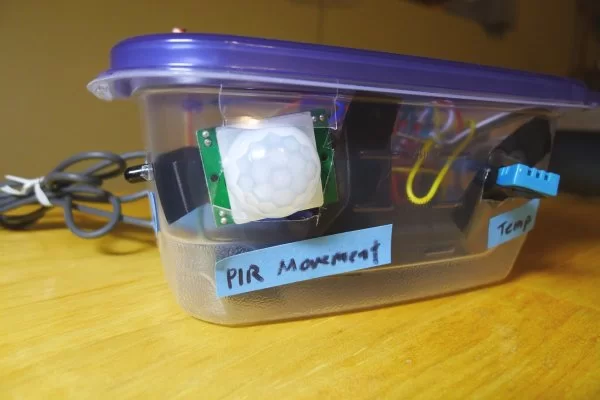
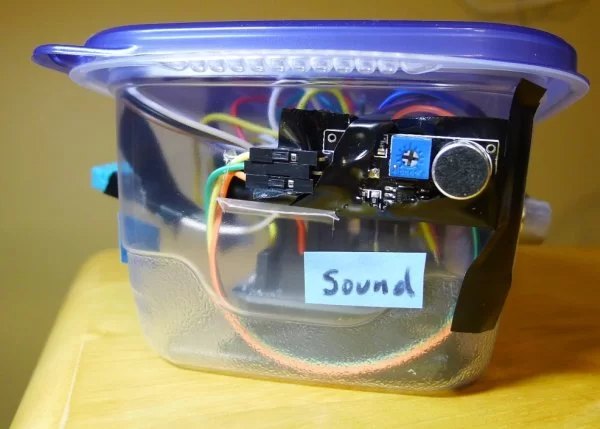
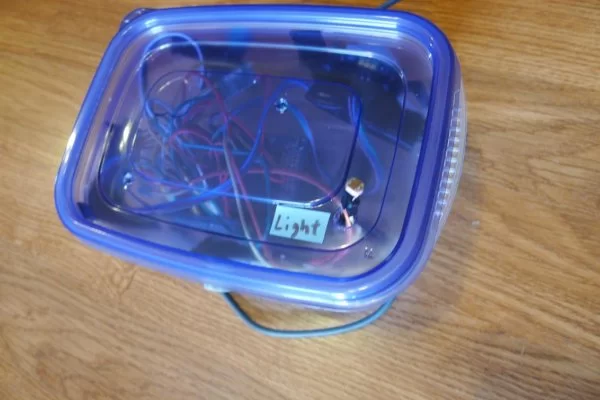
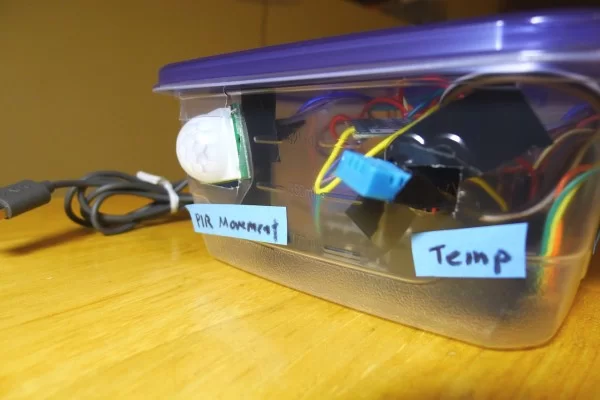
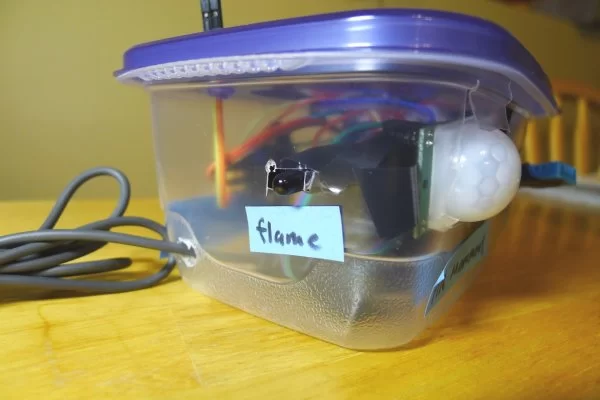
You can use whatever container you want for the sensor. I used a cheap food container and poked holes through it for the sensors.
The next six steps of the Instructable cover the hardware wiring of each of these sensors and some tips for using each sensor.
The two files attached above are the OpenHAB configuration file and the Arduino sketch for the Uber sensor. For the Arduino sketch, you can use the code as is even if you don’t use all the sensors. You just won’t get valid data for the sensors you don’t wire up.
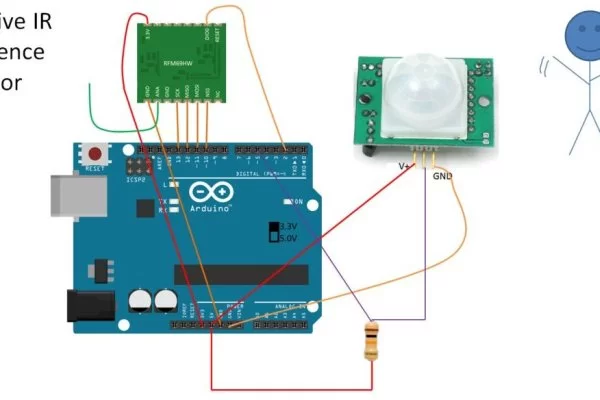
Step 7: Uber Sensor – Security / Area Presence Sensor
This Arduino sensor can be used as a security sensor for detecting intrusion, or as part of the home automation system to sense when a room is occupied. The idea is to use your smart phone to enable the alarm notification when you’re out of the house. Then, if the sensor gets tripped, you’ll get an email, as well as an indicator on your OpenHAB smart phone app.
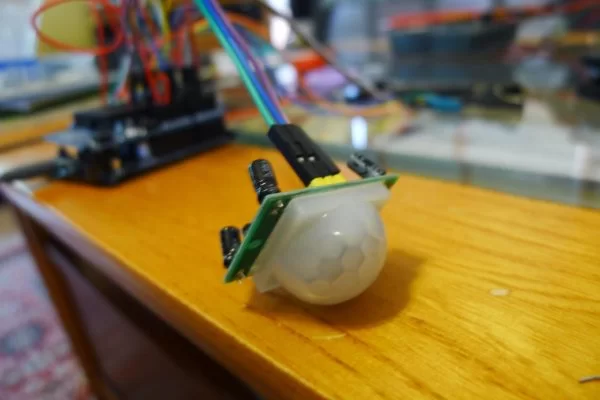
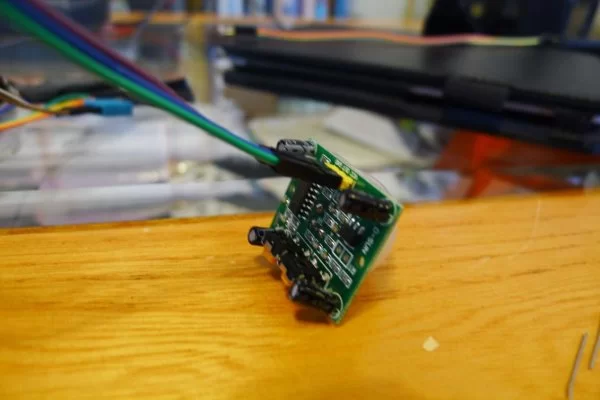
The PIR (passive infrared) sensor costs less than $3 each from everyone’s favorite online sensor store, ebay. Just do a search for PIR sensor and look for something that resembles the pictures here. Note that the sensors have a sensitivity pot and a hold-time pot. The hold time isn’t very important for our use, but you should adjust the sensitivity to something reasonable. You can set the sensor to ignore a dog in a kennel for example, but still catch an intruder. If you have a free-range dog or cat, i
t’s a bit trickier to set the sensitivity. You can use black electrical tape to cover up part of the globe if you want to narrow down the monitoring area.
Like the rest of the Uber sensors, the programming (Arduino sketch and OpenHAB config) is in Step 6.
Step 8: Uber Sensor – Dog Bark / Noise Sensor
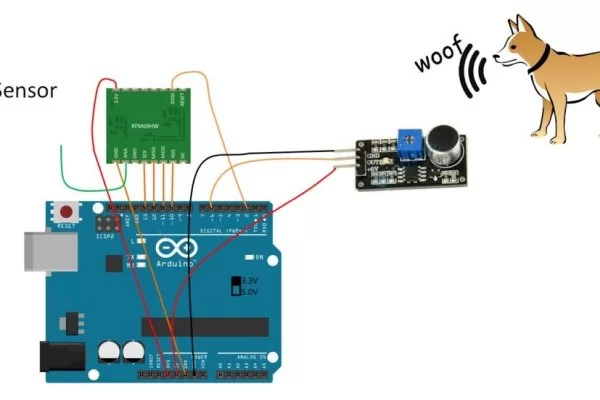
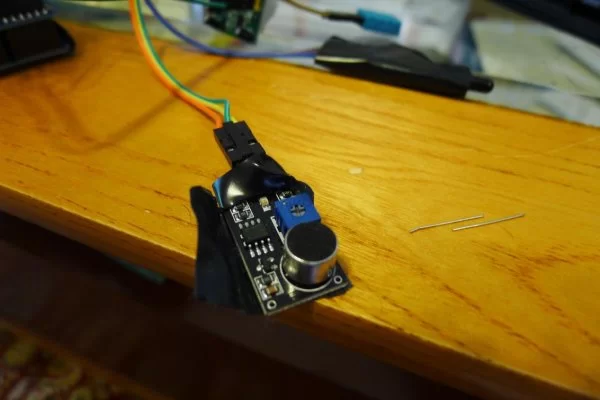
I’m using the sound sensor to send me email notifications if my dog barks. But this can easily be used for other purposes – like monitoring if an alarm is going off inside the house. The sensitivity of the sensor is easily adjustable.
The sound sensors can be found on ebay for about $3 each. There’s not really a model number for the sensor, just look for one with a pot for you to adjust the sensitivity. When it’s hooked up, there’s a red LED that turns on when you speak loudly into the microphone, indicating that the sensor output is high. If the LED is on even when the sensor is in total silence, adjust the pot until it turns off. Then make some noise to see how loud a sound level is needed to make the LED turn on.
Like the rest of the Uber sensors, the programming (Arduino sketch and OpenHAB config) is in Step 6.
If you use this as a bark sensor rather than a sound sensor, it might be nice to add a counter to get a gauge of how much the dog is barking. Here’s the code for adding this counter. You’ll want to add this counter code to the configuration provided for the Uber Sensor in Step 6. The rule resets the counter when the bark alarm is turned off. When it’s turned on, the bark counter will increment as the dog barks. It’s not quite a super accurate count because the sound sensor only sends updates every 20 seconds. So, interpret this counter to mean “how many times did the dog bark in 20-second intervals”.
Item Definition
Number itm_uber1_bark_cnt “Bark count [%.0f]”
Sitemap
Frame label=”Uber Sensor Alarm Status” {
Switch item=itm_uber1_gas_alm_sta mappings=[OFF=”Off”]
Switch item=itm_uber1_flame_alm_sta mappings=[OFF=”Off”]
Switch item=itm_uber1_bark_alm_sta mappings=[OFF=”Off”]
Text item=itm_uber1_bark_cnt
Switch item=itm_uber1_pir_alm_sta mappings=[OFF=”Off”]
Rule
//place this at be top of the rules file
var Number bark_counter = 0
//rules for bark sensor
rule “Uber bark threshold
when
Item itm_uber1_bark_mqtt received update
then
if(itm_uber1_bark_alm_enb.state == ON)
{
sendCommand(itm_uber1_bark_alm_sta, ON)
bark_counter = bark_counter + 1
itm_uber1_bark_cnt.postUpdate(bark_counter.toString)
}
end
rule “Uber bark response”
when
Item itm_uber1_bark_alm_sta changed from OFF to ON
then
sendMail(“ArduinoHomeAutomationOpenHAB@gmail.com”, “bark detected” , “dog barked!!!”)
//playSound(“ding.mp3”)
postUpdate(itm_uber1_bark_time, new DateTimeType())
end
rule “deactivate bark sensor”
when
Item itm_uber1_bark_alm_enb received update
then
bark_counter = 0
itm_uber1_bark_cnt.postUpdate(bark_counter.toString)
end
Here’s how it looks assembled, followed by the video demo.
Step 9: Uber Sensor – Light Sensor
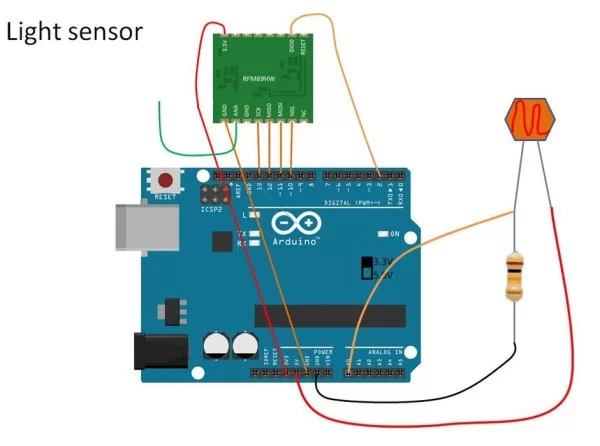
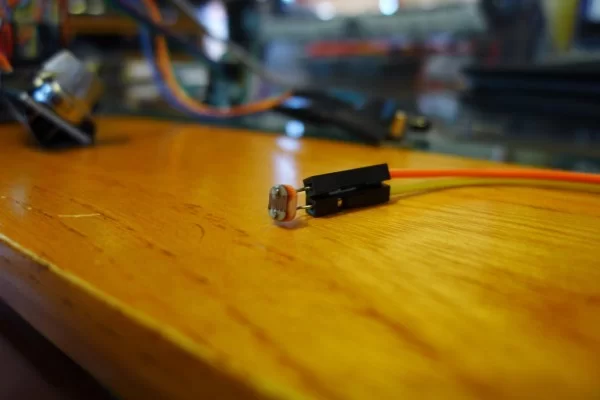
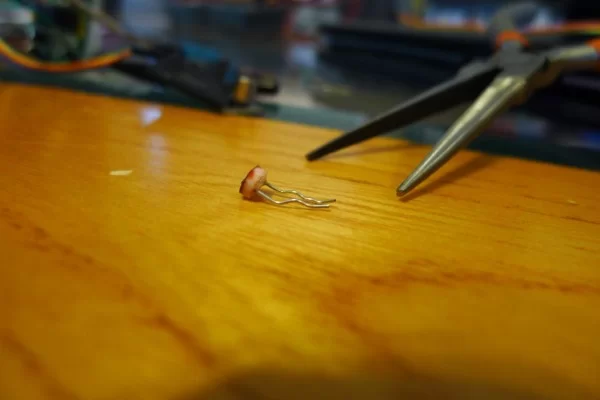
Above is the wiring diagram for the light sensor. The resistor is a 10k Ohm resistor. Search online for “photo resistor”. The photo-resistor is a very common components, and you can usually get a pack of ten for just a couple bucks. When putting this together, the photo-resistor tends to fall out of the dupont cables. It helps to put a few bends into the wire before inserting them.
In the OpenHAB configuration, look for this line:
if(itm_uber1_light_mqtt.state < 350)
Adjust this number to change the sensitivity of the sensor to your needs.
Refer to Step 6 for the Arduino code and OpenHAB configuration.
Step 10: Uber Sensor – Temperature / Humidity
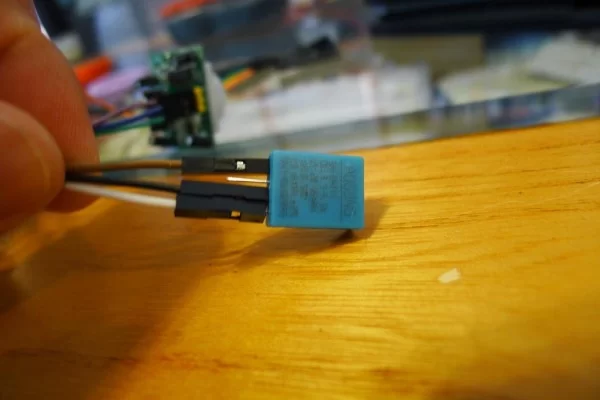
The temperature/humidity sensor I’m using is a digital sensor, model number DHT11. It’s a common sensor, and costs about $3. It’s usually blue. There is a slightly more accurate version of the sensor, the DHT22, that’s usually white. If you want to use that one instead, make sure you uncomment the define statement found in the Uber Sensor Arduino sketch.
//#define DHTTYPE DHT11
#define DHTTYPE DHT21
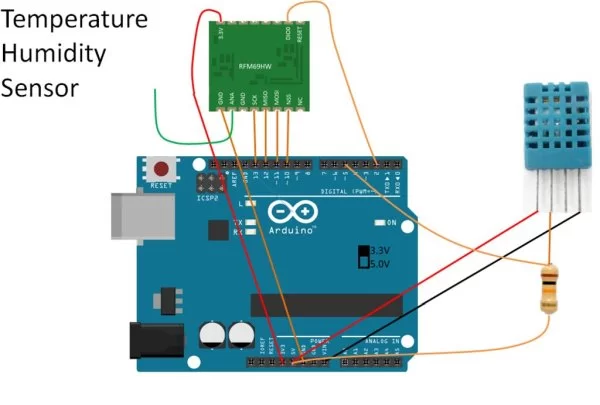
Other than that caveat, this sensor is pretty easy to set up. Wire up like the diagram above, using a 10k resistor. Just like all the other sensors, simply download the UberSensor Arduino sketch and it should work.
The Uber sketch updates the sensor data every 6 minutes (360000 ms). You can edit this update rate by changing this line.
if (time_passed > 360000)
{
float h = dht.readHumidity();
// Read temperature as Celsius
float t = dht.readTemperature();
…..
Here’s the sensor to look for.
Step 11: Uber Sensor – Flame Sensor
Safety Note: This sensor is not meant to replace local fire code mandated fire protection.
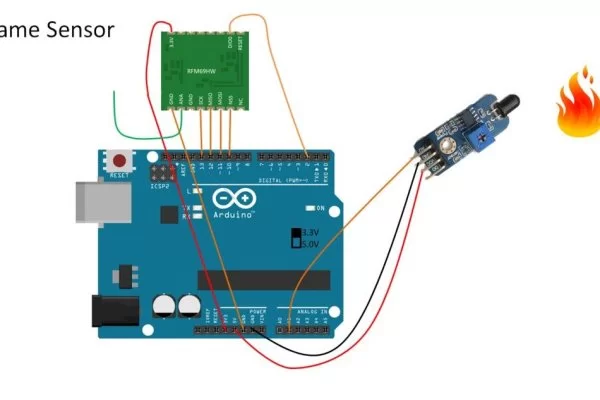
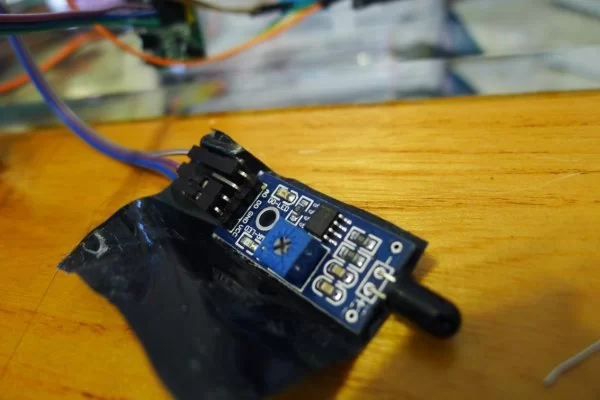
There’s nothing tricky about this sensor. There’s no model number for the flame sensor, but if you search on online for “flame sensor”, you’ll see lots of buying options. Each flame sensor should cost about $3 each, and look like this. I’m using the analog output of the sensor to register a flame, so the pot is irrelevant. That’s why the digital output pin is not used in the wiring diagram.
Similar setup as all the other Uber sensors. Wire according to the diagram above, and download the UberSensor.ino sketch. When you get to setting up the OpenHAB configuration on the Raspberry Pi, you can adjust the analog value that constitutes flame.
if((itm_uber1_flame_mqtt.state < 900) && (itm_uber1_flame_alm_enb.state == ON))
{
sendCommand(itm_uber1_flame_alm_sta, ON)
}
If you’re trying to use this in a kitchen you may need to adjust the sensitivity. I’ve found that a fairly large flame is required to set these off…so they’re not for early detection.
Sensor sitting in box:
Step 12: Uber Sensor – Smoke / Flammable Gas
Safety Note: This sensor is not meant to replace local fire code mandated fire protection.
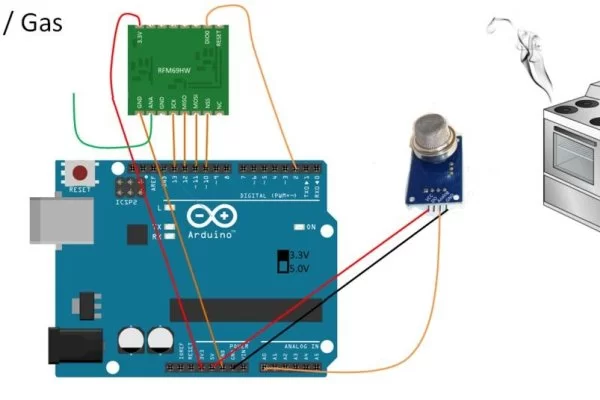
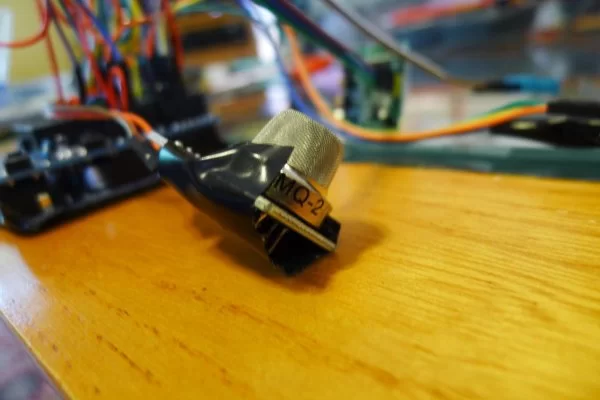
I’m using a MQ2 sensor to detect smoke and flammable gas like propane, methane, and natural gas from cooking stove. You can find it online for about $5. It uses a heating element inside as part of the detection sensor, so it’ll feel very warm when in use. Look for a sensor that has the analog circuity built in, like this picture.
Just like all the other Uber sensors, download the Arduino sketch and follow the OpenHAB configuration file.
The sensor is pretty sensitive. You can adjust the analog value that constitutes a detection alarm by changing this line in the OpenHAB configuration:
if((itm_uber1_gas_mqtt.state > 220) && (itm_uber1_gas_alm_enb.state == ON))
{
sendCommand(itm_uber1_gas_alm_sta, ON)
}
I’ve found the value “220” was good enough to not get any false alarms.
Step 13: Washer-Dryer Smartifier & Water Leak Sensor
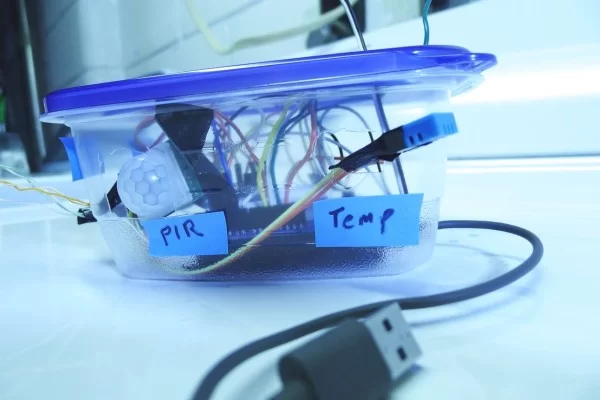
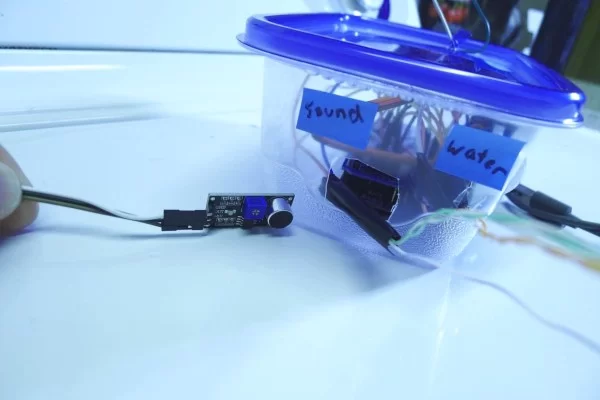
These nice Victorian gentlemen will show you how they’re using the Laundry Sensor.
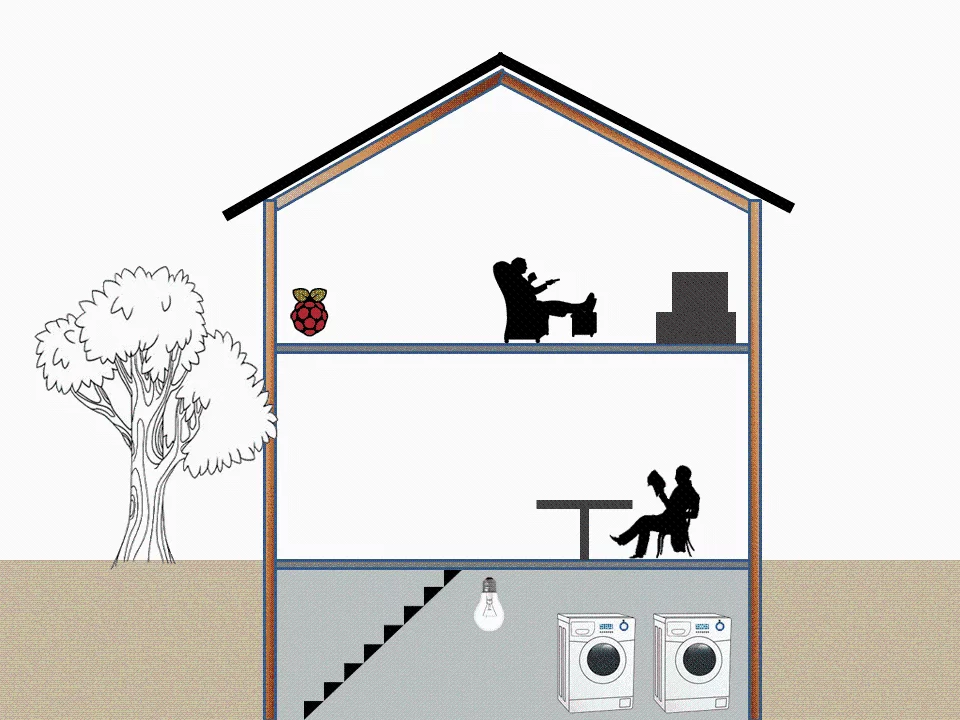
If your house is like mine, you have the laundry room in the basement. When I was single, I only went down to the basement once a week, so problems went unnoticed. Forgetting a load of wet laundry was really disgusting. The laundry room light sometimes got left on the entire week. And I couldn’t tell if the washer/dryer was still running without going down stairs. Only the dryer buzzes, and sometimes I’d miss it. Now that we have a baby, we’re doing laundry every other day it seems, so it’d be nice to have a dashboard view to tell us if the washer/dryer is running. And instead of having a dryer buzzer down stairs, I wanted the audible signal for both washer and dryer up stairs. This sensor is designed to solve all of these problems.
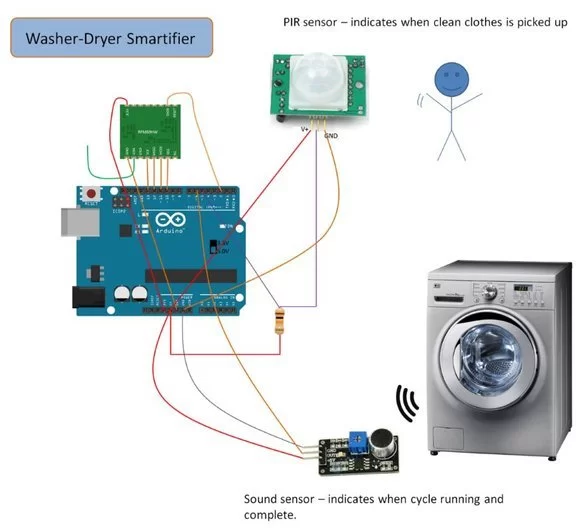
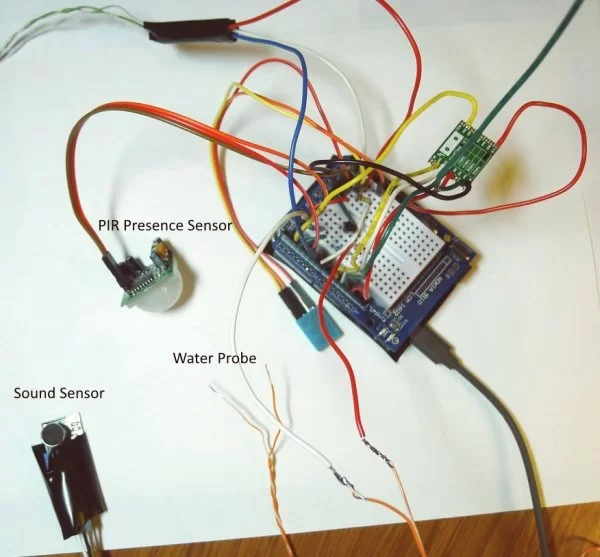
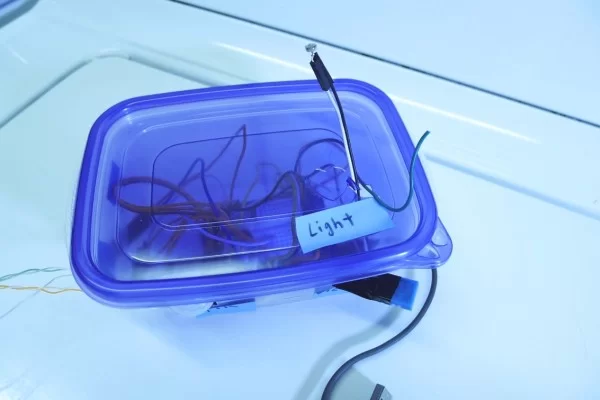
The schematic above is a great combination of sensors for a laundry room.
- Sound Sensor determines when washer or dryer cycle starts and completes
- PIR Presence Sensor used to determine when a completed load is picked up
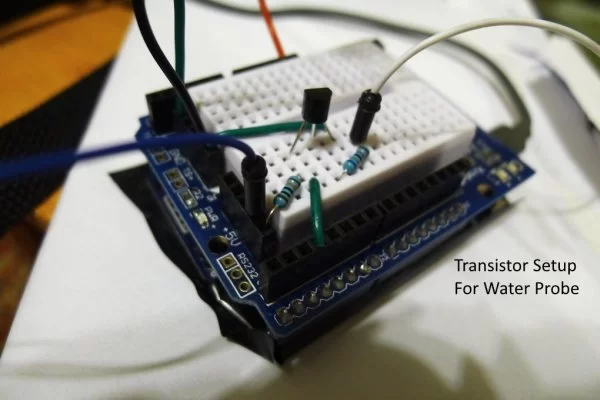
- Water Detection circuit senses if there is a water leak or overflow, or a flood in the basement.
- light sensor circuit from the Uber sensor is used to determine if the laundry room light is left on.
- Temperature/Humidity sensor – because it’s so cheap to add another sensor
The intention is to display the washer and dryer status on a smart phone or tablet in the kitchen or living room – somewhere that you can easily glance at. Similarly, the Raspberry Pi and speaker would also be sitting in the living room so that the audio announcements are more likely to be heard. The audio signal for washer completion or dryer completion can be a friendly sounding MP3 file. Heck, you can record your own voice saying “get the laundry!” and use that sound file if you want. In the demo, I used the ugly robot voice to say “washer complete” or “dryer complete” because the text to voice feature is available by default in any OpenHAB installation.
The PIR sensor should be positioned so that the sensor would naturally sense you as you’re moving around getting the clothes out of the machine. My awkwardness in live video doesn’t demonstrate this point well, and I was trying to not set off the sensor prematurely. You shouldn’t have to purposely wave your hand at the sensor.
If your laundry room is in the main part of the house where people walk through, the PIR sensor would not work for you as a way of indicating the load has been picked up. You can replace the PIR sensor with individual magnet and reed switches on the washer and dryer doors. It’s a simple substitution, so I won’t detail the circuit. With the reed switch wires going to the washer/dryer door, the installation is a bit more invasive, but it has the benefit of being a more positive indicator of laundry pickup.
–Hardware—
I split up the schematic into two for clarity, but my demo actually has both circuits and the light sensor circuit from the Uber sensor all integrated into one wireless Laundry Room sensor. The attached Arduino sketch will work regardless of whether or not you include the optional light and temperature sensor.
By now, you’ll have already gotten the pattern for these sensors. Assemble the sensor on the Arduino using the schematic and the photos. Download the sketch to the Arduino. Configure the OpenHAB using the configuration text file attached. Test.
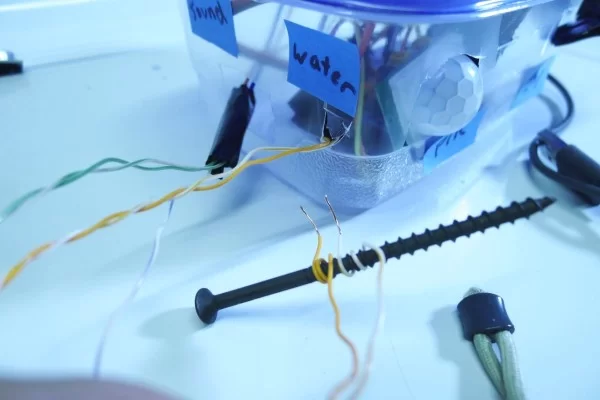
The water probe can just be wires coming from the prototype shield. You can use any long wire needed to reach from the sensor assembly to the floor of the laundry room. I stripped ethernet cables and made use of the inner conductor pairs. My assembly looks like this. Amazed I actually remember to take progress photos this time.
Assemble the sensor into a tupperware container. I used a screw to hold the ends of the water sensor probe apart. The weight also helped keep the probes on the ground.
Once the circuit has been assembled, you have to calibrate the sound sensor pot. This is pretty easy to do. Adjust the pot until the sensitivity is such that placing the sensor against the dryer or washer (while running) sets off the output LED. This youtube video demonstrates what it should look like.
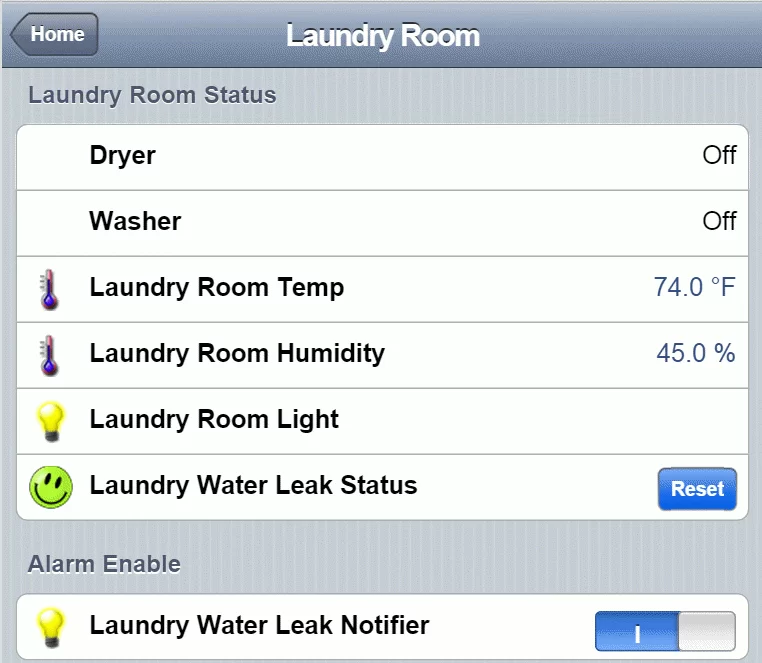
The OpenHAB screen looks like this. It will indicate whether the machine is off, running, or finished running (but hasn’t been emptied). Once the machine has been emptied (an assumption made by the PIR sensor), the state of the machine returns to off.
The OpenHAB configuration file needed to create this page is attached.
If you have the alarm notifier enabled, a water leak alarm will email you when it goes off. A water leak alarm will also constantly sound the alarm sound.
You will want to edit the Arduino code a little bit depending on your washer or dryer. I put in some constants to decide how many noise detections indicate the machine is running, and how it determines the machine stopped running, and also how frequent to examine the sound sensor. For the majority of dryers this should work. But your washer has some cycles where it’s adding water which may not set off the sensor as consistently, so you may want to extend the time or reduce the counts for the washer. Download the .ino file and change the relevant lines of code:
if ((millis() – sound_time_1)>500)
{
sound_time_1 = millis(); //reset sound_time_1 to wait for next Xms
…
//after X number of sound checks…
if (sound_count_1 >= 40)
{
//sound_count_1 = number of times sensor listened
if ((sound_detected_count_1 >= 8) && ((sound_1_device_state == 0) || (sound_1_device_state == 2))) //number of times sensor registered sound
{
Step 14: Charts! Visualize Your Data.
Charts are really easy to do. You can add charts for any data you have coming in, even digital data (like garage door open/close). It makes the most sense for analog data like temperatures and energy consumption. Do the following to add charts to your sitemap.
- From the OpenHAB website, download and unzip the addon files:
https://www.openhab.org/download/ - Grab the file name “persistence.rrd4j-1.5.0.jar” and put it into the folder.
- Open up the <
\OpenHAB15\configurations\openhab.cfg> file, and add “rrd4j” to the end of this line, like this:persistence:default=rrd4j
Now we need to tell OpenHAB which data items we want to collect data on and how often. Create a file name “rrd4j.persist” in the folder <\OpenHAB\configurations\persistence>. Add the following configuration text to that file. I’ve included my copy of rrd4j.persist if you’d rather use that.
// persistence strategies have a name and a definition and are referred to in the “Items” section
Strategies {
// for rrd charts, we need a cron strategy
everyMinute : “0 * * * * ?”
}
Items {
//list the items you want to trend and store
itm_garage_temp : strategy = everyChange, everyMinute
}
Now we just need to decide what page we want to add the chart to. Going to the sitemap file, pick any location you want (you can experiment, no big deal), and add this line to .
Frame label=”Charts”
{
//change period to 4h for 4 hours, D for 1 day, 3D for 3 days, W for 1 Week, 3W for 3 weeks…
Chart item=itm_garage_temp period=h refresh=10000
}
For any other data item you want to chart, just add that item into the rrd4j.persist file, and put it in the sitemap in the same way.
Step 15: Dog Tracker
This last example will be different from all the other sensor projects so far. I’ve been kicking around this dog tracker idea for a while. Recently, there was an “Internet of Things Hack Day” competition held by the local Arduino group here in the Twin Cities (Minnesota, USA). I took this opportunity to form a team to work on this dog tracker idea. This is what my teammates (Wolf Loescher, Russ Terrell, and Patrick Delaney) and I managed to make on competition day.
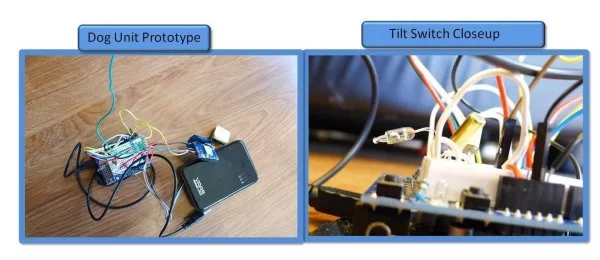
I’m presenting this idea mainly to highlight how flexible Arduino and DIY automation can be. You can make your own niche sensor. The prototype we made is fully functional, but the electronics needs to be shrunk down in order for it to be worn on the dog. I hope to keep working on it when I have more time. For now, I’ll just post the code and video demo without the fancy wiring diagram found in previous steps. You can pretty much figure out the wiring diagram from the Arduino sketch, so I hope that’s ok.
Motivation
Lots of people let their dog out to poop in the morning. It’s tempting to just let them out the yard by themselves and give them time to sniff around while you stay warm and cozy inside and finish your coffee. But there’s two problems with that.
- The dog might run away (if you don’t have a fenced yard).
- You don’t know if they poop, or where they poop, and end up spending more time looking for the poop. Neglecting to pick up the poop is NOT an option!
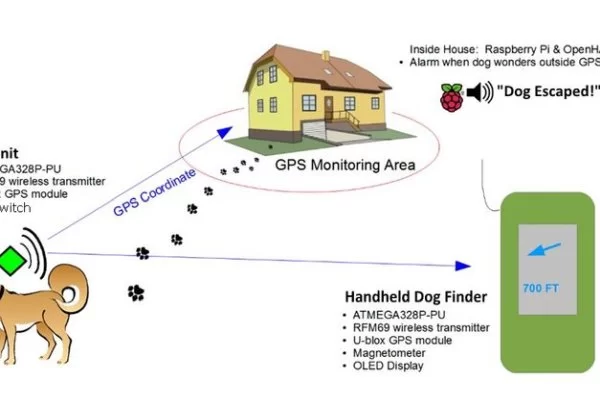
This dog wearables project aims to solve these problems. As seen in the diagram, the idea is to have a dog wear a collar box. The collar box contains a GPS module, tilt switch, and a RFM69 transceiver.
Dog Escape Alarm and Tracking
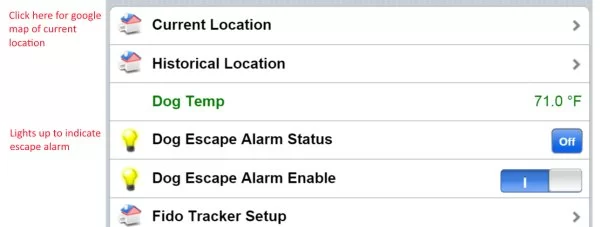
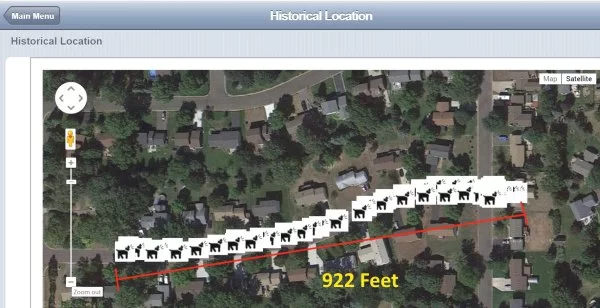
The GPS location is constantly being sent from the dog unit to the OpenHAB Raspberry Pi at home, via the same gateway previously detailed. The moment the GPS signal strays beyond a virtual boundary defined in OpenHAB, the Raspberry Pi speakers play an audible alarm to alert the dog owner they need to go out and fetch the dog. The owner can look at the OpenHAB screen to see a google map of where their dog currently is (or at least the last GPS signal received). Armed with the initial direction the dog went, he can then use a handheld unit to locate the dog outside. With the great range of the RFM69, the system should be able to locate the dog more than 900 feet away with the hand-held unit, or 700 feet with building obstruction. The range is good enough to be very helpful when locating a lost dog, even if you have no clue where it might have gone. You can drive around waiting for a ping from the handheld unit.
Actually, even without the Arduino hand-held unit, as long as your dog isn’t hell bent on running away, you’ll probably be able to find him just from the google map shown on the OpenHAB screen. You can use your smart phone OpenHAB app, connected to the home OpenHAB server, and see in real time where your dog is wondering off to as you go after him. With such good range, you’re likely to catch him before he goes too far.
Dog Poop Tracking
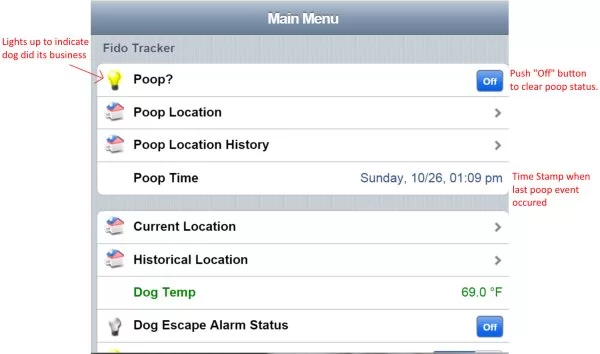
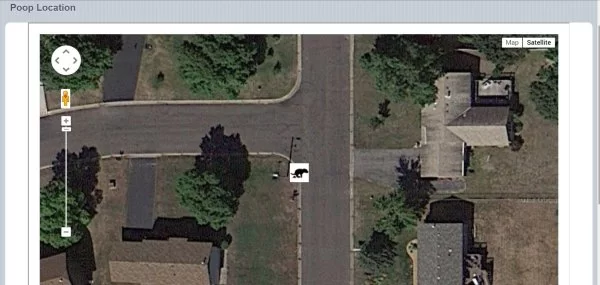
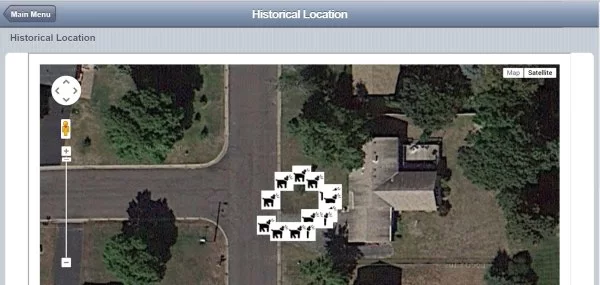
The system also tells you when your dog poops, and shows a google map of where the poop is. We use the tilt switch signal to tell us when the dog is holding the “poop” position for several seconds. When this happens, the dog Arduino flags a GPS location. The OpenHAB Raspberry Pi plays an audio alert to let you know that the dog has done its business. You then check the map to see where to pick up the poop. The timestamp is there to tell other family members later in the day whether the poop location is current or from the morning bathroom break, in case they miss the audio alert. Family members can use the alarm “OFF” button to clear the alarm and indicate to other family members that this morning’s poop has been picked up.
We’re also using the built-in temperature sensor in the RFM69 to get the ambient temperature of the dog unit. We can send audio alerts if the environment gets too hot or cold. For all of these audio alerts, it’s trivial to also add in email alerts, as seen in the other project examples.
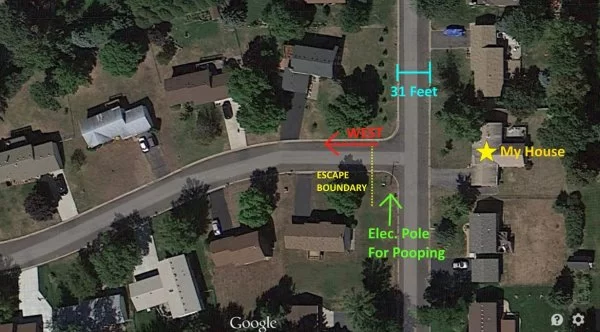
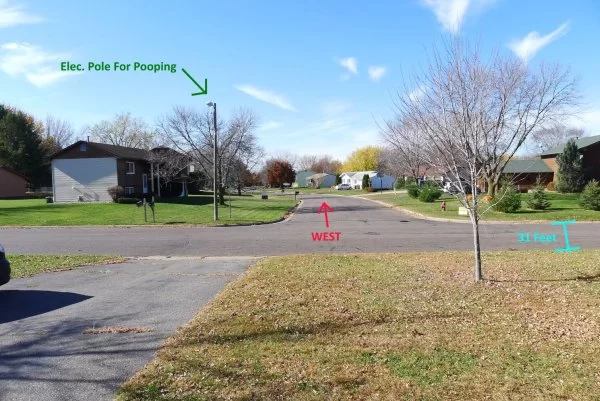
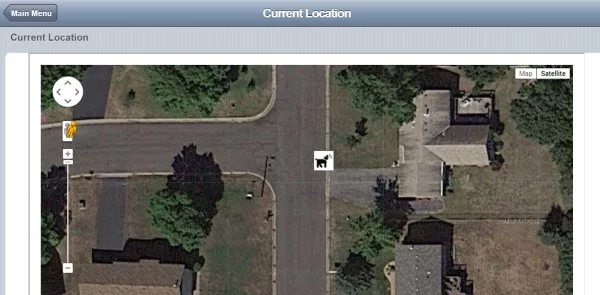
The following demo video is taken in front of my house. Here’s what to look for in the video and screen shots. I wanted to demonstrate the accuracy of the GPS unit. It seems to be good to within 5 feet. I’m able to set the unit at the end of my driveway, right on the grass line. The GPS map shows that location almost exactly. I purposely chose the light post as the poop location to give a sense of how accurate the GPS module is. Pretty impressive for a $15 device.
This is the dog unit placed at the end of the driveway, right on the grass line.
GPS track of me walking around the yard.
Video
We originally planned on putting a magnetometer in both the dog unit and the person unit. Unfortunately, the magnetometer library we wanted to use didn’t play nice with the RFM library. So we had to just skip that functionality. It would’ve been cool to get that working. The OpenHAB was setup to record and chart the direction the dog was facing each time it poops, so that we can determine whether or not dogs really face North when they go.
Step 16: Not So Uber
Perhaps “uber” is too bombastic a title. No project is perfect. Here’s the list of deficiencies, from the most to the least glaring. I hope to address these some day.
1) The Dual-Gateway Dumpling Conjecture
The RFM and Ethernet Arduino gateways should be able to be combined into one Arduino. When I was making the gateway, I had some poorly soldered transceivers and lead to making me think there was a library conflict. I haven’t gone back to fix the problem…because I’ve been too busy working on this Instructable :). It is sloppy claptrap programming on my part. [EDIT] Thanks to Alexandre Bouillot for taking the two gateways and combining them. I haven’t had time to try it out myself, but if you’re interested, here’s his Github
2) The RFM-RaspberryPi Integration Hypothesis
There is a Python port in the works for the RFM69 by a coder name Eric Trombly. I haven’t tried it yet. If it works, it means you can skip the Arduino gateways altogether. I would be very interested if someone does try it. His Github: https://github.com
Of course, that jerk chose to start his project after I went through the trouble of making the gateways. Darn him!
3) The Uni-Directional Communications Field Problem
I don’t actually talk to my field nodes – the field node to base communication is single-direction only. All of my sensor demos can be done with uni-directional wireless comms, but admittedly bi-directional communications would be more efficient for the security sensors. There’s no technical reason why the RFM gateway can’t talk to the RFM nodes…other than it requires a more thoughtful approach to the communication scheme…you know, the actual difficult part.
4) The Lack-Of-Ack Conundrum
I also don’t acknowledge the wireless transmissions from the field nodes. No reason why not to ack, since it’s actually built into the RFM69 library, and not acknowledging actually wastes wireless transmissions because I transmit-with-retry on most nodes. It would make the sensors more robust. The fix would require a bit more code on the transmitter end, but shouldn’t be too bad.
If someone wants to improve on the gateway, please fork my Github! I would welcome the improvements. That said, I’ve had the garage door monitor for months, and the battery powered security door since mid-August, and both have been working great. The system works well for the current group of sensors I’ve made.
Step 17: What Is Home Automation?
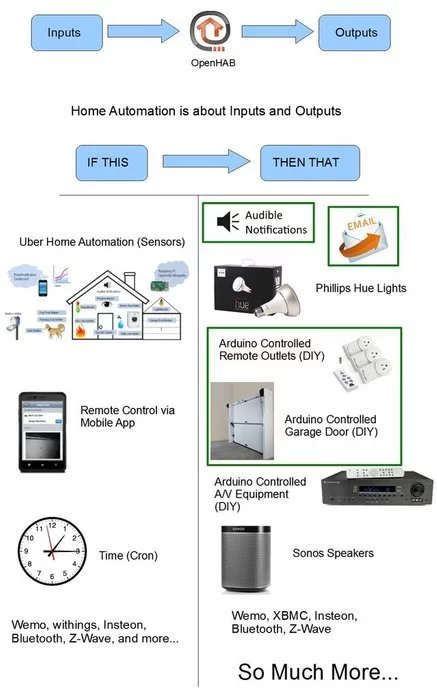
This is just the beginning of home automation. A truly uber home automation system should have available many different types of inputs, and be able to affect many types of outputs. OpenHAB is the logic engine that connects inputs (situations) to outputs (actions).
–Inputs–
OpenHAB natively supports a set of commercially available sensors. The goal of this Instructable has been to dramatically enhance this set of inputs by giving Arduino users a way to integrate DIY wireless sensor nodes into the system.
–Outputs–
OpenHAB also natively supports control of many different types of commercial products (outputs like lights and thermostats). I want to enhance this set of outputs with a series of Instructables for using Arduino to do physical computing. The first of these is this basic relay actuator, from which users can open and close garage doors or operate remote outlets.
Step 18: Conclusion
I tried as much as possible to make this tutorial accessible to most people. This isn’t one of those projects that require a 3D printer, a CNC machine, and hundreds of dollars. Nor is it a project that makes use of one-off items that others can’t replicate. It’s totally achievable. I’ve tried to point out workable alternatives to some of the more technically difficult portions. I think Arduino users would have no problems making the wall-powered wireless sensors work. For the few places you might get hung up, here’s what you can do.
- Linux. The Raspberry Pi is a good, cheap, lower powered option for the web server. But if you don’t want to use Linux and just want to get this home automation project off the ground, no problem! Both OpenHAB and Mosquitto can be installed on a PC or Mac. So the host machine doesn’t have to be a Raspberry Pi. The configuration files work on any OS without change.
- Soldering. It takes me quite a while to solder the battery-powered Arduino sensor. If you want to get started quickly, just stick with the wall-powered Arduino sensors first. You’ll still have to solder wires to the wireless transceiver, but that part is pretty doable. For a battery-powered option, you can also use an Anarduino wireless mini (Mini-WirelessHW-915Mhz) or a Low Power Lab’s Moteino. These are basically Arduinos with the transceiver built in. The sketches in this Instructable can be downloaded as is.
- Serial monitor is your friend! On the Arduino sketches, I kept the useful troubleshooting printout statements in the code. If you’re having trouble, just connect the sensor node Arduino to your computer and view the output on the Arduino serial monitor.
- Not interested in the wireless setup? Here’s a simplified wired ethernet version.
This project has taught me a lot. At first, I just wanted to solve the practical problem of monitoring my dog. Then it became “hey look at all these other sensors I can use”. In the end, it made me think more deeply about connected devices and how to meaningfully present all the information coming from DIY “internet of things”.
I can take credit (and blame) for the Arduino sketches that form the gateways for this project. As far as I know, no one has published a way for translating RFM69 wireless data into something that OpenHAB understands. All the rest of the software in this project are open source software. Thanks to OpenHAB, Mosquitto, and Low Power Lab for making their projects available. Open hardware and open software do amazing things.
Also, thanks to Instructable member makendo.
Any questions, feel free to ask it in the comments.
The following wall of text is placed at the end so I don’t put off anyone interested in making this setup. This is optional reading. I’m not going to tell you when the zombie apocalypse will happen, and really don’t have anything new to say. I just want to provide some context for Arduino based home automation systems. Here’s some stuff that I’ve learned.
- Wireless transceiver selection is pretty important. I did quite a bit of testing with nRF24L01’s before deciding that RFM69’s are better. It was a hard decision because everyone and their grandma uses nRF24’s.
- There are a lot of Arduino users out there like me. I came across many forum posts of people discussing how to do wireless Arduino sensors and how to build the web server and associated mobile app. Those two design problems appeared over and over again, and they’re my major motivation for making this instructable.
- Writing your own server is hard. A few Arduino smart home examples I came across involved writing your own node.js application, doing socket.io connection between the mobile browser and the server, doing basic_auth, and then interfacing the node app with an Arduino. That required way too much hard programming and difficult socket setup. I opted to go the OpenHAB route. Experienced programmers put time and effort into making OpenHAB. There’s no need for every Arduino user to start from scratch. We can just stick with the easy Arduino programming.
- It might not be obvious, but OpenHAB was not developed to talk to Arduinos. It was developed as the brains to control commercial products like Sonos speakers, Insteon lights and outlets, Phillips Hue (super fancy lights), Withings health gadgets, and a bunch of other things. Over time, people wrote “bindings”, or plugins, to make OpenHAB more flexible. When I found OpenHAB, I liked the interface and the capabilities, but there was no good way for it to talk to wireless Arduino nodes. It took some time to figure out how to use OpenHAB’s MQTT binding and come up with a scheme to translate the wireless data into MQTT data. So that’s how my Arduino gateways came about. To be honest, it’s not perfect, nor is it sophisticated. But it works well for what I’m doing. One of the commenters told me he is using this setup, so that’s nice to hear.
- Gateways are dry stuff to have to explain, but they enable all kinds of awesome sensors to talk to OpenHAB. I started this instructable with lots of details on how the gateway works, but it seem out of place here. I ended up taking the less functional paragraphs out. If you want to dig into the weeds of how it works, check out this blog post
- There are other systems like OpenHAB out there. Some with fewer capabilities, and some with different set of capabilities. I’m really happy with OpenHAB. Part of the challenge with DIY home automation is that the field is saturated with many platforms, similar to how commercial home automation is flooded with different brands. It’s nice to have options. But it’s difficult to know which ones will work for you until you’ve put in the time to dig into a particular system. It’s not like you could just google “home automation platform” and simply pick one from the list. Deciding on OpenHAB represents a large chunk of time spent on research and testing.
- Commercial home automation products have their place. Check out the cool video demos of Kai, the OpenHAB founder, controlling Phillips Hue lights and plant watering systems. I can’t make something as fancy as the Phillips Hue bulb. And I don’t want to make a DIY remote control outlet. For “outputs” that use high voltage, commercial solutions are more appropriate; they’re compact, aesthetically pleasing, and most importantly UL approved. I wish I had Hue bulbs or Sonos speakers to combine with my house of sensors to do some cool automation/notification. It would really show off OpenHAB.
- Outputs are difficult to DIY, but inputs (sensors) are not. With low voltage sensors, Arduino users have a unique advantage. We can make all sorts of crazy sensors to fit niche sensing situations that aren’t common enough to spawn commercial products. Maybe you want to chart how often your dog’s tail is up vs. down? Or you want a google map of where your dog poops? It’s hard to imagine a company would make a sensor for that and sell it for $30 at retail. I also think it’s satisfying to make sensors that mimic what’s commercially available. It’s like going to Lowe’s webpage for Iris products and clicking “I Made It!”
- Speaking of commercially available home automation systems, I think it would be cool if a company offers a desktop size model house with their smart home system. The model house would be something that the consumer custom designs online to look like their own house. It would be 3D printed, and come with servos, LEDs, and working doors and windows. The (Arduino?) controller for this model house would mimic the door, window, and light sensors that come with the home automation system. So when the real garage door opens, the model house’s garage door also opens. When the garage light is turned on, the LED on the model house’s garage also lights up. And maybe the house would have avatars, via OLED displays, that turn on when a family member is home. Maybe this model house can sit at your desk at work, mimicking your house miles away via VPN connection. Or if you’re a mid-westerner with a cabin “up north”, it could act as the security and status display for a cabin that’s a hundred miles away. Seeing a video feed or a virtual dashboard on your phone is nice…but being able to look up from your chair and “see” what happening miles away on a physical three dimensional object – that would be really neat. It would be a cool 3D printer project.
Thanks for reading the whole thing 🙂
Step 19: Year and a Half Later…
Hey, so it’s been a year and a half since I wrote about this project. In that time, there’s been lots of changes in the world of wireless development boards. Wi-Fi has become a lot cheaper and easier. You might want to consider using the Particle Photon ($20) or the ESP8266 ($6). Or maybe even Bluetooth for low power applications. For long range wireless applications, you might try LoRa.
A lot of the sensor ideas and OpenHAB configuration detailed in this post can still be used, but there are easier wireless solutions out there.
