Overview of Blink Camera Troubleshooting
Blink cameras often face motion detection failures, missed motion alert notifications, and offline status. Troubleshooting includes enabling motion detection and arming cameras, checking signal strength, replacing batteries, resetting notification settings, updating iPhone and app software, clearing app data, disabling Do Not Disturb and power-saving features, adjusting Android notification importance, and ensuring Blink app battery optimizations are disabled. For offline cameras, reboot or reset the Sync Module, restart the router, improve Wi-Fi signal or remove obstacles, and as a last resort perform a factory reset or contact Technical Support.
Quick Solutions to Questions related to Blink Camera Troubleshooting:
-
How do I fix motion detection not working on my Blink camera?
Ensure motion detection is enabled, the camera and system are armed, verify strong signal strength, and try replacing the batteries after leaving the camera empty for a minute or two. -
What should I do if I am not receiving Blink motion alert notifications on my iPhone?
Reset Notifications in Settings, ensure Allow Notifications is on for the Blink app, update iOS and the Blink app, clear app data if needed, and disable Do Not Disturb. -
How can I resolve Blink notifications not sounding on Android?
Disable power saving and battery optimization for the Blink app, ensure Do Not Disturb is off, and set Motion Notification importance to Urgent or High in the Blink app. -
Why does my Blink camera go offline and how do I fix it?
Causes include power loss, device defects, Wi-Fi disconnection, or inactive Sync Module; fix by reconnecting or resetting the Sync Module, rebooting the router, improving Wi-Fi signal, or factory resetting the camera. -
When should I factory reset my Blink camera?
Perform a factory reset if other troubleshooting (reconnect Sync Module, reboot router, improve Wi-Fi) fails or if camera settings were changed and default restore is needed.
Our society today, Blink cameras have become very popular. This is largely due to their dedication to the safety field. It is possible to use Blink cameras as either indoor or outdoor cameras.
Blink cameras can appear to malfunction, and at times especially when they go off, this can be quite exhausting. In this post, we look into a few of the main problems blinks cameras faces most of them and how to fix it by simply following procedures for each malfunction issue..
List of Blink Camera Common Problems
- Motion detection does not work correctly or simply does not work.
- Not Receiving Motion Alert Notifications
- Blink Cameras go Offline
Here Are the Blink Camera Troubleshooting for each problem
Motion detection does not work correctly or simply does not work
Here are some troubleshooting steps:
- Ensure motion detection is turned on in the settings
- Ensure that the camera is armed (look for the dark “running man” next to the camera settings button)’
- Ensure that the entire system is armed. This is located in the lower right-hand corner of the app
- Ensure good signal strength to the camera
- If all of the above is correct, try changing the batteries in the device. When you remove the old batteries, let the camera sit empty for a minute or two before putting the new batteries in.
Note: You can read out the detailed review of the blink camera, not detection, and how to fix it.
- Best Indoor Security Camera without Subscription
- Best Outdoor Security Camera without Subscription
- Blink Mini Camera Troubleshooting
Not Receiving Motion Alert Notifications
When it comes to understanding iPhone blink notification issues, it’s essential to know how this feature works and what can cause it to malfunction. The blinking light on your iPhone is designed to grab your attention when you have a notification waiting for you. However, several factors can disrupt this functionality.
One common cause of blink notification issues is incorrect notification settings. If you have accidentally disabled the blink notification option for specific apps or turned off notifications altogether, this can result in missed alerts. Additionally, outdated software and problematic app updates can also interfere with the blink notification feature.
To effectively troubleshoot and fix these issues, you need to dive deeper into the potential causes and explore the appropriate solutions. In the following sections, we will guide you through the process of troubleshooting blink notification issues on your iPhone.
Common Causes of Blink Notification issues
Before diving into the troubleshooting process, it’s helpful to familiarize yourself with the common causes of blink notification issues on iPhones. By understanding these causes, you can narrow down the potential solutions and save time in resolving the problem.
One common cause is misconfigured notification settings. If you have accidentally disabled the blink notification feature for specific apps or turned off notifications altogether, you won’t receive any visual alerts. This can lead to missed messages and calls, causing frustration and inconvenience.
Outdated software can also cause blink notification issues. Apple regularly releases updates to improve the performance and functionality of iPhones. By not keeping your iPhone’s software up to date, you risk encountering compatibility issues, including problems with the blink notification feature.
Problematic app updates can also interfere with the blink notification functionality. App developers frequently release updates to enhance their apps’ performance and add new features. However, these updates can sometimes introduce bugs or conflicts that affect the proper functioning of the blink notification feature.
By identifying these common causes, you can focus on the appropriate troubleshooting steps to resolve the blink notification issues on your iPhone.
Troubleshooting blink notification issues
1- Resetting Notification Settings on Your iPhone
One of the first steps to troubleshooting blink notification issues is to check and reset your iPhone’s notification settings. It’s possible that you may have accidentally disabled the blink notification feature for specific apps or turned off notifications altogether.
To reset your notification settings, follow these steps:
- Open the “Settings” app on your iPhone.
- Scroll down and tap on “Notifications.”
- Here, you will see a list of all the apps installed on your iPhone.
- Tap on each app and ensure that the “Allow Notifications” toggle is enabled.
- If the toggle is already enabled, try toggling it off and then back on again to refresh the settings.
By resetting your notification settings, you can ensure that the blink notification feature is enabled for all the apps on your iPhone.
2- Updating your iPhone’s software
One of the first steps you can take to fix iPhone blink notification issues is to reset the notification settings on your device. This can help resolve any software glitches or conflicts that may be causing the problem.
To reset the notification settings on your iPhone, follow these steps:
- Open the Settings app on your iPhone.
- Scroll down and tap on “Notifications.”
- In the Notifications menu, you’ll see a list of all the apps on your iPhone that have notification settings.
- Tap on each app individually and make sure the “Allow Notifications” toggle is enabled.
- If the toggle is already enabled, try toggling it off and then back on again to refresh the settings.
- Repeat this process for all the apps on your iPhone.
By resetting the notification settings, you’re essentially giving your iPhone a fresh start and allowing it to reconfigure the notification system. This can often resolve any issues with blink notifications.
3- Checking for app updates
Another common cause of iPhone blink notification issues is outdated software. Apple regularly releases updates for iOS, the operating system that powers your iPhone, to fix bugs and improve performance. By updating your iPhone’s software, you can ensure that you have the latest fixes and improvements that may resolve the blink notification problem.
To update your iPhone’s software, follow these steps:
- Connect your iPhone to a stable Wi-Fi network.
- Open the Settings app on your iPhone.
- Scroll down and tap on “General.”
- In the General menu, tap on “Software Update.”
- If an update is available, you’ll see a prompt to download and install it. Tap on “Download and Install” to begin the update process.
- Follow the on-screen instructions to complete the update.
Keep in mind that updating your iPhone’s software may take some time, especially if it’s a major update. Make sure your iPhone is sufficiently charged or connected to a power source before starting the update.
4- Clearing cache and data of problematic apps
In addition to updating your iPhone’s software, it’s also important to check for updates for the specific apps that are experiencing blink notification issues. App developers often release updates to address bugs and improve compatibility with the latest iOS version.
To check for app updates on your iPhone, follow these steps:
- Open the App Store on your iPhone.
- Tap on your profile picture in the top-right corner of the screen.
- Scroll down and you’ll see a list of apps with available updates.
- Tap on “Update” next to each app to download and install the update.
Updating your apps can help ensure that they are compatible with the latest iOS version and may resolve any issues causing blink notifications.
5- Disabling Do Not Disturb mode
If you’re still not receiving push notifications for Blink on your mobile device, the following steps may help resolve this issue:
iOS Users:
If you’re still experiencing blink notification issues after resetting the notification settings and updating your iPhone’s software, the problem may lie with specific apps. Clearing the cache and data of problematic apps can help resolve any conflicts or glitches that may be causing the issue.
To clear the cache and data of an app on your iPhone, follow these steps:
- 1Open the Settings app on your iPhone.
- Scroll down and tap on “General.”
- In the General menu, tap on “iPhone Storage.”
- You’ll see a list of all the apps on your iPhone, sorted by the amount of storage they use.
- Tap on the app that is experiencing blink notification issues.
- On the app’s storage page, you’ll see an option to “Offload App” or “Delete App.” Choose the option that suits your needs.
- If you choose to “Offload App,” the app will be deleted, but its data and documents will be saved. You can re-download the app from the App Store later.
- If you choose to “Delete App,” the app and all its data will be permanently removed from your iPhone.
Clearing the cache and data of problematic apps can help resolve any underlying issues and may fix blink notification problems.
Android Users:
Please note that all Android devices are slightly different based on manufacturer and OS version. If you’re unable to locate any of the following settings, please contact your device manufacturer or carrier for more information.
Verify Do Not Disturb is disabled. To access this feature, please follow these steps:
- Open the Settings app on your phone
- Tap into Sounds
- Verify “Do Not Disturb” is set to “off”
Verify power saving mode is off and battery optimization is disabled for Blink. To access these features, please follow these steps:
- Open the Settings app on your phone
- Tap “Battery“
- If your phone has “Power Saving Mode“, verify this is set to Off.
- If your phone has “Ultra Power Saving Mode“, verify this is set to Off.
- If your phone has “Put apps to sleep“, verify the Blink app is set to “Apps that won’t be put to sleep“.
- While in the Battery settings option, tap More. This is normally located in the upper right-hand corner
- Tap “Optimize Battery Usage”
- Tap “Not Optimized” then tap “All apps“.
- Verify the Blink app shows “Not Allowed“, or tap it and set “Don’t allow” then confirm by tapping “Ok”.
Samsung Users:
Samsung phones running One UI, the feature called “Put unused apps to sleep” is found in the settings page when you tap “App power management”.
- Open Settings.
- Tap “Device Care”, then tap “Battery“.
- Tap “App power management“.
- If “Put unused apps to sleep” is enabled, ensure that Blink is on the list of “Apps that won’t be put to sleep”.
For Samsung S8 owners, the settings are located in different areas:
- Open the Settings app on your phone and tap on “Apps“.
- Next, tap the three dots in the top right corner and choose “Special Access“.
- The default view will show “apps not optimized”. Change this to “all apps“.
- Look for the Blink app and make sure the toggle is set to OFF.
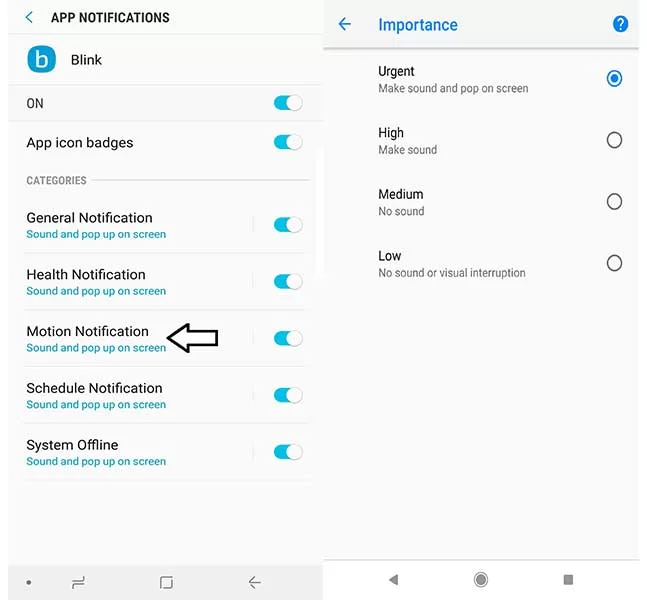
Android 8.0+ users, if you are receiving notifications but you do not hear the notification sound, you may need to change the importance of the notification.
- From the Blink app, tap on Notifications from the Manage Account side menu.
- Make sure that the toggle is set to on.
- Tap on the words “Motion Notification“
- Be sure that you have this set to either Urgent or High in order for sounds to accompany the notification.
Smart Home: SECURITY CAMERAS COMPATIBLE WITH APPLE HOMEKIT
Blink Cameras go Offline
Power failure is one of the causes since it is an electronic device that uses electricity to work. If the power definitely goes off the Blink camera is immediately offline. A defect is another reason that may make the camera go offline. Blink cameras can malfunction, like all other electric gadgets. Without Wi-Fi, the Blink camera cannot work. Thus, when the connection drops off, it will go offline or when the Sync Module on the App is not active.
When the camera’s blue light is on, it is an indication that it is recording activities in its field of view.
In case there is an error, the Sync Module indicates this by releasing a red light.
A defect is noted in the Blink camera, it should be rectified as soon as possible to maintain the efficiency of the camera.
What To Do?
1ST Method
- Reconnect your Blink camera to the Blink camera application
- Blink Sync Module can be reset and rebooted to setup mode by pressing and holding the reset button until a red light shows.
2nd Method
Reset the Router: Reconnecting your Blink camera to your Wi-Fi is the most popular troubleshooting option. Often you should try to reset the router. This is a good move for troubleshooting, especially if the Wi-Fi link is not secure. The internet connection will go off for a while when the router is rebooted, then switched on again. A Blink camera connection to the Blink App is then established.
3rd Method
Wi-Fi Signal: Trying to verify the transmission of the Wi-Fi signal would also help. It is possible to do this directly from the application. The Wi-Fi signal cannot enter the camera because of certain barriers that may block the signal, such as walls or other obstructions. Try changing the signal strength of the app and reducing the number of obstacles present.
4th Method
Factory Settings: Another troubleshooting step is to restore the Blink camera app back to factory settings. This mainly helps when some camera settings were altered without your prior knowledge. By factory resetting the camera, all backdrops will be turned to default. This is the best option to go for in case all others have failed.
If none of the above resolves the issue, please contact Technical Support by clicking here.
About The Author
Hassan Zaka
I am an expert in accounting and possess diverse experience in technical writing. I have written for various industries on topics such as finance, business, and technology. My writing style is clear and simple, and I utilize infographics and diagrams to make my writing more engaging. I can be a valuable asset to any organization in need of technical writing services.
Follow Us:LinkedinTwitter


