Opening the garage door can be a very tiring process. To solve these, automatic garage door openers are utilized. However, many companies make garage door openers. But when it comes to quality, then nothing can beat Ryobi. Ryobi is known they are its extensive outdoor equipment and other power tools. It is one of the leading garage door opener brands in the market and is easy to install.
The garage door openers make your task easy, and it is sturdy and robust. Just like different machines, they can also be damaged. One best parts of purchasing this garage door opener are that it can be easily installed and programmed. You don’t need any professional to install it. In this article, we will discuss how to do programming and installation of one of the best garage door opener-Ryobi.
What’s inside the Ryobi garage door opener?
Ryobi garage door openers are wireless openers that can easily be controlled through the remote and mobile app. It makes the opening of the garage gate easier and more convenient. Before we discuss how to program and install the Ryobi garage door opener, the Ryobi garage door opener comprises several things, which are listed below:
Module Ports: It has seven various types of module ports in which you can keep your stuff and even connect it to the music system.
AC receptacle: The garage door opener has a 120 Volt AC receptacle. This is used to operate the AC module of the garage door opener.
System for automatic reversal: If the door is closing and it gets in contact with an object which is 1 to ½ away from it. Then it will automatically open the door.
Battery Backup and charger: It has an 18V Battery with an inbuilt charging port.
Circuit Breaker: Whenever there is electrical overload, the circuit protects the AC modules.
Indoor and Outdoor keypad: As the name suggests, the indoor keypad is placed inside, whereas the outdoor keypad is placed outside the garage door.
Motion sensing and safety sensors: The motion sensors are used to turn the LED light on whenever there is movement in the garage. And the safety sensors send a beam whenever the door closes so that if any object is in the way, the door will not close.
Remote control and HomeLink connectivity: The garage door can be controlled through the Homelink system and remotes. It is the most convenient way of opening and closing the garage door.
Rail System: Lastly, the rail systems make installation easy.
There is an antenna as this is a wireless system, and also you can download the Ryobi garage door opener app (Android, IOS)from the play store.
Installation of the Ryobi garage door opener
Before installation, remove all the old ropes and locks attached to the garage door. Once you remove all this, you are ready to put your new garage door opener into your garage.
· Installation of the brackets
First, you need to install the brackets on the wall of the header. Draw a line to the header wall, drill the holes in the wall, and place the bracket into it.
· Attaching the rail assembly with the header bracket
Once you have installed the bracket, you must attach the rail assembly. To do so, measure the distance of holes in the bracket. And drill holes according to it in the rail assembly and assemble them with a clevis pin and hitch pin.
· Mounting the door operator in the ceiling
Place the door operator into the header bracket by aligning them together. Pull the trolley down and install the center brackets into the nearest joist to join the door operator to the ceiling. Attach the emergency rope to the trolley through the hole in the handle and tie it with a knot so it won’t fall.
· Door Brackets installation
Brackets are installed in the garage door. Place the bracket on the top of the garage door by marking the center of the door and using screws to secure the bracket. The next step is to connect the trolley to the door bracket. Pull down the emergency rope and slide the trolley to the garage door to connect the trolley. Now put the hitch pins and clevis pin to secure to lock.
· Safety sensor installation
The next step is to assemble the sensors with the bracket by pairing them with nuts.
· Indoor and outdoor keypad installation
First, look for an appropriate place to attach the indoor keypad. Calculate the distance between the keypad terminals present on the operator with the desired location. Now with the help of a wire, connect both the keypad and the keypad terminal. Similarly, the process is the same for outdoor keypad locks.
Now the installation is complete, and you can operate it with the help of remote control or through your smartphone by installing the mobile app of Ryobi.
So Lets into How to program Ryobi Garage door opener?
Once the installation is complete, the next thing to do is to program the Ryobi garage door opener.
Ø The first thing to do is set the travel limit
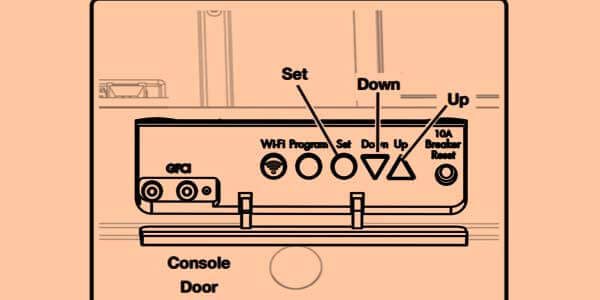
For this, check if the inner and outer trolleys are connected. Then check for the programming button, which is present in the console door. Now press the Up button and hold it for a few seconds. After that, release it, and your open limit will be set.
Similarly, in this way, you can set the closing travel limit. Instead of the up button, press the down button for some time, and after you release it, your lower limit will be set.
After that, test the system to see if it’s working according to the limit you have set for opening and closing the garage door.
Ø Secondly, turning on and off the module ports.
There are seven different ports present in the Ryobi garage door opener. Select the number of ports on the inside keypad to turn on the module port inside the keypad.
Also, you can open multiple ports simultaneously. And to switch it off, press the button again on the port.
Ø Programming the outdoor keypads
The keypad, installed outside the garage, must be carefully programmed. Select the 1 and 3 numbers on the keypad and turn the program on and off. This will make the LED light flash, indicating that the PIN you have entered has been saved. Now the same has to be programmed on the opener motor.
To do so, select the program’s option on the opener, and once it opens, you can enter the PIN that you have set.
Remember that it will remain open for 30 seconds. So, you have to enter the PIN fast.
Ø Lastly, program the remote.
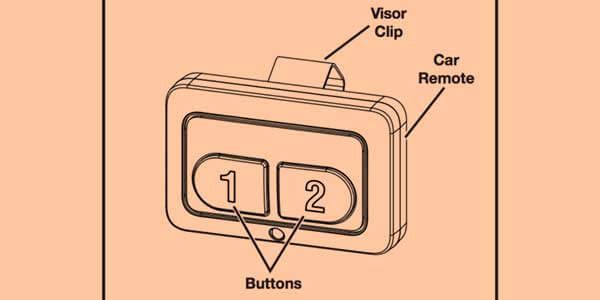
Select the program option on the opener then the LED light on the opener will flash thrice. After that, you need to press the 1 and 2 buttons. This will turn on the green light which indicates that the remote has been programmed. After doing so, test whether the programming is done properly or not by entering the number you have set.
Summing Up
The garage door opener from Ryobi is easy to install and maintain. You can do the programming and installation independently with the help of a manual provided with the product. Also, you can check the steps given in this article.
You might want to see this:
- Ryobi Garage Door Opener Manual
- How to Reprogram Clicker Garage Door Keypad
- How to Reprogram Liftmaster Garage Door Opener
- How to Reprogram Chamberlain Garage Door Keypad
- How Do I Program My Homelink Garage Door Opener without a Remote
- How To Reprogram Genie Garage Door Keypad
Frequently asked questions:
1. Why is the Ryobi garage door opener remote not working?
One of the common issues people face is that the garage door opener has stopped working or is not working properly. There could be many reasons for it. But some of the most common reasons is the remote’s battery.
Whether the battery is damaged or discharged, you can replace the old batteries with new ones. Another reason could be obstacles between the remote signal and the door. Either you are too away from the opener. Sometimes, the garage door opener won’t open due to wiring issues. It would help if you bought a new remote for the garage door opener to solve this issue.
2. Why is the Ryobi garage door opener indoor keypad not working?
This is one of the common problems faced by many people. The reason for it could be the wiring problem inside the remote. You need to open the keypad and check if there is an issue with the wiring, or you can press the keypad buttons for a long time, and then it will start working. Also, you can check whether the keypad’s battery is damaged.
3. Does Ryobi garage door opener work with HomeLink?
You can easily connect your Home Link device with the garage door opener. It will allow you to access your garage door from anywhere.
4. How to reset Wi-Fi on the Ryobi garage door opener?
Use the app after first pressing and holding the Wi-Fi key on the door opener unless a blue light flashes. Before adding the new setup, remove it if you have an old opener. Only connect the garage doors to the app function if it is a broad door to reduce the danger of damage.

